Inflicts 1 stack of Ignition on the target when dealing Crit DMG. Can be triggered up to 1-4x per round.
Gains Crit and Crit DMG buffs after casting Fire skills.
Grants all allies in battle immunity to Burning tiles. This helps your team safely traverse the Burning tiles Luvata will leave behind, but this buff can be dispelled.
Star Level
1
2
3
4
5
M.ATK Increase
5%
10%
10%
15%
20%
Ignition Triggers Per Round
1
2
2
3
4
Crit Buff Level
1
2
2
3
Crit DMG Buff Level
1
3
Ignition is a type of Life Loss debuff: At the end of the turn, loses HP equal to 25% of the sum of the caster's P.ATK and M.ATK.
Ignition’s damage is equal to 25% of the sum of Luvata’s P.ATK and M.ATK. This means Luvata has some power scaling with P.ATK, so it is not a completely wasted stat on her.
Initial Skill: Searing Gaze
1 NRG cost, 0 turn cooldown skill.
Deals 80% Fire AoE DMG to all enemies within 1 tile of the target tile. Notably, targeting a tile means this skill is not locked to targeting an enemy.
Inflicts 1 stack of Ignition to all enemies hit, and forces impacted tiles to become Burning.
Luvata will also gain ATK I and Meditation buffs. As the Meditation buff lasts for 2 turns, casting this skill is NRG positive.
Rank 1
Recommend: Player Preference | James' Pick: RibbitBlazing is a passive skill that inflicts Scorch on 1 random injured enemy within 3 tiles of Luvata. This is the same skill learnable by Flame Sorceress and K.A. Fire Conjurer. Optimizing this skill requires regularly playing Luvata within 3 tiles of enemies, but that may restrain her full potential as she does have skills with a max range of 4 tiles.Ribbit transforms a target into a Cursed Frog for 2 turns. Under Cursed Frog, the enemy’s movement is fixed at 1 tile and is immune to buffs, debuffs, knockbacks, and teleportation effects, and does not take any damage. This is a crowd control skill similar to polymorph effects from other RPGs, and while you cannot attack the Cursed Frog, it functionally disables an enemy from actions for 2 turns.Long-term, both skills are unlikely to be part of her regular skill loadout. If you cannot decide, consider selecting based on the HP or DEF stat gain.
Rank 3
Recommend: Leaping FlamesLeaping Flames is a passive skill where Luvata’s Crit will increase by 20% when attacking enemies with Scorch, and her Crit DMG will increase by 20% when attacking enemies with Ignition. To maximize this skill, enemies should be inflicted with both debuffs.
Upon defeating an enemy with Scorch, Luvata will deal additional Fire AoE DMG to all enemies within 2 tiles of the target and inflict Ignition.
Fiery Determination is a passive skill that increases Luvata’s ATK by 20% when she is on a Burning tile. At the end of her turn, the tile beneath her becomes Burning.
This skill is somewhat problematic because to take advantage of the ATK increase, Luvata must stand still or backtrack her movement, or be dependent on another character (ally or enemy) inflicting Burning tiles ahead of her.
Long-term, it’s reasonable to consider a Castalia for Fiery Determination if you can make effective use of Burning terrain.
Rank 5
Recommend: Player Preference | James' Pick: FirewalkingBoth reaction skills are contingent on Luvata standing still on a Burning tile.Wall of Ember provides protection against single-target attacks, and triggers Luvata to perform Preempt, absorb the Burning tile, and gain a Shield of the DMG type corresponding to 100% of her M.ATK. However, note this skill has a cooldown of 3 turns.Firewalking decreases DMG taken by 10% and recovers 20% of her HP at the end of her turn. This is the same skill learnable by Beryl, Flame Sorceress, and Darklight Fire Priest. Assuming Luvata is on a Burning tile, this skill actively reduces damage taken, heals HP, and will protect against more than just single-target attacks.
Rank 7
Recommend: NRG Restoration; Castalia: Phoenix TransformationNRG Restoration increases Luvata’s NRG recovery. This will be essential to have as both of her Rank 11 options have high NRG costs.Phoenix Transformation allows Luvata to teleport to any Burning tile on the map. This has potential to make her an extremely mobile character, but it is dependent on other targets, terrain, and objects to trigger burning tiles. After teleporting, Luvata will inflict minor AoE Fire DMG within a 1-tile radius of her.
Rank 9
Recommend: Fiery WingsRecall that Energy Wave is the general magical basic attack that deals 80% DMG with a range of 2 tiles.Scorching Attack has the same damage and range as Energy Wave but inflicts Scorch.Fiery Wings deals +10% more DMG, has a greater range of 3 tiles, and will change tiles to Burning.Access to more Burning tiles complements Luvata’s entire skill kit, and changing a tile to Burning will subsequently inflict the enemy with Scorch. As far as raw damage, Scorching Attack is likely to output more damage upfront on enemies already inflicted with Scorch, so it may have a slight edge against bosses, but basic attacks overall make up a minority of Luvata’s damage.
Rank 11
Recommend: Fiery Wings - Nirvana in Flames; Castalia: Meteor FlameBoth skills target a tile and have power increases if Burning tiles exist within the target tile radius.Fiery Wings – Nirvana in Flames attacks 6 times, dealing 20% AoE DMG to all enemies within 1 tile of the target range, and the first 3 attacks will inflict Scorch. If a Burning tile is nearby, this skill will absorb the Burning tile and additionally inflict 1 stack of Ignition.Meteor Flame deals 70% Fire AoE DMG when no Burning tiles are within radius, then forcibly turns the impacted tiles to Burning. If a Burning tile is within radius, the DMG is increased to 140% and absorbs the Burning tile.It is worth a Castalia for both skills. At a high level, you can consider Meteor Flame for AoE DMG, and Nirvana in Flames for single-target damage and stacking Scorch and Ignition.
Sample Skill Build
Basic Attack
Reaction Skill
Skill 1
Skill 2
Skill 3
Fiery Wings
Firewalking
Fiery Wings - Nirvana in Flames OR Meteor Flame
Leaping Flames
NRG Restoration
This build uses either of Luvata’s Rank 11 skills as her primary NRG spender, preferring Fiery Wings – Nirvana in Flames on a single-target, or Meteor Flame for AoE damage.Her Reaction Skill should be whatever Luvata learned at Rank 3.
Weapons
Nirvana is Luvata’s astral imprint. This complements her skill kit well, increasing her AoE damage, inflicting more Ignition debuffs, and applying more Burning tiles on the battlefield.If Nirvana is inaccessible to you, Diffusing Prism and Resentment Broom are fine options to increase Luvata’s damage. Use whichever has greater Star Level and engravings.As always, Starry Sky Heritage remains a reasonable and competitive option.
Trinkets
Because Roaring Flint is an instant skill that deals fire damage, this will trigger Luvata’s Crit and Crit DMG buffs that she can use for her follow-up attack.Blood Luxite Amulet is a good option to increase her overall magical damage, though she is unlikely to use the Dying bonuses.Origin Hourglass and Shield of Justice are also good options for the passive ATK increases. The Wall of Ember reaction skill can contribute to supporting Shield of Justice uptime as well.
Tarots
Stat Priority: M.ATK > P.ATK > HP > M.DEF = P.DEFBecause Luvata’s trait is conditional on her dealing Crit DMG, Verdict of Justice is a fine option to increase her Crit chance and Crit DMG.Dream of The Magician is another good option to increase Luvata’s overall AoE DMG.As you will frequently deploy Luvata on maps with high target counts, it is reasonable to consider Temptation of The Devil as well.
Engravings
Stat Priority: M.ATK > P.ATK > HP > M.DEF = P.DEF
Sword + Wand: Sword + Wand remains a fine combination and a comfort pick for the ATK and DEF increases.
Sword + Pentacle: As a ranged unit with several long-range skills, Sword + Pentacle is a reasonable option when Luvata is able to avoid damage and remain unharmed.
Potential Team Members
Kvare, Agata: Recall that damage-over-time effects, like Ignition, are considered Piercing DMG. Consider pairing Luvata with Kvare and Agata who can increase Piercing DMG dealt against enemies.
Beryl, Miguel, Edda: While Luvata is extremely capable of creating Burning tiles, she can be more lethal playing with allies who can create Burning tiles as well. Consider teaming Luvata with Beryl, Miguel, and Edda.
Caris, NonoWill: Luvata is part of the Papal States and Aggression categories. Consider building a team with her using Caris’ or NonoWill’s Leader’s Auras.
Kvare will possess an additional skill, Roster, on his action bar. This is an instant skill that costs 2 NRG. Roster, the active skill:
Inflicts the Roster and Life Loss debuffs on enemies without Roster for 3 turns.
Can be used up to 1-2 times per round (depending on Star Level).
When using the skill Roster for the first time each turn, can refund 0-2 NRG (depending on Star Level).
Roster, the debuff effect:
Inflicts 2 random Level 2 debuffs on the target for 2 turns.
When the Roster debuff ends or when the target is attacked and enters the Dying state, Kvare immediately summons an assassin to attack the character, dealing 100% of Kvare’s M.ATK as Piercing DMG, then removes Roster. Cannot be dispelled or immunized.
Finally:
When Roster is removed from enemy targets, Kvare’s ATK and DEF will increase by 5%, up to 20%, lasting until the end of battle.
At the end of Kvare’s turn, he will also cast the Roster skill on the closest enemy without Roster within 5 tiles of him.
Initial Skill: Conviction
Single-target skill with a range of 1-4 tiles, costs 2 NRG, and has a 0 turn cooldown.
It deals 100% of M.ATK as Life Loss and inflicts the Move I and SPD II debuffs on the enemy target for 2 turns.
If cast on targets with Roster, Conviction will dispel all their buffs before attacking and additionally deal DMG equal to 100% of Kvare’s M.ATK. The duration of the inflicted Life Loss from this skill is reduced by 1 turn.
In other words, casting Conviction on enemies with Roster will immediately inflict 1 turn of Life Loss damage they would have taken without Roster.
Rank 1
Recommendation: Will of Victory
Will of Victory is a selection of 6 skills, cycled from top to bottom per the tooltip, and alternates between a support skill and a damage skill. This is not a decision skill, and each skill can only be cast once per battle.
Unstable Erosion debuffs 1 random enemy within 3 tiles with 2 random Level 1 Attribute Debuffs and also inflicts Life Loss. Level 1 Attribute Debuffs are quickly made redundant when you have Level 2 or higher Attribute Debuffs in your party. Additionally, using this passive require Kvare to play within 3 tiles of enemies. As you will learn from later down Kvare’s skill tree, he possesses skills that have a max range of 4 tiles, and his ultimate skill, This Is the Moment for Rain, has a 6-tile radius.
Rank 3
Recommendation: Player Preference | James' Pick: Kvare's Gift
With Victory Before Battle, Kvare recovers 20% HP and 1 NRG, and gains 2 random Level 2 Buffs any time an enemy with Roster is defeated. This is easy to utilize at low Star Levels, but recall that Kvare refunds NRG when casting Roster at higher Star Levels, so the NRG recovery may become redundant.
Kvare’s Gift is an active ability that can only be used once per battle. This skill heals the target for 40% of Kvare’s M.ATK and causes the target to share 50% of DMG taken by Kvare (single share not to exceed 70% of Kvare’s max HP) for 2 turns. On enemies, inflicts Stun for 1 turn. For allies, grants them ATK II, DMG II, and DMG Reduction II buffs for 2 turns. Kvare’s Gift may be used to set up burst damage on short maps, share DMG against a lethal single-target attack, or used for objective-based maps, but it is still hindered by its single use per battle.
Rank 5
Recommendation: Player Preference | James' Pick: Sanctuary Emblem
Entrapping decreases DMG taken by 8% from active attacks and steals 2 random Attribute Buffs from the target, thus providing mitigation and cleanse utility.
With Sanctuary Emblem, when Kvare is hit by an AoE attack, he grants all allies within 2 tiles of him an absorption shield corresponding to the DMG type, equal to 30% of his HP, for 2 turns. This skill is contingent on being hit by AoE attacks and can only trigger each shield type once per battle. This reaction skill will excel when you are proactive against sources of AoE physical and magical damage. Additionally, when playing this skill, HP becomes a throughput stat as the shield scales with Kvare’s HP. The more HP Kvare has, the greater the value his external shields will be. Notably, when Kvare possess a shield, DMG taken is reduced by 10%. This effect does apply if shields come from external sources.
Rank 7
Recommendation: Player Preference | James' Pick: Arcane Toxins
Arcane Toxins is a source of magical damage and inflicts 3 random Level 2 Attribute Debuffs, but its NRG cost contests with Roster and Conviction. Additionally, Roster is already inflicting Level 2 Debuffs. By Voyager Lv. 35 and beyond, you should be learning to be comfortable with inflicting guaranteed sources of attribute debuffs, or using Disaster Bottle.
Dark Withering is an AoE skill that inflicts Life Loss and ▼Healing Received to all targets hit, but it is set back by its 5 turn cooldown.
Both skills are unlikely to be part of Kvare’s regular skill loadout. Consider your selection based on the the HP or DEF stat increase.
Rank 9
Recommendation: Player Preference | James' Pick: Silencing Attack
Infectious Attack applies 1 stack of Infection. Silencing Attack blocks Active Skills for 2 turns when attacking Injured targets.
Kvare will infrequently cast basic attacks throughout battle, most likely when he has <2 NRG or when This Is the Moment for Rain is on cooldown, so the overall impact of your decision here is minimal.
If you cannot decide, consider your selection based on the HP or DEF stat increase.
Rank 11
Recommendation: This Is the Moment for Rain | Castalia: Wither
This Is the Moment for Rain deals 40% of M.ATK as Piercing DMG to all enemies within 6 tiles of Kvare, triggering and removing all DoT effects on enemies hit. If enemies hit have the Roster debuff, then this skill additionally inflicts 4 debuffs: Piercing Vulnerable II, 🚫Reaction Skill, 🚫Passive Skill, and Isolate for 2 turns, and triggers and removes Roster after attacking.
Wither is a passive skill that modifies This Is the Moment for Rain and adds a Life Loss passive effect. By using Wither, This Is the Moment for Rain no longer triggers and removes DoT effects on enemies hit, but instead increases DMG by 100%. Further, when actively dealing damage with non-Instant skills, Kvare will additionally inflicts 60% of M.ATK as Life Loss for 1 turn.
Sample Skill Builds
This Is the Moment for Rain Build
Basic Attack
Reaction
Skill 1
Skill 2
Skill 3
Silencing Attack
Sanctuary Emblem
This Is the Moment for Rain
Will of Victory
Wither
Single-Target Build
Basic Attack
Reaction
Skill 1
Skill 2
Skill 3
Silencing Attack
Sanctuary Emblem
Conviction
Will of Victory
Flexible
Weapons
Nightmare Puppet: Nightmare Puppet is Kvare’s astral imprint, granting a passive ATK and HP increase. After dealing DMG, the weapon inflicts 1 random Level 1 Debuff on the target. If using a debuff skill, the effect changes: After attacking, inflicts 1 random Level 1-2 Debuff and Nightmare Puppet 1-3 for 2 turns. Nightmare Puppet is a debuff that increases Piercing DMG taken by 5-15%. Cannot be dispelled or immunized.
Diffusing Prism: If Nightmare Puppet is unavailable or inaccessible to you, Diffusing Prism is a fine option for it’s M.ATK and Piercing DMG increases.
Starry Sky Heritage: Additionally, recall that Kvare will boast higher HP due to his trait. As such, Starry Sky Heritage is a reasonably strong option.
Trinkets
Origin Hourglass: Origin Hourglass is a good option for its ATK increase. Additionally, with Kvare’s high base SPD, he will benefit from having immunity to Movement debuffs as well.
Shield of Justice: As a ranged unit who should ideally avoid taking damage, Shield of Justice is another good option when Kvare can maintain high uptime on the physical shield. This can also help his uptime on Sanctuary Emblem’s 10% DMG mitigation effect.
Tarots
Stat Priority: M.ATK > HP > P.DEF = M.DEF
Temptation of the Devil: Because Kvare gains ATK and DEF when enemies with Roster are defeated, this incentivizes deploying him on maps with multiple enemies. As such, his trait pairs nicely well with Temptation of the Devil.
Course of Fortune: For a general option, Course of Fortune is a versatile and hybrid choice for damage, healing, mitigation, and NRG recovery. The AoE Piercing DMG trigger will benefit from Kvare’s Piercing Vulnerable debuff.
Engravings
Stat Priority: M.ATK > HP > P.DEF = M.DEF
Sword + Pentacle: As a ranged unit with several long-range skills, Sword + Pentacle is a reasonable option when Kvare is able to avoid damage and remain unharmed.
Sword + Wand: Otherwise, Sword + Wand is a fine combination and a comfortable pick.
Potential Team Members
Agata, Caris: Kvare and Nightmare Puppet are one of the first appearances of inflicting debuffs that increase Piercing DMG taken. Consider teaming Kvare with other Piercing DMG dealers like Agata and Caris.
Taair: Similarly, Kvare himself is a Piercing DMG dealer, so also consider teaming him with units that increase Piercing DMG like Taair.
Layla, Dantalion, Magnus: Kvare is a member of the Night Crimson, Iria, and Fortitude categories. Consider incorporating one or some of the unique Leader's Auras.
*The Sword of the Valley does not have the best equipment in the absolute sense, especially the equipment and Tarot. The picture below is a relatively standardized combination of matching. If there are other practical combinations, you can also leave a message to share.
Lila's Advantages:
Defenders, in addition to providing protection and gain to friendly forces, can also strengthen their own damage;
The star rating is relatively silky, with 3 stars small qualitative changes, and the basic mechanism of 4 stars is complete, so there is no need to force 5 stars;
The first-order and forced alert features, the maximum number of alerts is up to 7 times per round, and it can effectively output the group outside the battle round and protect teammates. It not only liberates the equipment position, but also liberates both hands when fighting in non-high-pressure environments;
The halo holder of the new star camp Crimson Night, the powerful characters of Crimson Night, finally have a big halo hand!
Lila's Cons:
The skill position is tight and there are many high-quality skills, so it is difficult to carry the best output skills and the best survival assistance skills;
As a defender, although both output + assistance are taken into account, the advantages of both sides are not outstanding.
Drawing suggestions: Players who have entered the Crimson Night chapter have limited options. As a Scarlet Night's big halo hand, it is quite recommended to draw; old players can judge whether to draw based on their own character needs.
In terms of weapon selection, you can choose between increasing the life limit, replenishing the new blade of the physical attack panel, and providing energy recovery and life recovery based on the health status . The former can properly take into account Lila's output and survival; the latter can mainly provide Lila with energy recovery efficiency, especially for Lila, which can more efficiently release core skills to cut off all the clouds.
Lila's equipment choices are quite diverse: hunter's intuition, fancy top hat, shield of justice and eternal pendant are all available .
The hunter's intuition mainly supplements the alert damage after Lila releases all the Yunyi; the fancy top hat provides various immune effects, improves magic defense, and cooperates with the attack posture, which can also indirectly improve your own physical attack panel; there is a higher-level protection of justice Shield can greatly improve Lila's offensive and defensive attributes, add shield value, and strengthen Lila's resistance to physical output hands; Eternal Green Desert can effectively trigger Eternal Green The second-level gain effect of the fall is superimposed.
Tarot Language is preferred for recommending special blood-sucking entries and towers that can greatly increase damage outside the turn ; secondly, you can also consider other towers that increase damage and increase panels such as magicians and demons.
In terms of engraving selection, the sword + scepter combination is recommended , which can improve Lila's offensive and defensive panels and has better output and damage resistance in enemy action rounds; if there is no special entry for the destruction of the tower, you can consider the sword + The Holy Grail combination can appropriately strengthen damage and replenish battery life.
Detailed explanation of personality:
As a defender, Lila has a professional blocking skill set, and is one of the few defenders who can block magic attacks. The biggest feature of personality gives Lila is: the ability to pre-control damage in non-action turn.
The first-order mechanism allows Lila to attack before the target when she is attacked, and she has the opportunity to directly kill the enemy, or hit the low-health state such as injury, and cooperate with the effects of the ship, and can also impose various negative states and large-scale states for the target. Reduce your own injury. The first mechanism allows Lila to reduce her own injury pressure by outputting outside the turn compared to other defenders.
Lila's star rating has been improved, mainly by magic defense, first-hand damage ability and range, and first-hand trigger times.
Lila's star rating improvement has a significant effect every time. The 3-star small qualitative change can increase the first batch range to 3 grids and the number of triggers to 4 times; the 4-star large qualitative change can cause the first batch damage level, range, and number of triggers to be increased. The maximum mechanic is achieved; the full star can restore 1 energy at the beginning of the round, and the release of Yunyi by killing the core skill will be smoother, and you can release it for two consecutive rounds at the beginning.
Skills selection:
The initial skill is a sturdy and heavy blow, which is not compatible with Lila's personality and skill characteristics. There are not many carrying scenarios. If a few single bosses are fighting, Lila needs to consider single output, you can choose to carry this skill appropriately, usually not carry it. .
Level 1 recommended coordinated defense skills can improve your physical and magic defense, and cooperate with the same boat. When friendly forces are teaming up, they will have the maximum double defense panel improvement. When they are in a passive skill, they will maximize their attack panel.
Both skills are about level 3, both of which are very high-quality skills . Recommended to select the Fenglang Tongzhou on the left . This skill is a high-quality instant skill. The displacement effect can help friendly forces adjust their positions and at the same time strengthen themselves. The same boat effect can also be linked to personality and core skills. Good performance of Lila's output from the turn; the right-hand safe haven skill is also a high-quality auxiliary skill that can provide excellent survival gain for yourself and friends, especially Lila's unique penetration damage-free 3, which can It greatly reduces the damage of characters with high penetration damage such as Silver Wolf Carris in tower climbing and PVP. It is recommended to use the power of comprehension to make up for the points.
The 5th level reaction technique is recommended to click on the left to get the waves and stop the Lan . Since Lila's own speed is too high, she can dodge most of the damage from ranged attacks, and after dodge, she can add another piece of damage. In small levels and this period of reverse tower It is a very useful reaction technique; frontal defense is an excellent anti-injury skill, suitable for high-pressure injury-bearing and teams that use Lila to assume tank responsibilities. It can be used to reduce the effect of the individual turning point, and the attack of the same waves is reduced. It greatly improves Lila's ability to sustain injuries and recommends using the power of comprehension to make up for points.
Level 7 dual practical skills, recommended . The big halo of the Crimson Night camp on the left can improve the panel and strengthen damage for each character of Crimson Night. The right side cuts all the Yunyi is also a feature of Lila himself. It is a core skill that can be linked to personalities. This skill is actively used and is a damage skill with a large-scale 3*25%=75% ratio of 2 circles. At the same time, it applies vulnerability 2 and attacks. You can then obtain two gain states: [Iris posture] (no need to force the dangerous range standby, personality trigger, more flexible movement) and [Shut]. Among them, the personality first can be changed to forced alert, and the range can be additional One frame is added, and the number of times is increased by one. After the number of times is triggered, the first-hand attack of personality continues to be triggered. The first-hand attack of personality is well linked to personality, improving the personality effect, making Lila a good player who is alert and first-hand damage .
The forced alert that can be effectively targeted at ADHD characters. For example, if the silhouette Lavier advances to Lila's forced alert range, he will take at least 4 times of Lila's forced alert damage before moving and releasing his skills.
Level 9 general attack enhancement skills, it is recommended to use the sword on the right rod . When this skill has 3 or more negative effects in the target, it can cause 145% of single damage to accumulate, and its damage ability is still very excellent.
In terms of negative skills addition, Lila can use Fenglang Shou and Shuttle Yunyi skills to be consistent, and subsequently cut off the skill rounds, strengthen the normal attack and chase the enemy, causing high damage.
The left battlefield is traveling through the battlefield on the 11th level, especially the land reclamation stage, especially the tower of conquest and PVP to make props with multiple burning terrain, which is relatively better to use; however, it is recommended to click the right-hand counter posture, which can greatly strengthen the Lila output panel, Improving the damage to the enemy within the warning range outside the turn can also provide a certain amount of self-sustainment, making the overall use better.
In terms of skill combination, the sword in the regular general attack enhancement stick, the reaction skills are used to stop the storm, and the three skill slots are the big halo of the crimson night + the core skills are the clouds + the wind and waves are in the same boat/the pose is enough . When carrying all the Yunyi + Fenglang together, the pressure on skill points is slightly greater. It is best to have characters such as Tael/Kokona/Acampbell that provide energy recovery, so help Lila.
When there are other halo hands, Lila with extreme output can also consider assisting defense passive + facing posture + killing Yunyi . This combination is the skill combination of Lila's physical attack panel.
In addition, when considering the intensity level with high injury pressure and Lila's continuous protection responsibilities, the reaction technology frontal defense and support technology haven is a good combination of carrying.
Ilia's great halo hand Ditalio, arrayed by Lin's great halo hand Leonid, especially Ditalio. Many powerful characters on Crimson Night have the Ilia camp, and the characteristics of Ditalio's great halo , the combination effect of Lila is quite good. Acampbell's presence with a large halo can also give Lila an additional high-quality skill position option.
Tael, Kokona and others provide auxiliary accusations that reduce the skill CD, which can assist Lila very well. Especially for Lila who is not a full star, the energy replenishment requirement is quite large.
Characters such as Momo and Pamina who have a wide range of multiple alerts or counterattack effects are quite comfortable to use. The enemy can give high damage to the enemy in the round of action to complete the kill.
The displacement effect of Lila's storm skill can also provide certain displacement for Tristein or other short-legged characters (such as August) who are also in the Crimson Night camp, helping short-legged high-burst characters to better attract enemies. .
----Separation line----
"Rank text" to recruit new information for the Lily of the Valley WeChat exchange group
The communication atmosphere in the group is harmonious, and there are many big guys. Friends are welcome to join the group to communicate~ Please add me on WeChat when joining the group: da_guaisgou , note [Lily of the Valley]~
Hey everyone! I know it’s been forever, so I just want to take a few moments to let you all know that I am alive! Work has been incredibly intense, recently, and as such, I had to take a step back with the guide-making for my sanity’s sake, but things have gotten a bit better, so I’ll tentatively say I’m back, now.
Taking a short break gave me the time I needed to reassess my guide format, and change it to be more in-line with what I would like it to be. Several weeks ago, I came up with a graphic, and I used it on here, but I really wanted to apply it to my character guides, but the theme simply didn’t line up—but now it does. Therefore, it is my pleasure to introduce my “Old Scrolls of Garbelius” Character Guides! Moving forward, this will be the guide format I use, so I really hope you all enjoy it! I will also be going back and updating my old guides to this format.
Now, for Layla… She really does seem like a fun character to use, though she certainly isn’t meta-defining or anything. I might throw a few pulls her way and see if I get lucky, but I don’t recommend chasing her unless you really like the character.
Anyway, if you have any questions or comments, please let me know!
*The Sword of the Valley does not have the best equipment in the absolute sense, especially the equipment and Tarot. The picture below is a relatively standardized combination of matching. If there are other practical combinations, you can also leave a message to share.
Tristein's advantages: the output upper limit is very high, high investment and high returns. The camp is relatively excellent.
Tristein's disadvantages: a little embarrassing after the low-star burst round; if you want to use it comfortably, you need to win at least 4 stars or even full stars; you can eat some operation and positioning thinking.
Drawing suggestions: Tristein's main feature is that he uses his personality Bloody Wrath. After entering the rampage round, his explosive ability is very excellent, and the low star will be much worse in the rhythm of use. With sufficient output positions in the lineup, Tristein's demand is not high.
Since this issue starts, it will officially enter the era of special martial arts . In the next period of the Anti-Tao Lila, it will open the acquisition of special martial arts exchange materials. 95% of each issue can be replaced stably with a random special martial arts . In the 95% stage of the Anti-Tao, everyone will be briefly replaced. Depend on your lineup, whether there are UPs in each issue, whether Deep 2 can score high scores or Deep 3 can pass relatively easily . If you cannot, you should consider drawing the current UP to stabilize the 95% ranking; if you do not have the current UP to get 95% % is not a big problem, so you can consider a small jump in the current UP.
Tristein weapons can be chosen between the Hammer of Sound or the Brutal Tomahawk. Relatively speaking, the Hammer of the Sound directly improves the general use of Tristein's physical attack panel and pre-war dispersion gain effect ; the higher the defense of the target of the brutal axe attack, the gradually manifests the output income.
As a high burst output player, the selection of equipment needs to prioritize the output panel or increase damage. Tristein has good individual advancement ability and releases bloody rage, and has infinite indomitable effect to temporarily protect his life. You can consider that when there are no friendly troops around, the loner cloak will be greatly improved with the panel attributes and critical strike rate . In addition , You can consider improving the original hourglass of the attack panel , which can also have a certain profit effect on blood burning.
The Blood Crystal Amulet can be regarded as Tristein's exclusive equipment. However, unlike the Thousand Army Breaking Array Gun, which can also improve Pamina with 1 star, the Blood Crystal Amulet low star contributes relatively limited to Tristein's output income; of course, there are high-star Blood Crystal Amulet, It is the choice of Tristein over other equipment.
Tristein's Tarot selection can be selected between magicians or demons. Magicians can supplement Tristein's core output skill with one punch to bury the range of damage; demons can help improve Tristein's offensive and defense panel.
Tristein's seal, recommend sword + scepter . The sword + scepter that can improve Tristein's attributes has the best output and benefits for Tristein among the many seals, which is relatively the most suitable Tristein.
Detailed explanation of personality:
Tristein's personality, the combination of Bloody Wrath and Rapunish state, and other instant skills, can give him very excellent ability to advance and explode damage in a single round.
1-3 stars Tristein has not improved much overall, 4 stars have a small qualitative change , and the infinite indomitableness after triggering the Bloody Wrath can continue until the start of the next 2 rounds of action; the key non-instant skill of the full star is cooled -2, which can allow the core The output skill is released more frequently with one punch.
Skills selection:
* 5. Both sides of the left and right 11th level supplement their attack attributes . Tristein is the main force to train them. You can also consider spending the power of comprehension in these two levels, and pointing both sides.
Tristein's initial skill is a range skill with a relatively low rate. After release, you can add an additional level 2 debuff effect.
The first-level recommendation is the left-handed Fury Chaser. The damage rate of Fury Chaser is higher. In some scenes, Tristein can carry it. With the skills such as personality and passionate stinging step, you can also deal extremely high single-body damage in a single round.
Both sides of the third level are Tristein's core skills, and it is recommended that both sides be lit. On the left is the rare two instant conversion skills currently available . The first use can help Tristein adjust his position and obtain damage improvement effects. After that, it can be switched to the same instant single knockback skill, the hot-blooded header. On the right side is used in conjunction with the personality of Bloody Wrath , which greatly improves Tristein's subsequent output panel.
Level 5 recommended street style on the left. Street style can effectively enhance Tristein's resistance to melee attacks, and after being counterattacked, it can also add an additional attack, which is more cost-effective.
The 7th level left side of the left punch is its core output skill. This skill is regarded as magic damage in combination with personality range damage, and has good group damage ability, and also has personality linkage: if you have not entered the rampage state, you can pass it back to the side of friendly troops within 4 squares; if you use the bloody rage and enter the rampage state, you will have a very high level The overall damage effect.
Level 9 general attack is enhanced, and the right side fatal strike is recommended. The left seal strike is not practical for Tristein, who has one punch to solve the miscellaneous soldiers. It is relatively fatal to attack the right side. It has the chance to deal higher damage in the unskilled round, and is more general-purpose.
Tristein basically doesn’t carry both skills at level 11, so it is recommended to click on the family on the left . Family members are a very high-quality passive skill. In rare cases, you can also consider carrying it to improve your own survival and add additional benefits to friendly forces. The right side of the Destruction Storm is expensive and 2CD, and the cost-effectiveness is not high. If you need to use it with a one-punch burial dual-holding range Skill output, initial skills are also sufficient.
In terms of skill matching, since Tristein is a pure output character, the skill set is quite fixed: normal attack enhances the deadly strike and the street style of reaction skills; three skill slots, passive blood burning, dual instant skills hot-blooded stinging step Basically, the other skill position in the small level chooses to bury one punch. The boss battle can consider single-body skill fury pursuit with only 2 energy requirements.
As the Knights Alliance and invading the Fire-like faction, Gloria and Nonovil can provide them with additional faction aura, enhance attributes and additional effects. Gloria's flag raises movement and various The effect of increasing attributes is more in line with Tristein's lineup . Lila, who subsequently had the Crimson Night camp halo, was also her good halo hand.
Physical experts Homa, Universal Gunta El & Kokona can also provide excellent auxiliary effects for Tristein.
In addition, Tristein, who focuses on range damage, especially those with low training, can also cooperate with other characters with excellent group damage abilities such as Silhouette Lavier, Pamina, Silver Wolf to improve the efficiency of clearing the field.
Edit (1/28/25): @LittleSara reached out to me to make me aware of an excellent single-target build for Tristan, as showcased by Exemplar in this video. I really like the nuking potential of it, so I wanted to throw it in the guide!
Edit (1/28/25): Fixed a tiny error and also included some clarifications in the Notes section.
Edit (1/27/25): Swapped out Feast Axe for Tuning Hammer, and double-pentacle for sword-cup.
Edit (1/26/25): Fixed a few typos and swapped the engraving suggestions.
Hey guys! Here’s my Tristan guide! She really seems like a great DPS with a lot of unique mechanics. I hope you find this guide helpful and, as always, if you have any questions or comments, let me know!
Each star improves quite significantly, and pulls out the personality effect into an extra skill of a pseudo-instant (re-move). The main usage revolves around the outbreak effect of Bloody Wrath. The character is highly operational, and it may take a certain amount to be used proficiently. Level chess skills. Overall, it is an excellent character, but it’s a pity that like Pamina, the character always deliberately leaves some flaws, and then pairs it with special weapons to perfectly strengthen the personality (maybe the new characters will be designed in this direction in the future. …), it is recommended to increase to at least three stars, if possible, it is better to be more than four stars.
Star advancement priority - 4.5 stars
Appearance rating:
General use of pictures - 4.5 stars
Duoge King Guide - 4.5 stars
Competitive Application- 5 stars
Tower of Adversity Appearance Rate - 4 Stars
Class Skills:
Level 1 - Fury Chasing (left), with few opportunities to use, choose the relatively safe 3% life side.
Level 3 - Hot Blood Spike Step (left), both sides need to be learned, but if you have to open one side first, it is more likely to provide various long-distance hot Blood Spike Steps than the attack panel when the blood is burned and boosted.
Level 5 - Street style (left), no need to talk about it, the book effect is completely crushed to the right
Level 7 - One punch to bury (left), the fixed-point blast on the right is also good, but when it comes to Tristein's signature skill, it must be a punch to bury. It's a pity that as a burst output character, the multiplier of this ultimate move It's a bit unqualified and requires special weapons to strengthen its output ability.
Level 9 - Fatal Strike (right)
Level 11 - Family (left), there are not many opportunities to carry, but if you choose one, it is recommended to choose a family member, which will be used to save your life when the indefinite indomitable ends.
Use the Priority Skills of Enlightenment - Level 7 >= Level 3 > Level 11 = Level 5
Level 11 and Level 5 are purely used to increase the physical fitness by 3% attacks, and can be selected according to your personal situation.
Level 7 fixed-point blast. Although the effect can only be triggered once per cast, the skill itself is instant, and can also give enemy life percentage damage and easy damage within the range. It is still a very practical skill when facing groups of monsters.
Level 3 blood burning can improve the panel in the rampage state, and can be carried according to the situation
Personal resident carrying skills
Normal attack - fatal strike
Response - Street Style
Skill 1 - One punch to bury
Skill 2 - Hot Blooded Sting
Skill 3 - Fixed-point blast (replace with blood burning depending on the situation)
Armed Tarot:
Weapons - The first choice of brutal tomahawk or the hammer of the sound
Brutal Battle Axe , Combined with Bloody Rage, it perfectly matches the effect of the brutal tomahawk, but it is quite easy to reduce the target's defense in the current environment. Whether it is the optimal solution still depends on the level.
The Hammer of the Sound , the most common axe hammer weapon, panel attack increase and dispersal effects without any conditions, a good choice for lazy players (difficult to show)
Equipment - First choice of blood crystal talisman, second choice of lone walker cloak or original hourglass
Bloodstone amulet , the problem of perfectly strengthening the problem of Tristein's low magnification is basically more suitable for Tristein than other equipment
The lone walker's cloak To be honest, the Blood Crystal Talisman is too suitable for Tristein, making other equipment worthless. If you insist on choosing, the cloak is relatively suitable for Tristein, but at least the character needs four stars to make the infinite indomitable change for 2 rounds. Only then can one person charge in the battle
Original hourglass , a steadily improved monster attack panel, combined with blood burning is a relatively good choice
※In fact, burning the flint is also a good choice, but considering the advantages of using the burning the flint in the Tristan, it is necessary to have a high spark fire ring to suit. This group of people is extremely difficult, so the equipment recommendation is not listed. (It's so difficult to start with Fire Rings after more than 11 months of opening the server)
Tarot - the first choice of demon, the second choice of magician
demon Generally speaking, the first choice for AOE output characters is magician, but considering the characteristics of the blood crystal talisman, the damage increase rate is too high. In addition, Tristein is suitable for most occasions, and the demons may be more A good choice.
magician , All AOE output characters are common, the disadvantage is that the demand is too large and difficult to allocate.
Engraving:
Sword + scepter, basically no need to consider it. With the passionate blood stinging step, Tristein's displacement ability is basically safe +12% offense and defense
Pros and cons:
Advantages - High mobility, and has undead characteristics similar to Alexei (Tristein will be indecisive). If it is fully equipped, it will have the opportunity to challenge Augur.
Disadvantages - The operation is complicated, and you need to have a certain positioning ability to fully utilize it. You are also very dependent on the blood crystal talisman equipment, so you need to achieve a complete body price.
Use details:
1. The most important thing to pay attention to is whether the player's purse can afford to play this character
*The Sword of the Lily of the Valley does not have the best configuration in an absolute sense, especially the equipment and Tarot language. The picture below shows a relatively standardized combination. If you have other practical combinations, you can also leave a message to share.
Tael's advantages: A very versatile super-fast healing support. In addition to no longer moving teammates, it can recover energy, increase speed, increase damage, gain attributes, etc. It has an exclusive ability to share damage and save lives, and has multiple instant casts. High-quality auxiliary skills, skills can be released multiple times in a single action.
The star level improvement is also very smooth, with 2 stars being a small qualitative change; after stepping on the book to instantly cast your personality skills at the beginning of 3 stars, you can instantly cast your personality skills once more. After the first move, you will increase damage to your teammates and make the enemy vulnerable to damage; high stars Finally, relying on multiple instantaneous abilities to link personalities, the single-round healing burst is the highest in the game.
Tael's shortcomings: Low-star treatment capacity is slightly lower, and the frequency of releasing unique historical skills is relatively low. 2 stars will be slightly improved, 4 stars will be significantly improved.
Recommendations for extraction: As a very versatile high-quality treatment support, Tael is highly recommended for extraction. He has multiple high-quality auxiliary skills, his ultimate skill is also very unique in sharing damage, and has a long value retention period.
equipment
As Tael's weapon, it is recommended to choose the Restructured Rubik's Cube . The Reorganized Rubik's Cube can not only increase Tael's healing capacity, dispel the debuff effect, but also directly dispel the immobilizing effect when using Campfire Talk, and only apply the drunken buff effect to teammates. It is the most suitable equipment for Tael.
The equipment selection is relatively diverse, and you can choose based on your own needs, equipment conditions, etc. Tael, who is the fastest player in the game, can consider wearing a note and using it with the Wisdom Seed's range speed-increasing skill. With his first move, he can ensure the speed of joining a teammate or leaving a teammate alone; he can also choose a fancy hat to maintain his status. , to avoid being interfered by various negative effects; the disaster bottle Tael can also be selected. Taking advantage of its high-speed characteristics, the disaster bottle adds negative effects to the enemy, and all subsequent friendly forces can benefit from their actions.
Tarot can consider the grace of the Queen or the mercy of the Priestess . The Queen's Elegance can supplement Tael's dispersal ability, especially when allies already have debuffs and use Campfire Talk on allies, combined with the Reorganize Cube, it can better prevent allies from being affected by the negative effects of Campfire Talk; Priestess Mercy can supplement Tael's healing capacity, making it a standard choice for healing characters.
In terms of engraving options, we recommend the Holy Grail + Scepter or Double Holy Grail . Tael's various skills and auxiliary abilities are very good, but they basically consume energy and have CD. Holy Grail + Scepter can allow Tael to release skills more efficiently, so it is recommended as the first choice. Secondly, you can also consider the conventional combination of double holy grails and increased healing capacity.
Skill
Personality details:
Personality has an additional increase in the range of treatment and support skills, as well as additional healing effects. Unique instant historical skills, you can choose 1 out of 3 to release high-quality skills in a single action.
Star promotion mainly increases the upper limit of knowledge layers and acquisition efficiency. The overall star promotion improves one's own strength very smoothly . 1 star is slightly stuck, 2 stars is a small qualitative change, and individual skills can be released once at the beginning .
4 stars can already make the release of personalized history skills more efficient. Full stars will further increase mobility and range, and can acquire knowledge more efficiently.
Here are three personal history skills:
Heroic Epic: 1~4 stars with 6-block range (extra +1 for personality), 7-block range with full stars (extra +2 for personality), instant cast, additional damage-increasing and damage-free buff effects to the target. When released, additional personalized treatment can be triggered.
Historical truth: Xiaoguan has a very useful movement control skill, with a range of 6 blocks for 1 to 4 stars (extra +1 for personality), and a range of 7 blocks for full stars (extra +2 for personality). He can apply -2 movement force to the target at a very long distance. , Vulnerability Level 2 debuffs, which restrict the movement of enemy short-legged characters, and this vulnerability effect can be applied indefinitely as long as there are two intelligence layers, making the target vulnerable to damage without interruption.
Learn from history: instantaneous group dispersion + healing, 1~4 stars with 4-block range (extra +1 for personality), full star with 5-block range (extra +2 for personality), can dispel 2 debuffs of friendly forces within the range, and restore life. When this skill is released, it is first dispersed and then the blood is added, which can better avoid being affected by debuff effects such as treatment ban. After this skill reaches full stars, it can perform 3 consecutive shots in a single round . Coupled with the additional healing effect of personality, it can achieve a group healing effect of (30% + 25%) * 3, and it can also use the light of the soul again, etc. Other treatment and support skills can once again trigger personalized additional treatment. Star Tael's healing burst ability is the highest in the game and far exceeds that of other healing characters.
Skill selection:
For the first level, it is recommended to click on the left intelligence seed first . The left intelligence seed has a short CD, a group-added speed increase, and meditation lasts for two rounds. It is more suitable for characters with slow speed, high-quality and low-cost skills, and has better versatility. Especially for characters such as Xia Ke Lulu and Silver Wolf that also have energy recovery mechanisms, It can be used to release skills at a high frequency in the future. It is recommended to click it first; Qianli Jiayin on the right is also a high-quality auxiliary skill, but compared to the seed of wisdom, the skill CD is longer, and the recovery energy is 4 points and the mobility is 2. It is suitable for supporting short-legged melee characters with high-cost and powerful skills. You can consider adding points.
Level 3 recommends the light of the soul on the right side . The light of the soul can restore energy to all allies within the range, and can also trigger a personalized battery life effect, making it more cost-effective to light up.
Around level 5, they are all very practical reaction skills, and each has its own suitable application scenarios. Forbearance can allow Tael to better resist various enemy control effects. It can better play its high-speed assist role at the beginning of each round and is very useful when resisting targets with control effects . Pacifism on the left mainly improves Tael's survivability. Because Tael's skills have a long range and flexible movement, he often moves in the back row and has little pressure to survive. In BOSS battles or levels with high injury pressure, he can carry more weapons. Good value for money.
At level 7, we recommend the campfire talk on the left side. Hard control in small levels is very useful . This skill can be used with dispelling debuff weapons to reorganize the Rubik's Cube or the Tarot Queen's Elegance. It can also prevent teammates from being immobilized and give them tipsy buffs. .
The ninth-level enhanced basic attack can be used either left or right . The demand for Tael's forward basic attack is very low, and the two enhanced basic attacks each have their own advantages and disadvantages. You can choose based on your own needs. The benevolent attack on the left can increase the subsequent healing amount; the dispersing attack on the right supplements relatively better life attributes. , can dispel the target's enhanced status.
The special skill on the right side of the 11th level point is Dream Talking in a Cage . When turned on, there is a halo effect, which increases the damage, penetration damage, immunity to attribute debuffs of friendly forces within 3 blocks around you, restores life after the action, and allows friendly forces to share the damage. It is a very high-quality life-saving skill. It should be noted that the halo effect of this skill has a small range, only 3 squares. In actual combat, you can use the scroll to release this skill, then move and adjust your position, and cooperate with the pacifist reaction skills to reduce damage and disperse the enemy's buff effects. Tael can also be injured forward.
Tael's skill set is relatively diverse. You can bring whichever one you want to strengthen your basic attack. The reaction skill "Forbidden Heart" can be used to deal with levels where the enemy has control skills and strong continuous damage capabilities; BOSS battles or levels with high pressure of resistance to damage. , optional pacifism. There are 3 skill slots: Seed of Intelligence and Dreaming in a Cage. The third skill slot, Campfire Night Talk, is very easy to use. It has excellent hard control ability. You can also choose healing skills according to your own needs (low-star main milk). ), Light of the Soul (to further enhance teammates’ energy recovery), Qianli Good News (auxiliary C position), etc.
Team combination
The tipsiness added to Tael's campfire talk can be stacked and shared with other critical hit buffs . When paired with Kokona and other tools that can increase the critical hit rate of allies, it can increase the critical hit rate of allies by 60% and greatly increase the critical hit rate of teammates. .
Tael's ability to assist teammates in recharging, as well as the penetrating damage enhancement effect of the Dream Talking Aura in the Cage, are combined with Xia Ke Lulu, Silver Wolf and other self-recharged penetrating damage teammates, as well as multi-group penetrating damage cards. Liz allows them to release skills at a high frequency and can also increase penetration damage.
In addition, as a healing aid, the super-fast Tael's high-quality auxiliary skills can also allow him to be integrated into any lineup and can well assist various output players.
Tael : Prince of the Kingdom, the update will be released soon. Independently speaking, it is an excellent support. In the regular map, you can add attack, acceleration, and movement to a single character such as Silver Wolf who is a slower output player, which can instantly double her hand feel. Another example is that it can be used to meditate for people like Lulu and Huoma who cannot circulate energy before 5 stars. The energy recovery is approximately equivalent to 5 stars, which is very profitable. In the pile driving map, he can insert himself into the magic team, wait for the boss to take action, and then use the horn. Then our magic team will output the first round first, wait until the second round to activate the group acceleration pull bar, and let our magic team's super speeding boss fight another round. This style of play is similar to Ada's Cask, but the advantage is that it can be used in reverse towers with such speed adjustment. Of course, Tael's strongest point is that he is Lin's great assistant, and he provides the greatest support to Akanbe. With Tael, Akanbe no longer has to worry about lack of energy. It should be emphasized that if it is used as an energy function, its milk volume will not be enough, and it can be regarded as the passive role of the princess. Tael's star-rising curve is very smooth, and the 1-star feel is poor. You need to carry equipment or spiritual light that can be used instantly. Otherwise, if you pick up the scroll in the first round and cannot activate the skills, it will mean that you will hang up immediately. It is very useful starting from 2 stars. You can directly open the scroll in the first round without the need for instant cast. With 3 stars, you can increase the movement to improve the feel and also add damage + vulnerability in the first round. With 5 stars, you can stack it every round. It is more qualitative, compared to Kokona Only 5 stars are good. Taer’s 2 stars are basically good, and 5 stars can be very good. Therefore, it is recommended to give the position to 2 stars as soon as you get it. If there is a position in the future, it is recommended to go to 3 stars. 5 stars can wait for others. Run after the ones with higher priority are finished .
Recommendations for adding points: All points at level 1, right at level 3, left at level 5, left at level 7, right at level 9, right at level 11. These auxiliary functions are complete. If you need Tael to work part-time as a wet nurse, you can add skills as needed.
*The Sword of the Lily of the Valley does not have the best configuration in an absolute sense, especially the equipment and Tarot language. The picture below shows a relatively standardized combination. If you have other practical combinations, you can also leave a message to share.
Advantages and Disadvantages:
Advantages of Silhouette Lavier: Excellent single-round burst, good at AOE and single-point, extremely efficient in cleaning up impurities, star requirement is not too high, 3 stars is a small improvement.
Disadvantages of Silhouette Lavier: The panel attributes are low, and there is no panel supplement for personality, especially the survival panel, which is a bit brittle.
Extraction suggestions: You can definitely consider extracting, powerful AOE linkage, small levels are very comfortable to deal with crowded situations; it also has the ability to output single stakes.
equipment:
As Silhouette Lavier's weapon, it is recommended to choose the Swift Wind Heavenly Fierce Sword . The new version of this equipment will be directly sent to full stars during the event, and the special effects will supplement the physical attack panel and explosive damage. They are all excellent attributes that can improve Silhouette Lavier's burst output. . As a second choice, you can also consider the Right Pitch Hammer or the Feasting Great Axe.
For equipment selection , the Lone Walker Cloak is recommended . Silhouette Lavier has the ability to break into a group alone. The special effects of the Lone Walker Cloak are easy to trigger. After triggering, the attack and defense attributes and critical hit rate are increased, which is very suitable for Silhouette Lavier. that can increase the physical attack panel and be immune to movement and speed reduction You can also consider a real-time hourglass .
Tarot recommends choosing Magician's Dream . The Magician's additional damage-increasing effect is very suitable for Silhouette Lavier with multi-range skills. Secondly, you can also consider demons to superimpose the attributes of Silhouette Lavier in small levels.
In terms of engraving selection, since Silhouette Lavier itself has certain ways to increase damage and explosion damage, but its panel attributes are not outstanding enough, only the combination of sword + scepter is recommended . This engraving combination itself is also more suitable for Silhouette Lavier's mobility. In theory, it can also maximize his own physical attack panel; if it appropriately improves survival, or has excellent physical attack star coin engravings, you can also consider sword + star coins.
Personality details:
The improvement of Silhouette Lavier's star level mainly increases the reactivation efficiency and the number of layers accumulated in the vitality state .
The 3-star Silhouette Lavier can perform double actions every 1 round; the number of layers of vitality can also be stacked up to 20. When fully stacked, it can increase the critical hit rate by 20%, damage and explosion damage by 10%, which is a small qualitative change.
The frequency of reactivation of 4-star Silhouette·Lavier is the same as that of 3-star, but the number of vitality layers can be accumulated to 30, and additional vitality layers can be obtained based on the number of enemies hit by the skills; if the star is full, it can act again every round. And based on 4 stars, you can also directly obtain 10 layers of vitality at the beginning. Star Lavier's reactivation efficiency is maxed out, and the vitality stacks can easily reach 30, gaining an additional 30% critical hit, 20% increased damage and critical damage.
For Silhouette Lavier, it is recommended to consider getting 3 stars first; if you have a star level, you can consider getting full stars.
Skill selection:
*Tips: Since Lavier and Silhouette Lavier currently share level and class (skills are clicked separately) , when you light up the class, if your Lavier has not been trained, you can first check whether there are more red color medals or not. There are many blue medals , just switch which point has more.
After Lavier has 3 stars and lights up and takes another drink, this skill can be passed on to Silhouette Lavier . After passing on the drink, the skill will have an armor-piercing effect and an additional 10 layers of vitality.
Silhouette Raviye's initial skill, Gale Wind Sword - True Intention/Determination, is a very high-quality low-cost range damage skill , and the carrying cost performance is even slightly better than the ultimate skill Gale Wind Sword - Ranmang Wentian at level 7 left. This skill is initially a 2-cost AOE with a 3-block range and a 65% damage multiplier. After use, it switches to a 1-cost AOE with a 2-block range and an 85% damage multiplier. This skill is combined with the passive skill Blast and Blade. It does not require other energy replenishment assistance. It can completely cycle itself after high-frequency reactivation and continuously use this skill for range output.
The first-level blast on the right side, Duankong, is a divine passive and a core skill in the core, which is a must-play. After this skill actively causes physical damage (hard-damaged armbands, fire rings, etc. will not trigger), including single-target basic attack damage, AOE damage, etc., it can trigger the passive. After the passive is triggered, the damage type will be area damage. , which can be directly linked to the personalized re-action effect. This skill can also be passed down to Raviye
To sum up, the blast and air-breaking skills can supplement the 15% area damage multiple times and add multiple level 2 attribute debuffs during the burst round of Silhouette Lavier . Even if single-target skills, basic attacks, etc. are used, they can be continuously used. Using personality, triggering and then acting, Silhouette Lavier, especially the high-star Silhouette Lavier, also has excellent single-target output capabilities.
The level 1 left side of Gale and Cloud Piercer is also a very good instant burst range skill. It can be linked to Gale and Sky Break. In the burst round, Silhouette Lavier can trigger Gale Wind and Sky Break 3 times, completely reducing the damage. Full , especially in clearing levels and human-machine arenas, this skill is quite useful. If you have enough power of understanding, you can consider adding some points.
Level 3 recommends the mobile team member on the left side . This skill can increase Silhouette Lavier's damage and ignore the target's reaction skills when it is necessary to speed up Silhouette Lavier or deal with characters with difficult reaction skills.
Level 5 reaction skill, recommended on the left side . The unyielding effect provided by this skill improves Silhouette Lavier's survivability. In addition, defeated allies will recover all their health, gain damage 3, and avoid damage 3, etc. Summons can also be triggered , and can be coordinated with characters who have summons, especially Sophia (the future silhouette Sophia) .
The level 7 left ultimate move, Gale Sword - Luanmang Wentian, is a bit embarrassing. Its skill range and output ability are quite good, and it also has a cool ultimate animation. However, it consumes 4 costs of energy. Without Kokona and Tael, When assisting in follow-up, Silhouette Lavier is prone to multi-round skill interruptions, and the cost-effectiveness of carrying is lower than the initial skill. Therefore, at this level, it is recommended to use Gale and Blade on the right side. If the comprehension power on the left side is sufficient, then consider supplementing it. point.
With the assistance of Tael and Kokona, when carrying Gale and Blade, Silhouette Lavier can still use Gale Sword and Luanmang Wentian continuously in the burst round.
For the ninth-level enhanced basic attack, it is recommended to punch me on the left side .
After this skill is used for the first time, it will switch to roll for me. In conjunction with the passive skill of Wind and Sky, Silhouette Lavier can also deal 195% single target damage + 2 blasts of Sky and Sky in a single round by relying only on enhanced basic attacks. trigger, and also has certain knockback and control effects.
Neither of the two 11th-level skills are Silhouette Lavier's exclusive skills. You can select them based on your needs. Personally, I prefer the hunting impulse on the right side , which enhances Silhouette Lavier's ability to disperse some mobs and stand in BOSS levels. Practicality; during the land reclamation period, you can also consider the left side dodge step , which has miraculous effects on some levels such as tower climbing.
Silhouette Lavier's enhanced basic attack and reaction skills are quite fixed. There are three skill slots and many high-quality skills. You can match them according to your needs.
Team:
Ditaleo from the Ilia camp and Nonovelle from the Invading Fire camp can supplement Silhouette Lavier's panel when they carry camp auras. The special effects of these two characters' camp auras are very effective for Silhouette Lavier. It's also quite practical. In addition, these two characters themselves also have high-quality AOE skills and can be combined with Silhouette Lavier for AOE. You can also look forward to the launch of the Crimson Night camp's halo players in the future.
who is excellent at speed-up and charging Tael, who is indirectly charged and can supplement critical damage , Kokona, , who is a high-quality physical support , and Houma . These three auxiliary characters can all assist Silhouette Lavier very well.
In addition, Silhouette Lavier’s good friend Sofia ’s current summons can trigger Silhouette Lavier’s reaction skills at a low cost and efficiently. I’m angry. In the future, Silhouette Lavier will also have a low-cost weapon. Consumable summons work with Silhouette Lavier
Raviye Early Summer Memory : With the update of Crimson Night, Miss Head is coming. As the first SP character in the game, she is very popular and powerful. I originally wanted to write a review of Miss Head after 3 stars learn how to drink, but today is the first day and I naturally want to gain popularity (no). Talking about the character itself, this character seems very simple and crude at first glance, because her personality is almost exactly the same as Cole's. She moves again in the 2nd round for 3 stars, and again in the 1st round for 5 stars. However, her moves are almost To move again unconditionally, you only need to bring Duan Kong, a passive that can be learned at level 1. This makes her basically easier to use than Cole, because Cole cannot trigger the move again in Attack the Stronghold. Since we mentioned Cole, the level 55 Hunting Impulse skill of Miss Head can just match Cole's continuous stabs. Therefore, if you want to use Miss Head as a continuous stabbing Cole, then there is no problem in carrying Hunting Impulse. of. Although Miss Tou can "imitate" Cole, she is better used as an AOE warrior. If you want to use the AOE style, there are actually two ways to use it, one is the natural skill style, and the other is the ultimate skill style. I personally recommend that newcomers to the wilderness use the natural skill flow, and veterans who can assist can use the big move flow. The improvement of Miss's star level is very big, because she is extremely dependent on the panel. The armor penetration of 3-star drinking is very important to her, and moving 5-star every round is a qualitative change, so it is recommended to go directly to 5-star . After experiencing the reverse tower in recent periods, Miss Tou is not enough as the main C output, and often appears as the deputy C, so the position is lowered from T0 to T0.5 .
Recommended equipment: Special Martial Arts/Zhengyin/Feast, Orphan Clothes/Arm Gauntlets, Justice/Magician, Engraved Sword and Staff
Recommendations for adding points: All points at level 1, left at level 3, left at level 5, left at level 7, left at level 9, right at level 11. It is recommended to use all the points that increase attack. The high magnification on the right at level 9 is also quite good. There are many The power of understanding is remarkable
Hey all! Just wanted to make a separate post about this, but I updated my SP Rawiyah guide just now! Apparently, the SP skills aren’t usable until the character is 3-star, which I didn’t realize, so I updated it accordingly. You can find this and my other guides on my [Patreon](hrrps://www.patreon.com/Garbelius), so please consider becoming a member over there to stay up-to-date with my content!
It is a pretty good character for novices. Its output ability is passable, which makes up for the low penetration damage, high mobility, and excellent operating feel with no shortage of energy. Although the strength is not top-notch, it is still quite comfortable to use and has a unique personality. The distribution of corresponding star numbers for improvement is also relatively scattered. It is recommended to practice to at least three stars. If new players have the spare time, they can also consider directly upgrading to five stars. The effect of Wolf Awakening 3 obtained by five stars is quite good.
Star promotion priority - 4 stars
Appearance rating:
Tweet image versatility - 4.5 stars
Dog King Strategy - 4 stars
Athletics App – 4 stars
Tower of Adversity appearance rate - 4 stars
Class skills:
Level 1 - Repel pursuit (left), generally not carried, mainly chosen for 3% of life
Level 3 - Instant Silver Flash (left) + Queen's Declaration (right), both moves must be learned and basically don't need to be considered. Instant Silver Flash, Agata's core skill, Agata's characteristics all depend on the target having wounds. This move can instantly inflict two layers of wounds on the target, and can "trigger personalized damage" at the moment. It is basically a permanent must-have. bring
The Queen's Proclamation, although it has the disadvantages of vulnerability 2 and slowdown 2, but because it consumes only 2 energy and has 0 CD, it is more used as an AOE for cleaning up soldiers that can be cast every round with passive energy recovery.
Level 5 - Queen's Elegance (left), in addition to the ability to dodge one melee attack per round when the skill itself is healthy, the key point is that each dodge can be used to counterattack (melee), as long as it is paired with Instant Silver Flash to get dodge, or Huo Huo If Ma's blinding triggers dodge, or other dodgeable means, you can always carry out melee counterattacks.
Level 7 - Taste of Prey (left), an important passive that allows Agata to have no shortage of energy. As long as there are enemies within 6 cells at the beginning of the action, it can basically provide +2 movement and +1 energy per attack. Passive effect.
Level 9 - Silent Strike (right), if it smells like carrying prey, Agata basically has no shortage of abilities. The chance of using basic attacks is very slim, so 3% health is still a priority.
Level 11 - Feast (right), one of Agata's signature skills. Although the output multiplier is not high, it is the most important skill for Agatavi's sustained combat power. In addition, although the output characteristics are described as melee combat, they are actually not It is a skill with a range of 2 and can "directly hit". It is quite comfortable to use.
In addition to the third level, which must be opened, it is recommended to focus on the 3% attack that is always open for output positioning.
It is worth mentioning the Level 7 Wild Boil. In fact, the effect of this skill is quite strong. If there were not so many easy-to-use skills, I would want to carry this skill with me permanently. However, if it is mainly a single soldier combat, this skill will undoubtedly greatly improve the effect. Tiagata has the ability to continue fighting, and the 3CD lasts for 3 times, which is basically equal to the permanent effect.
Personal resident carry skills
Basic Attack - Silent Strike
Reaction - Queen's Grace
Skill 1 - Instant Silver Flash
Skill 2 - Smell of Prey
Skill 3 - Feast
Armed Tarot:
Weapon - First choice is Thorn of Nothingness or Blade of Rebirth
Thorn of Nothingness As one of Cole's women who also holds a sword and has high mobility, most characters will have a fixed critical attack style, Thorn of the Void + Lone Walker Cloak + Justice, paired with the Kokona Stew Pot, which is basically stable and full. Violence rate
Blade of Rebirth , mainly used to increase HP, and combined with personality and equipment, it can achieve extremely high HP increase.
※If you have spare resources, you can add a parliamentary sword that only supports HP. Maybe it can be used instead on special occasions.
Equipment - Preferred Lone Wanderer Cloak or Crystal Explosion Armor or Flying Blade Arm Gauntlet
Lone Wanderer's Cloak , as explained in the weapon selection of Void Thorn, this ultra-high mobility and survivability character is a perfect fit for the Lone Walker cloak.
Crystal Explosion Armor , as explained in the weapon selection of the New Life Blade, it is completely based on individual combat to increase HP. Compared with the critical strike style, it is difficult to say that it will definitely lose. After all, the positioning is somewhat different.
Flying Blade Arm Gauntlet , the arm brace is also one of the equipment suitable for Agata. Not only can it be used to trigger passive energy recovery, but it can also add one more personalized penetrating damage. However, because the demand for arm braces is too large, should Agata be given arm braces? As a permanent fixture, you have to consider it carefully
Tarot - First choice is justice or magician, second choice is destiny
justice , the critical attack flow is matched with a stable and suitable tower, you don’t need to think too much.
magician , when hitting AOE with critical hit, you can also sacrifice a bit of critical hit rate to consider the magician, but it is more suitable to be used with a style that piles up HP. Some people may say why not use the Fool to have higher HP? When fighting alone with HP flow, most of them are facing a large number of miscellaneous soldiers, so there are more opportunities to use AOE. In addition to increasing HP, the Fool has no multiplication for AOE. In comparison, the difference in output is too big. huge
destiny , if you don’t particularly pursue the upper limit of output, Destiny with special entries is also a good choice. When Agata fights alone, the various buffs of Destiny can greatly improve the ability to continue fighting. Each buff lasts for two rounds, which is very convenient. It’s easy to fill them all up, and it can stably trigger the damage-increasing effect of Overwatch talent.
Engraving:
Sword + scepter, there is basically no need to consider it. Agata's high mobility is exaggerated. The +12% attack and defense can be regarded as a permanent effect.
Advantages and Disadvantages:
Advantages - Characters that feel comfortable to use are one of the good choices for new players to get into the game.
Disadvantages - The speed of 151 is quite embarrassing. It is difficult to integrate into some existing team systems. In terms of damage, it can only be said to be barely passing. It is difficult to cooperate with Ogu, whose output is extremely high, and it is not suitable for him to be the main output. He is really a bit like a lone wolf in defeating the boss.
Usage details:
1. Since it is a character with good feel and high degree of freedom, it is very convenient to use and there are not many details that need to be paid attention to. The main thing is to configure the speed of the character in battle. 2. For some detailed reviews of Agata, you may consider referring to bilibili’s Sword of Suzuliana_White Bear videos. Some detailed tests and personality determination methods are not easy to explain in pure text. You may need to watch the test videos to make it clearer.
Agata : Silver Wolf Queen, although the explosive output is not as outstanding as Ogu, but it is stable and smooth. This is the same as Bella. With arm gauntlets and charging skills, it is basically no problem to use one big move every round. At the same time, it has extremely high mobility. High mobility is very easy to use in regular maps. The star rise is quite smooth. 2 and 4 stars increase penetration damage, 3 and 5 stars increase physical attack and mobility, and 5 stars increase the ability to jump and climb. Qualitative change, simply a flying man. At the same time, it is now obvious that the plan is to promote penetration damage, so penetration damage is really promising in the future. It is recommended that if there is Silver Wolf but no Ogu, Silver Wolf will have a higher priority as a physical C running film. Remember, Silver Wolf should not blindly pile up blood . By calculation, under normal circumstances, the attack benefit is still greater than the blood benefit, but the blood benefit is also quite high for Silver Wolf. Star promotion is smooth, you can run stars as needed, and you can stay at any star level. It is recommended to give priority to 2 stars , as the improvement is considerable.
Recommended equipment: New Life/Void, Arm Gauntlet/Disaster Bottle/Fire Ring, Fool/Justice, Engraved Sword and Staff. If you want to play critical attack and annihilation, bring Nether Justice. Otherwise, under normal circumstances, just New Fool.
Recommendations for adding points: Level 1 left, Level 3 all points, Level 5 left, Level 7 left, Level 9 right, Level 11 right, subsequent attacks can be replenished
The much-anticipated Karis has finally come out, but to be honest, I am a little disappointed personally. Maybe my expectations were too high at the beginning, comparing her with a big killer like Ogu. One thing to say, Karis is still useful, but I personally recommend upgrading it to three stars first. There are not many occasions where it can be used at present, and most of them are icing on the cake for players who already have a complete box. ※If Karis has a chance to get a buff, we will update it again (it may be pure delusion)
Star priority - 3.5 stars
Appearance rating:
Tweet image versatility – 4 stars
Dog King Strategy - 4.5 stars
Athletics App – 3.5 stars
Tower of Adversity appearance rate - 3.5 stars
Class skills:
Level 1 - Light of Sanctuary (left), a common instant auxiliary skill in the King's camp. In fact, the probability of carrying a level 1 skill is quite low. If you choose an auxiliary, you may be able to carry it depending on the situation, and it also has 3% health.
Level 3 - Protect all living beings (left) + punish all sins (right). If you want to play Karis, you must learn both moves.
To protect all living beings, the Magic Shield refers to this family. It will definitely be useful, but more importantly, the immune immobilization effect attached to the shield is very useful when facing enemies with skills such as dizziness, sleep, and freezing. It can also be used with Bella's Flame Star Death to avoid the stun after casting.
All crimes are punished at the same time. This move is probably the most criticized this time. CD2 makes Karis feel bad in operation. Even if she draws five stars and can enter the light oracle state every round, she does not have enough skills to use continuously. , if you want to use it every round, you must follow the five-star Kokonna, but the effect of having the five-star Kokonna accompanying you does not seem to be very high, which is a bit of a pity. Even though there are many complaints about this move, it is still necessary to learn it. The range height difference and range height difference are as high as five blocks. In many cases, the AOE that can ignore the terrain is still good.
Level 5 - Asylum of Darkness (left). In fact, it doesn’t matter which move you choose. Considering that the current version of Karis is not so short of energy, it is better to choose Asylum of Darkness to deal more damage in certain situations.
Level 7 - Guidance of Glory (left) + Purge of All Evils (right), both moves must be learned. Needless to say, the great halo of the French Empire. Purge of All Evils is the main killing move for Karis when defeating large bosses. Enter the Oracle of Light. When used to purge all evil, it can trigger astonishing damage of up to 130% + 100% + 80% = 310% to large bosses.
Level 9 - Punishing Evil (right), there is really not much to say about this move. The frequency of use is not high under the current situation, but if you want to maintain the light oracle burst once in two rounds before five stars, you may have to use this move intermittently to maintain it. Number of revelations per round
Level 11 - Crystal Energy Wave Cannon (right). Even though the multiplier of this move is only 60%, it seems that the output is not high, but it has a range of 3 blocks + a range of 3 blocks. The most important thing is that it is the only magic reduction and defense 3 at present. After triggering the light oracle state , the range can even reach five squares, even if Keris is not the main output, because of this move and Yao Protect All Beings, she can also have a supporting position.
※The natural skill of Corrosion Secret is actually a good auxiliary skill. It has a three-frame range and gives the target three level 2 attribute debuffs at one time. It is actually quite useful. If you carry a disaster bottle, you can give the target what you want with a high probability. negative
Use Comprehension Priority Skills - None
To be honest, in the current environment, over-investment is not recommended. The main must-learn skills have already been used up by two comprehensions. In many cases, they are also positioned as auxiliary. However, if you want to develop Karis into the main output, it depends on your personal ability. Let's open level 11 and level 5 to get 3% attack.
Personal resident carry skills
Basic attack - punish evil
Reaction-Dark Asylum
Skill 1 - Punishment for all crimes
Skill 2 - Crystal Energy Wave Cannon
Skill 3 - Brilliant Guidance/Glory to protect all living beings, switch between the two moves depending on the situation
When a few large bosses require Karis's output, they can switch from punishing all crimes to eradicating all evil.
Armed Tarot:
Weapons - The first choice is the Diffusion Gun, the second choice is the Legacy of Starlight
Diffusion , a weapon launched almost specifically for Karis, the greatly enhanced damage of various sins may be slightly insufficient.
Legacy of Stars , considering that one of Karis’s main skills, Punishment of Sins, mainly penetrates AOE damage, directly adding an attack panel is a more suitable choice for Karis.
Equipment - the first choice is the original hourglass or the burning flint, the second choice is the spring breeze grass compound concentrated pills or the disaster bottle
original hourglass , although the five stars are physical and magic attack +8%, but because most of the magic attack angles do not have particularly suitable equipment, Karis's punishment for all crimes is mainly to eat the attack panel, so it is recommended to give priority to the magic attack equipment for Karis silk use
burning flint , combined with the penetrating damage-increasing effect of diffusion 稜顡 and halo, it can increase a lot of damage to targets without percentage damage reduction.
Shunfugusa Complex Concentrated Pill , Karis’ skills and characteristics are not compatible with most of the popular equipment. The all-purpose Spring Wind Grass Compound Concentrated Pills can at least maintain HP and reconciliation when needed.
disaster bottle , similar to concentrated pills, can be used as a general-purpose device.
Tarot - first choice is the devil, second choice is the magician
demon , Karis also does not have a particularly suitable Tarot, but considering that when she wants to play as an output, there will be a lot of miscellaneous soldiers on most battlefields. Combining with demons to increase the panel attack will be the best choice, and it is also one of the few that can Combining crime with punishment is one of the ways to increase damage
magician , similar to the reason for carrying demons, but becomes the choice when using crystal energy wave cannon or eliminating all evil as the main output method
Engraving:
Sword + Scepter, there is basically nothing else to consider. Karis’s panel is not particularly high, and the multipliers of her skills other than eliminating all evil are low. If the panel is not maximized, she may not even be punished for all crimes. Can’t sweep away trash fish
Advantages and Disadvantages:
Advantages - Currently, Karis is used as an auxiliary and has its own auxiliary effects (crystal energy wave cannon and radiant protection of all living beings). It also has one-punch superman to eliminate all evil against large bosses. It is good to carry on special occasions.
Disadvantages - It is really just the icing on the cake. If there are not many characters to cooperate with her, Karis's personal ability is really...hard to describe in one word
Usage details :
1. Pay attention to eliminate all evil. The type of skill switching mainly depends on whether there is a light oracle state "when preparing to cast", rather than the state when the skill is released.
2. Pay attention to the description of the Light Oracle. In addition to the changes in exclusive skills, non-exclusive skills can increase the range by 2 and reduce energy consumption by 1.
Callis : Callis is a character that I can’t put into words. First of all, I am a big fan of plot, so I watched all the plots of Suzuran without missing a beat. Well, the character of Karis, I think is currently the strongest character in the plot, because the French Empire is the most powerful in terms of strength, surpassing the Knights Alliance and Ilia. It was also the French Empire that these two forces joined forces to fight back then. And the old version of Karis that was revealed at that time was actually quite good. Not particularly strong, but at least her skills were very distinctive and her linkage was good. As a result, it was officially launched. Not to mention the skill set is quite ordinary, and the linkage is extremely poor. For example, let's use her for output. She lacks powerful single-point skills and barely has a big move that is specialized for large-scale. However, the text in the multiplier is a damage-increasing mechanism, which is severely diluted by other damage-increasing mechanisms. For another example, let's use her to deal group penetration damage. Except for Tael's reverse tower in this phase, which increases penetration damage, other times it is better to use Ogu's power. For example, you want to use Karis to assist the magic shield? Oh my god, I have to use her as an auxiliary. Why don't I use an auxiliary that can increase our damage and make one that is more defensive? Why should I defend when I can kill all the opponents? And her personality is very poor. Before 3 stars, she couldn't explode in the first round. 3 stars barely broke out in the first round, but the cycle couldn't keep up. Only 5 stars can keep circulating the light oracle state, so after 5 stars, it will still be there. Okay, but just okay. In short, the skill linkage is very poor. As long as her magic shield can be used instantly, she can be upgraded by one or two levels. It can only be said that this is the most poisoned character since 2.0. Although there are a lot of shortcomings mentioned above, Karis, as the current AOE penetration big C, has received various version bonuses. When the reverse tower requires AOE penetration damage, Karis is the first. At the same time, it can also be seen from climbing the tower. , if you encounter high-cost physical magic and double damage avoidance, Karis's role in penetrating the big C can be displayed, so the position is adjusted from T2 to T1.5 . In terms of running stars, if you want to use them, it is recommended to run to 3 stars. The feel of starting in round 1 is very different from starting in round 2. Then leave 3 stars all the time. Only run 5-star Karis unless no one is running. .
Recommended equipment: Prism/Starlight, Hourglass/Fire Ring/Top Hat, Magician/Justice/Destiny, Engraved Sword and Staff, Prism with Prism, Great Improvement, Tarot Carry Depending on the Situation
Recommendations for adding points: Level 1 left, Level 3 right, Level 5 right, Level 7 all points, Level 9 right, Level 11 right. In fact, if you want to play Karis, you also need all points at Level 3. It can be seen that she needs to be very high. It’s a lot of investment, but the rate of return is mediocre.
The first one to attack the long-range spell damage angle. Although it is a surprise attack, its basic mobility is only 3. It is prone to short legs in general push pictures. It is more inclined to a character specialized in boss strategy. Hasna is a very conscientious and powerful single target in recent times. Three stars can be used to passively trigger the dark fragrance effect. She is also the perfect assassin aura that can be used by the Swift Wind camp to eat Cole. If you don’t pursue the output firepower of the extreme panel to compete in special levels, it is recommended to upgrade to three stars first, and then move to five stars depending on your personal needs.
Star promotion priority - 4 stars
Appearance rating:
Tweet image versatility – 4 stars
Dog King Strategy - 5 stars
Athletics App – 3.5 stars
Tower of Adversity appearance rate - 3.5 stars
Class skills:
Level 1 - Hypnosis (left), increases field control ability on special occasions. In fact, both moves are rarely used. Natural selection +3% health.
Level 3 - Fragrance Impact (left) + Fragrance Trail (right). Fragrance Trail is equipped with a prompt skill that can automatically add dark fragrance. In addition, it has the effect of continuous energy recovery. It is a must-have for Hasna. of passivity. Although the output of Incense Impact is not as good as the level 11 ultimate, it only consumes 2 energy and has a 150% multiplier. In many cases, it still needs to be carried.
Level 5 - Ruohua cartilage (left)
Level 7 - Recognize people by smell (right), one of Hasna's powerful passives. It is usually carried with the third-level scent path shadow double passive passive.
Level 9 - Eviscerate Phantom (right), the most exaggerated basic attack multiplier. Although the probability of using it is not high, there is no need to consider choosing this move directly.
Level 11 - Bone-shattering (left), a powerful single-target ultimate move, usually used for boss strategy. If the consumption of the four energy is to be used continuously in normal levels, it needs to be combined with tactical flag planting and passive stable energy recovery.
Use Comprehension Priority Skill - Level 5 ≧ Level 11
In addition to the must-have Level 3 skills, as a powerful output, the 3% attack of Level 5 and Level 11 is naturally a priority, and the other skills can be temporarily ignored.
Personal resident carry skills
Basic Attack - Eviscerate Phantom
Reaction - Ruohua Cartilage
Skill 1 - Incense Trail
Skill 2 - Recognize people by smell
Skill 3 - Incense Impact (carry alternately with Bone-Breaking Marrow depending on the situation)
Armed Tarot:
Weapons - First choice is Focus Staff, second choice is Legacy of Stars
Focus on the Staff , passively paired with focus, with a range of up to five blocks, and coupled with its own recovery ability, Hasna can be said to be the most suitable candidate to use the focus staff at present.
Legacy of Stars , a universal weapon of the legal system. If you are worried that the non-damage effect of the Focused Staff is not easy to maintain, or if you want to use the excitement of battle as a range buff, you can also consider Xinghui.
Equipment - the first choice is Disaster Bottle or Flying Blade Arm Gauntlet, the second choice is Spring Wind Grass Compound Concentrated Pills
disaster bottle , after actual testing, the disaster bottle can actively trigger Hasna's passive scent effect on the target. The four-frame range is completely consistent with Hasna's. The disadvantage is that the attack panel of the SR equipment is slightly lower.
Flying Blade Arm Gauntlet , similar to the disaster bottle, the five-star arm sleeve has a shorter CD and a higher panel attack. It can be used to trigger the hidden fragrance every round, but the disadvantage is that the range is shorter, so you need to consider the situation when using it.
Shunfugusa Complex Concentrated Pill , mainly used with the focus staff. Sometimes if you suffer continuous damage such as floor burning or infection, it may be difficult to maintain the non-injury effect. At this time, the concentrated pill is Hasna's good partner.
Tarot - Justice preferred
justice , although Hasna is the same as her younger sister who is a pure single-target output that takes critical hits, but Hasna does not have the crosshairs of her younger sister to match the princess's out-of-turn play style and can use high towers. It is recommended that Hasna only choose justice. Unless special circumstances require a function other than being a thug, consider functional tarot such as Destiny or Judgment.
Engraving:
Sword + scepter, there is no need to consider it at all. It has a range of ultimate moves and a direct hit effect. Although the mobility is not high, the attack position is still relatively flexible. It is recommended to only consider sword + scepter engraving.
Advantages and Disadvantages:
Advantages - A powerful hitter. Not only does it have a high single-target multiplier, but its subtle fragrance effect can also provide group buffs to teammates when fighting against bosses. As long as there are no attribute restrictions, it can be regarded as one of the powerful output players necessary for fighting against bosses.
Disadvantages - pure single output + short legs, pushing the map in many levels may be restricted by the terrain.
Usage details :
1. In addition to the boss guide, when using it, you must pay attention to whether the enemy's position after taking action falls within the range of the hidden fragrance given by Hasna's personality. Although there are skills to actively use the hidden fragrance, controlling the position depends on the hidden fragrance of the personality. In addition to taking action yourself, you can also buff your teammates, making it easier to take advantage of Hasna's strengths.
Homa : One look at Ding Zhen. Before Homa came out, I thought she should be in the T0 position, and she did not disappoint me. The low-star Houma has outstanding auxiliary abilities. He has two core auxiliary skills at the first level, and only his ultimate skill has enough gold content in the subsequent stages. Houma's own output is not low. As for the offensive skill in the tacit selection, if the person on the upper body of [Balur] is within 2 blocks of the enemy, the multiplier of this move is a full 160%, and 40% of it is based on the walking bird. The human panel counts. The person who best matches Houma is August. August's re-movement and instantaneous attack can make the bird play 3 or even 4 times in one round. It is very violent. Do you like me walking the bird to do radio gymnastics? 1-star auxiliary is enough, 3-star is easy to use. It is recommended to give priority to 3-star. 5-star can be recycled and used by itself and the output ability is improved. If there is a position, go to 5-star .
Equipment recommendation: Heroic Spirit/Star Chi, Arm Gauntlet/Acceleration Book, Magician/Justice/Judgement, Engraved Sword and Staff
Recommendations for adding points: All points at level 1, right at level 3, left at level 5, right at level 7, left at level 9, right at level 11. You can add level 3 left later, and add attack when full.
Rising star: The first one to attack the long-range spell damage angle. Although it is a surprise attack, its basic mobility is only 3. It is prone to short legs in general push pictures. It is more inclined to a character specialized in boss strategy. Hasna is a very conscientious and powerful single target in recent times. Three stars can be used to passively trigger the dark fragrance effect. She is also the perfect assassin aura that can be used by the Swift Wind camp to eat Cole. If you don’t pursue the output firepower of the extreme panel to compete in special levels, it is recommended to upgrade to three stars first, and then move to five stars depending on your personal needs. Star promotion priority - 4 stars
Appearance rating: Tweet image versatility – 4 stars Dog King Strategy - 5 stars Athletics App – 3.5 stars Tower of Adversity appearance rate - 3.5 stars
Class skills: Level 1 - Hypnosis (left), increases field control ability on special occasions. In fact, both moves are rarely used. Natural selection +3% health. Level 3 - Fragrance Impact (left) + Fragrance Trail (right). Fragrance Trail is equipped with a prompt skill that can automatically add dark fragrance. In addition, it has the effect of continuous energy recovery. It is a must-have for Hasna. Passive. Although the output of Incense Impact is not as high as that of the 11th-level ultimate, it only consumes 2 energy and has a 150% multiplier. In many cases, it still needs to be carried. Level 5 - Ruohua cartilage (left) Level 7 - Recognize people by smell (right), one of Hasna's powerful passives. It is usually carried with the third-level scent path and shadow double passive passive. Level 9 - Eviscerate Phantom (right), the most exaggerated basic attack multiplier. Although the probability of using it is not high, there is no need to consider choosing this move directly. Level 11 - Bone-shattering (left), a powerful single-target ultimate move, usually used for boss strategy. If the consumption of four energy is to be used continuously in normal levels, it needs to be combined with tactical flag placement and passive stable energy recovery.
Use Comprehension Priority Skill - Level 5 ≧ Level 11 In addition to the must-have level 3 skills, as a powerful output, the 3% attack of levels 5 and 11 is naturally a priority, and the other skills can be temporarily ignored.
Personal resident carry skills Basic Attack - Eviscerate Phantom Reaction - Ruohua Cartilage Skill 1 - Incense Trail Skill 2 - Recognize people by smell Skill 3 - Incense Impact (carry alternately with Bone-Breaking Marrow depending on the situation)
Armed Tarot: Weapon - Focus Staff is the first choice, Legacy of Stars is the second choice Focus on the Staff , passively paired with focus, with a range of up to five blocks, and coupled with its own recovery ability, Hasna can be said to be the most suitable candidate to use the focus staff at present. Legacy of Stars , a universal weapon of the legal system. If you are worried that the non-damage effect of the Focused Staff is difficult to maintain, or if you want to use the excitement of battle as a range buff to attack and tank, you can also consider Xinghui.
Equipment - the first choice is Disaster Bottle or Flying Blade Arm Gauntlet, the second choice is Spring Wind Grass Compound Concentrated Pills disaster bottle , after actual testing, the disaster bottle can actively trigger Hasna's passive scent effect on the target. The four-frame range is completely consistent with Hasna's. The disadvantage is that the attack panel of the SR equipment is slightly lower. Flying Blade Arm Gauntlet , similar to the disaster bottle, the five-star arm sleeve has a shorter CD and a higher panel attack. It can be used to trigger the hidden fragrance every round, but the disadvantage is that the range is shorter, so you need to consider the situation when using it. Shunfugusa Complex Concentrated Pill , mainly used with the focus staff. Sometimes if you suffer continuous damage such as floor burning or infection, it may be difficult to maintain the non-injury effect. At this time, the concentrated pill is Hasna's good partner.
Tarot - Justice preferred justice , although Hasna is the same as her younger sister who is a pure single-target output that takes critical hits, but Hasna does not have the crosshairs of her younger sister to match the princess's out-of-turn play style and can use high towers. It is recommended that Hasna only choose justice. Unless special circumstances require a function other than being a thug, consider functional tarot such as destiny or judgment.
Engraving: Sword + scepter, there is no need to consider it at all. It has a range of ultimate moves and a direct hit effect. Although the mobility is not high, the attack position is still relatively flexible. It is recommended to only consider sword + scepter engraving.
Advantages and Disadvantages: Advantages - A powerful hitter. Not only does it have a high single-target multiplier, but its subtle fragrance effect can also provide group buffs to teammates when fighting against bosses. As long as there are no attribute restrictions, it can be regarded as one of the powerful output players necessary for fighting against bosses.
Disadvantages - pure single output + short legs, pushing the map in many levels may be restricted by the terrain.
Usage details : 1. In addition to the boss guide, when using it, you must pay attention to whether the enemy's position after taking action falls within the range of the hidden fragrance given by Hasna's personality. Although there are skills to actively use the hidden fragrance, controlling the position depends on the hidden fragrance of the personality. In addition to taking action yourself, you can also buff your teammates, making it easier to take advantage of Hasna's strengths.
Hasna : Hasna is one of the most embarrassing characters in version 2.0. First of all, she is an innovation, an assassin who can damage her skills, so there is nothing wrong with being cautious about the numerical values. However, the mechanism could obviously be designed to be more interesting, but it was ruined by the emergence of the reverse tower. In the earlier PV, Hasna was obviously a normal assassin with 5 moves. At the same time, her characteristic was AOE. The PV demonstration clearly showed the AOE ability of her ultimate move. As a result, it may be that in the early stage of the tower reversal, the planners did not think about how to create a map to promote the AOE character, which resulted in the character being significantly modified, and now it has become a character whose skills can only be used against one person. The worst thing is that Hasna had no intention of finding this person after her current reverse tower ended. This is because among the powerful Raiders, her strength is only higher than Garcia. In the last issue of Lulu Tower, she actually gave the boss a magic shield or something. She was only a single player. The character, given a magic shield, is not completely without room for appearance. She is not easy to use in the normal map, because the trigger of Personality Secret Fragrance is passive, and it will only be triggered when the enemy comes within 3-5 blocks of her attack range. If she has the skills to hit the backhand, Sofia will be early. Kill like crazy, both Cole and Lulu are crazy about killing. The point is that she only really fights against one person, but assassins can actually pretend to fight against groups. Not to mention Sophia relies on fate and fire rings, and Lulu can hit 2 with her ultimate move. It's still very powerful. Cole triggers the kill and then moves again, which can be regarded as a 2 hit. So in the assassin lineup, we can't compare, we can only compare mages vertically, that is, with Bella. From a single-target comparison, Hasna is actually no worse than Bella. Even with the help of Aida and other assists, Hasna's single-target output is greater than Bella's. But precisely because she can only play one-on-one, she can't compare to Bella. Whether it is the charged fire meteorite or the bang bang bang bang, Bella is a very useful core skill. For example, the early land reclamation weapon book uses fire meteorite, and the first phase of the reverse tower also uses Bella's fire meteorite. Not to mention, bang bang bang, it is useful in many scenes. For example, when I was clearing the land in Shen Wen 2, there was no Aogu or Sophia at that time, and it was very difficult to clear the land. I just used Bella bang bang bang to get through it. Therefore, Hasna was completely defeated by being able to fight alone, which was too featureless. Suddenly I remembered that the real one-on-one was Lunmei, so Hasna couldn't even touch Lunmei's single-target legal system king. All in all, it's just so-so. It can be used when there are no mages such as Akanbe, Bella, and Lunmei. Hasna Running Star is not recommended .
One of the leaders of Suzuran 2.0 characters, with a top-notch OP role. If you are not a hero like me, August is basically an absolutely necessary character, no matter whether it is a single target, a group damage, or a boss. , fighting minions, long-distance movement, etc., Ogudu is first-class. It is recommended to jump at least four stars (but in the first round, rely on attacks to trigger the anger burst)
Star promotion priority - 5 stars
Appearance rating:
Tweet image versatility – 5 stars
Dog King Strategy - 5 stars
Athletics App – 5 stars
Tower of Adversity appearance rate - 5 stars
Class skills:
Level 1 - Chivalry (right), Ogu's output skills are sufficient, and the rest is to stack passive to increase the maximum damage. For attacking some large bosses that cannot be hit from the back, Chivalry + 20% attack from the front is still very useful. of
Level 3 - Inner Nightmare (right), although the warm touch is also good, and the penetrating damage can also break the shield when fighting against adversity, but I recommend the Inner Nightmare more. When the Inner Nightmare is unable to attack the target, the Inner Nightmare can take the initiative to burst into anger and act again. It is very useful when attacking at long distances or on the road, and the shield value it gives is also quite high, close to a full health, which is very useful for long-distance attacks or when rushing. This aggressive character is still very useful in certain situations.
Level 5 - Power Awakening (left), paired with Kokona Breakfast or Lunch Box, you can directly get a damage buff of 2 when you start taking action. However, as a top output player, the 3% attack of Level 5 must be fully activated sooner or later.
Level 7 - Tearing Cyclone (right), the carrying probability of both moves is not high, but considering functionality and energy usage, Tearing Cyclone is more recommended.
Level 9 - Charged Attack (left). Similarly, Ogu doesn’t have many opportunities to use basic attacks, but if you have to choose, I would recommend Charged Attack. The energy elimination of Ruin looks good, but in fact it can There are too few opportunities to use it
Level 11 - God's Wrath - Heaven and Earth Destruction (right), Ogu's AOE ultimate move, mainly used to clear out miscellaneous soldiers in a large area, only choose to carry it according to the level requirements. But it’s still the same old rule. For top DPS players, the 3% attack at level 11 will be fully activated sooner or later.
Use Comprehension Priority Skill - Level 11 >= Level 5
Although they are all for 3% attack, the priority of level 11 is still slightly higher than that of level 5. The overlord breaking roar attack of level 11 and the accompanying isolation effect may be a key skill for the boss in a specific level.
Personal resident carry skills
Basic Attack - Charged Attack
Reaction - Power Awakening
Skill 1 - Divine Wrath‧Instant
Skill 2 - Inner Nightmare (it may be less likely to be carried if it is above four stars, but if it is less than four stars, it is basically necessary to enter it early when the anger breaks out)
Skill 3 - Divine Wrath‧The Ember of Heaven and Earth
Armed Tarot:
Weapon - Preferred Feast Ax or Hammer of Righteousness
Great Ax of Feast , although it is difficult to trigger the effect for AOE clearing groups of monsters and minions, unless you want to bring Burning Fire Stone to reduce the blood before AOE, but generally speaking, it is not recommended. For elite monsters or bosses, it can exert maximum output when performing combos. After killing, it will also restore blood to increase the power of fighting on the front line.
Hammer of Righteousness , in addition to the dispersion function, it directly and unconditionally increases the physical attack panel. Although it is not as much as when Feast triggers special effects, the damage is better than Feast when clearing a group of monsters with full blood. It is a weapon with balanced damage. The disadvantage is that the rarity is too high. , even harder than a feast
Equipment - Preferred Blade Arm Gauntlet
Flying Blade Arm Gauntlet , there is no need to choose. Of course, this kind of powerful character must give him the best. The armband is the best choice for Ogu. It is best if it has five stars. It can trigger anger more frequently. Even if the effect of the anger burst ends, it can be used again immediately. Entering a state of angry outburst and continuing to output
Tarot - Magician first, justice second
magician , due to his personality's angry burst effect, Ogu has excellent performance in both single target and AOE output. Carrying the magician's stable damage increase is naturally the best choice.
justice , although Ogu himself is not a character with a high critical hit rate, when facing a specific boss or fighting the Tower of Adversity, in order to maximize Ogu's output limit, justice may have to be considered. Especially in the Tower of Adversity, there will be various special entries that provide increased damage, but the bonus to critical damage is relatively small, so this 15% has a relatively more significant impact on damage, and combined with Kokonna's stew pot buff, in fact Combined with Justice's critical hit rate, it's not too ugly. You can still get some impressive numbers with a little bit of luck.
Engraving:
Sword + scepter, the top output hand, basically does not consider the engravings other than sword + scepter. Moreover, Ogu itself is a melee corner, and the movement restrictions are not high. It can almost steadily gain +12% attack and defense every time.
Advantages and Disadvantages:
Advantages - It is pure violence, no matter what enemy is killed, the damage output of the combo can even be higher than that of my sister. Starting from Ogu, there are all kinds of powerful characters, but among them, Ogu's output is considered to be the best.
Weaknesses - For a character with a damage-oriented role, I honestly can't find any shortcomings. If it weren't for the fact that he is a male character, I would have given him a five-star rating.... It's impossible to say anything just to find fault. What are the functions other than being restrained or output?
Usage details :
1. Ogu is very easy to use. The only thing you need to pay attention to is the timing of the anger burst and energy management. Do not be unable to maintain the anger burst state or energy when you need to use a big move against elite monsters or bosses. Just not enough
August : It’s finally time to lick the dog Ogu. Ogu is a strong character from beginning to end. He was placed fourth just because the top three in the reverse tower have a higher weight than this one. If a new player draws August, then please give him all your best resources, because he will give you a very high rate of return. It seems to be a short-legged little red job, but with the blessing of Zai Dong, it is not inferior to others, not to mention the assistance of Gloria/Homa, Ogu can be said to run very fast. August's land reclamation is the top card, because his natural skill is his strongest output skill, and at the first stage, he can activate chivalry, and at the third stage, he can activate another core skill, Heart Nightmare. In other words, August has It can be basically completed at level 15, which will make you happy. Compared to the above ones, August still has a lot of stars. If you get one, you should run first and don't stop. Although 4 stars is enough to use, he deserves 5 stars .
Recommended equipment: Feast/Zhengyin, Arm Gauntlet, Magician/Demon, Engraved Sword and Staff
Recommendations for adding points: 1st level right, 3rd level all points, 5th level all points, 7th level right, 9th level left, 11th level all points. If you really lack the power of understanding, just order this, but I recommend all Ogu Pointed

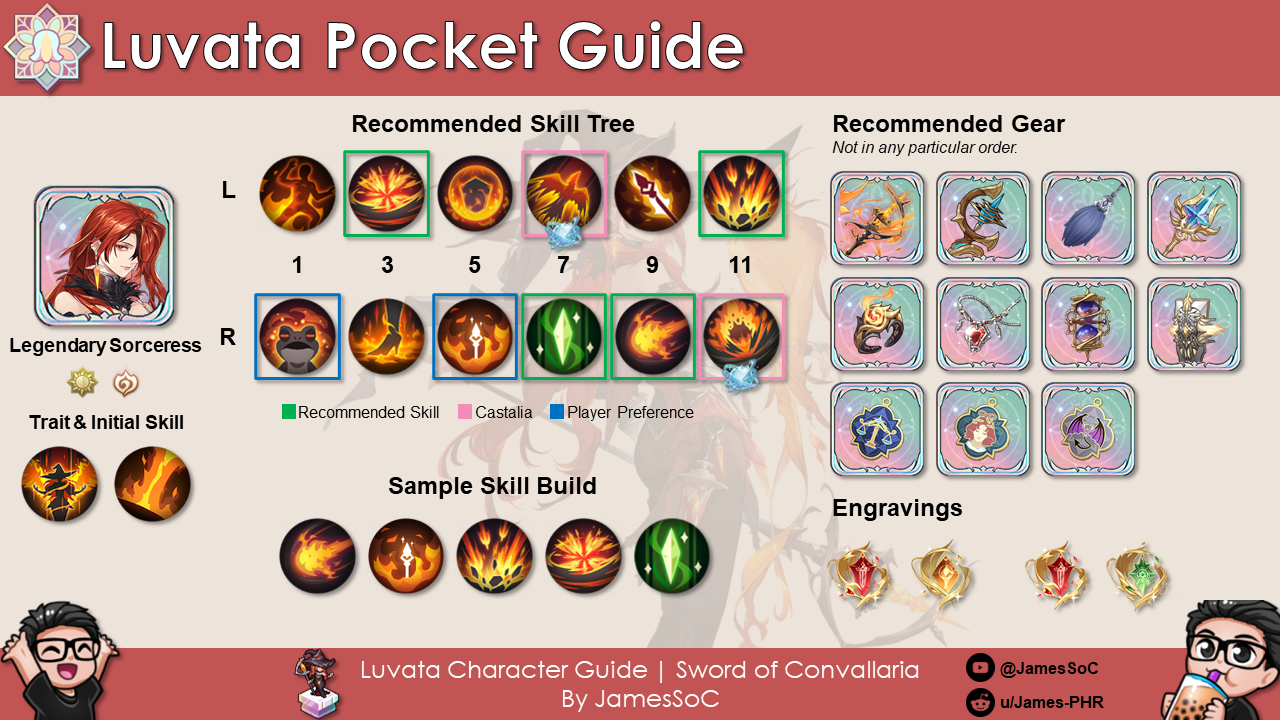
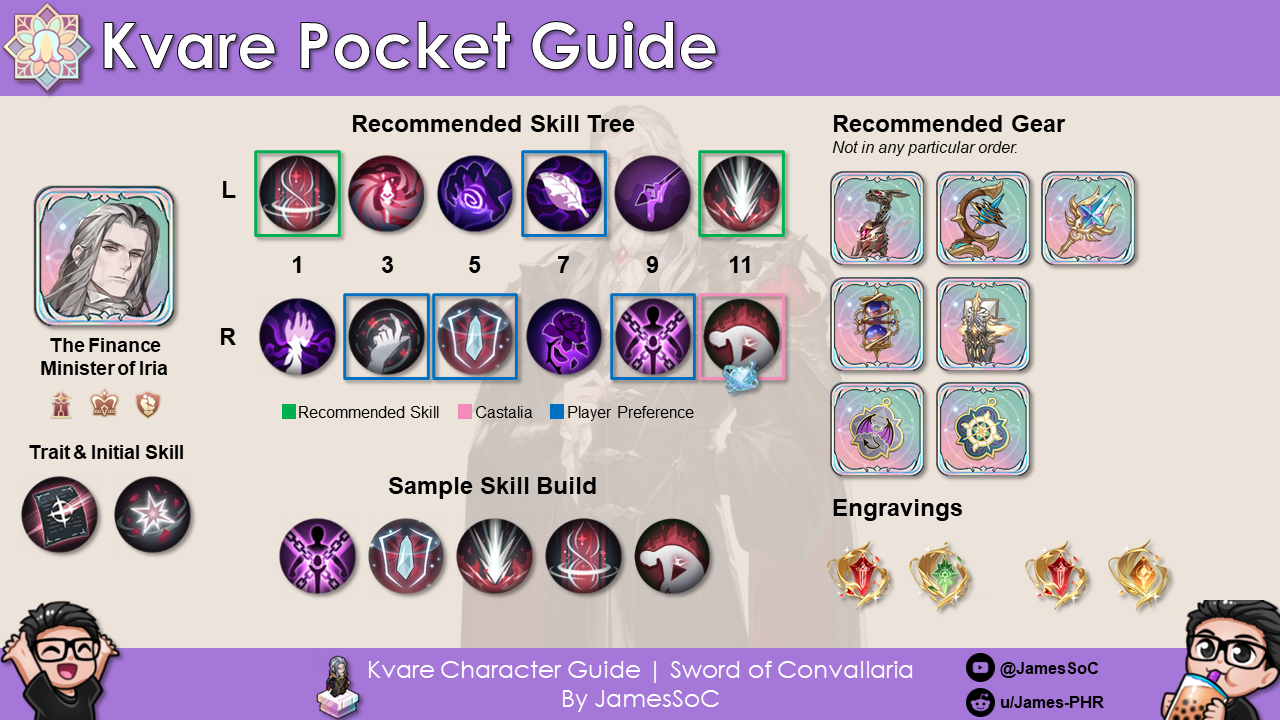
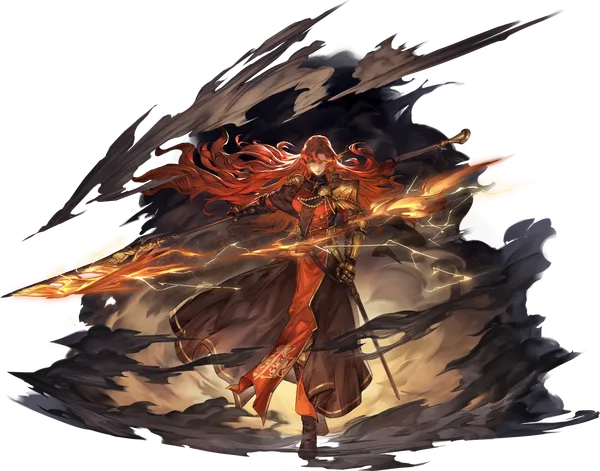

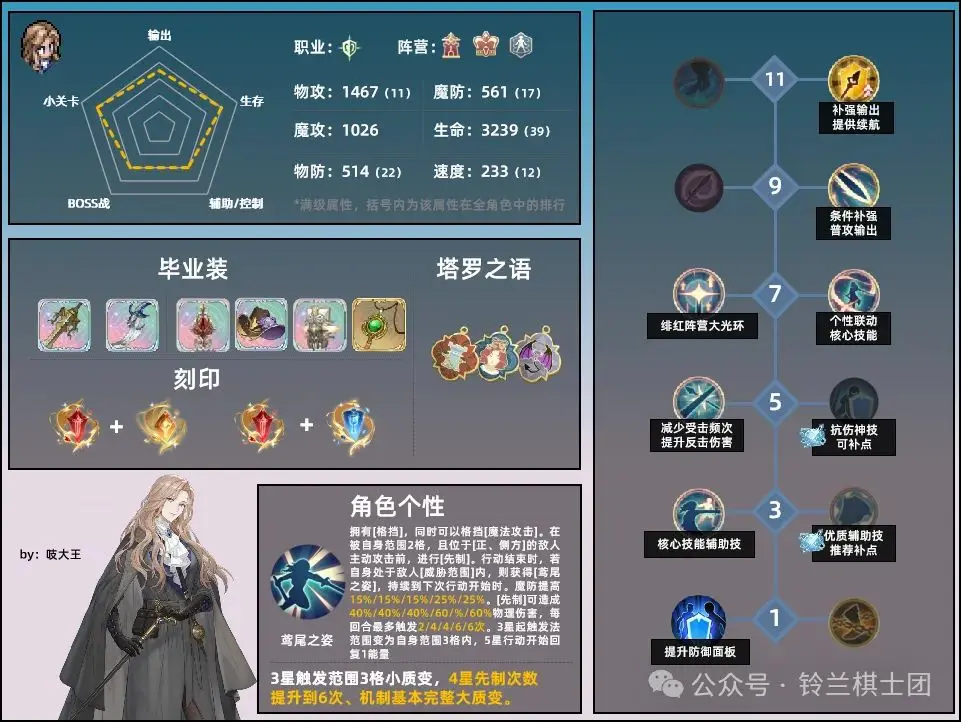

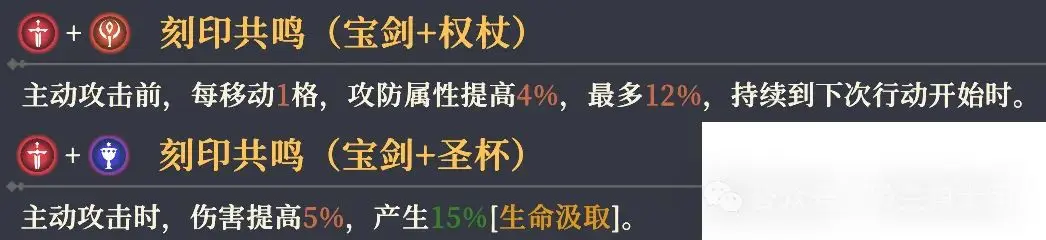
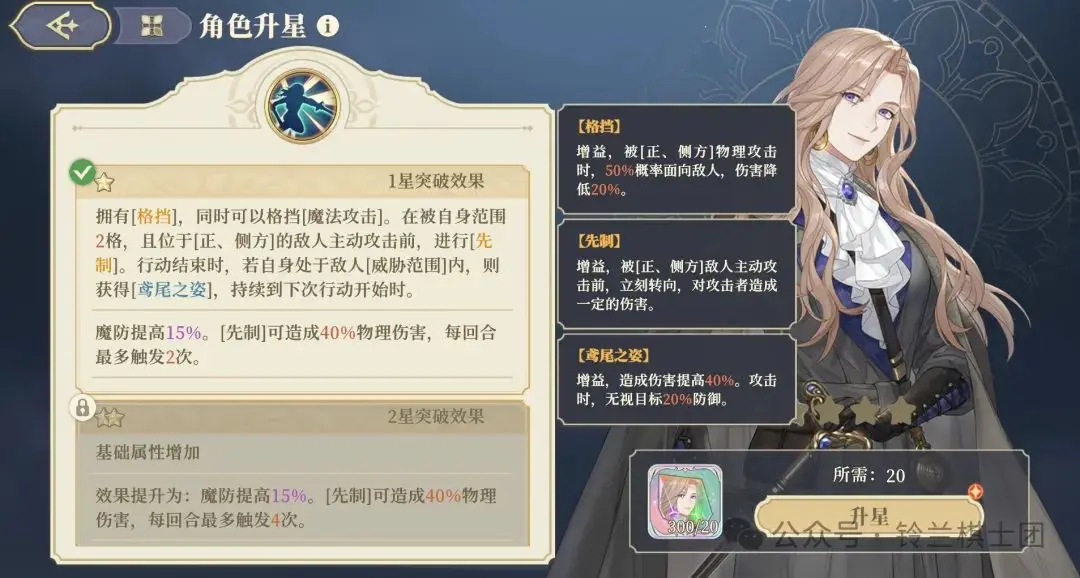
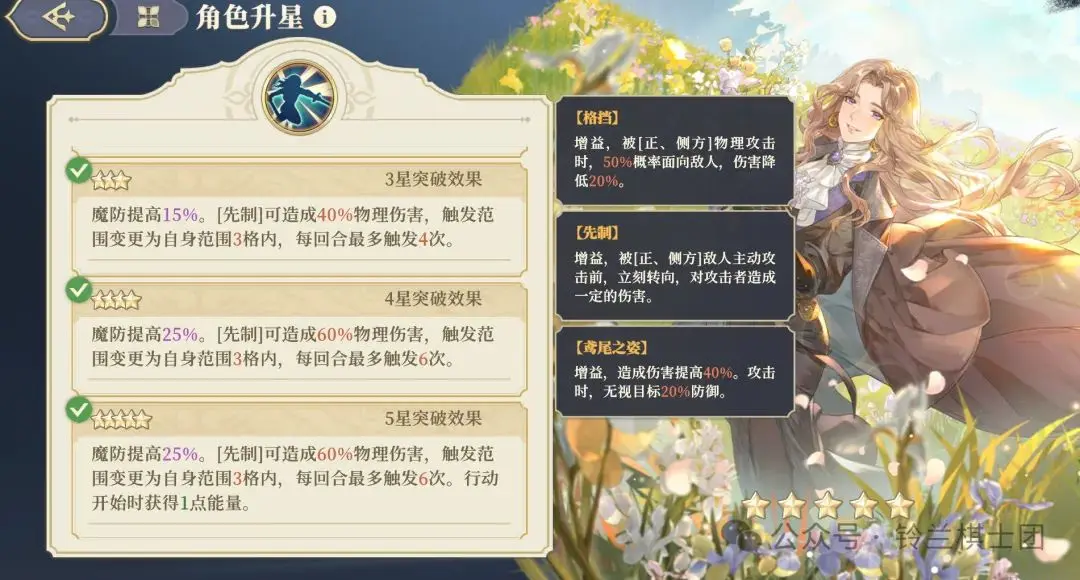
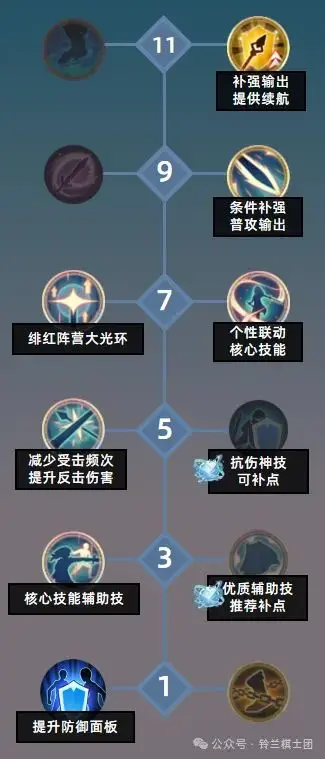
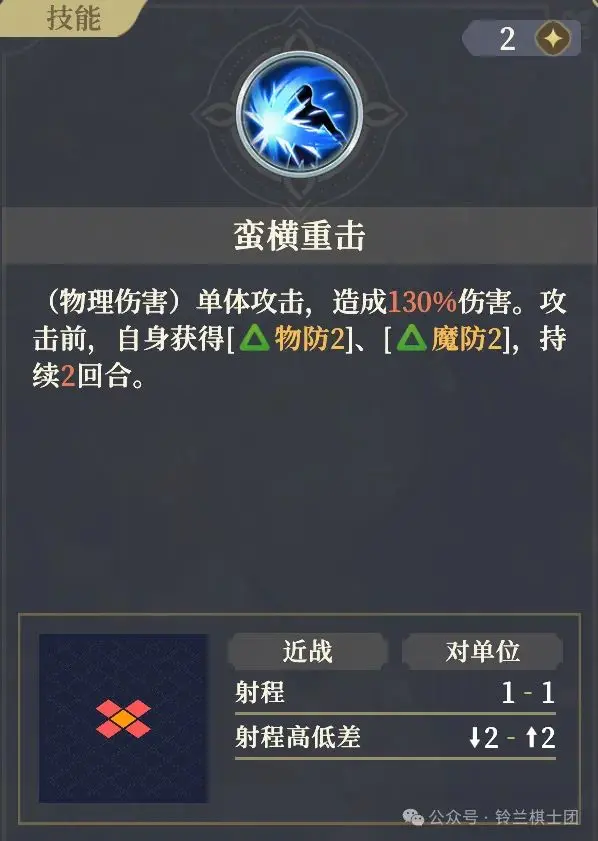
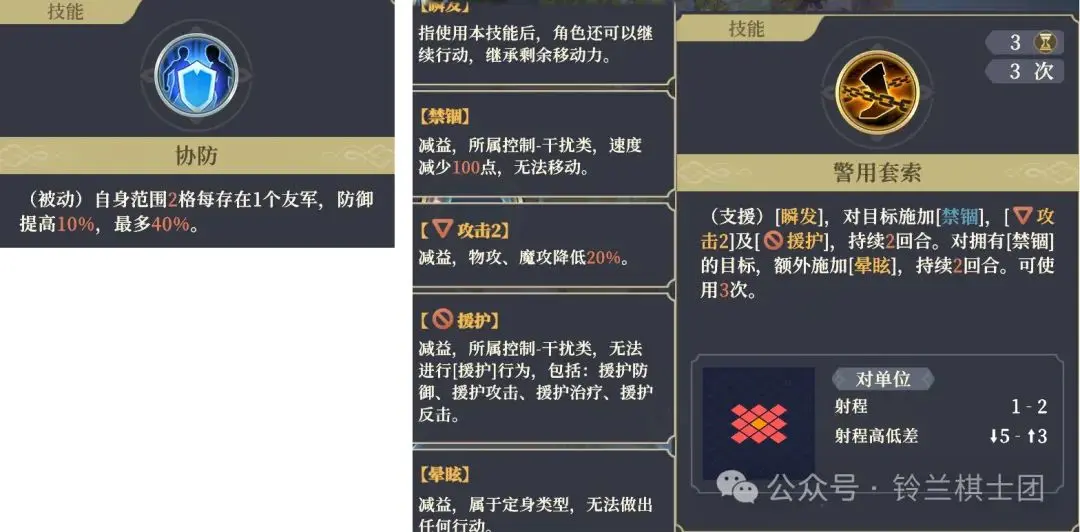
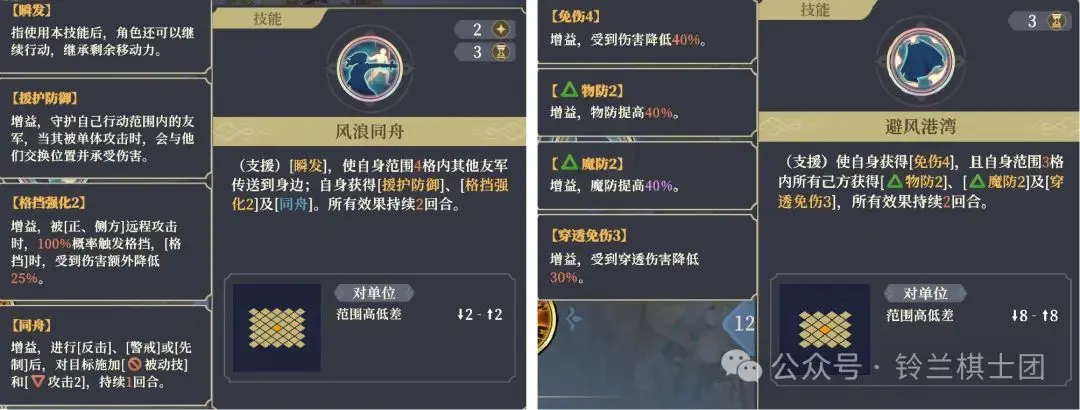
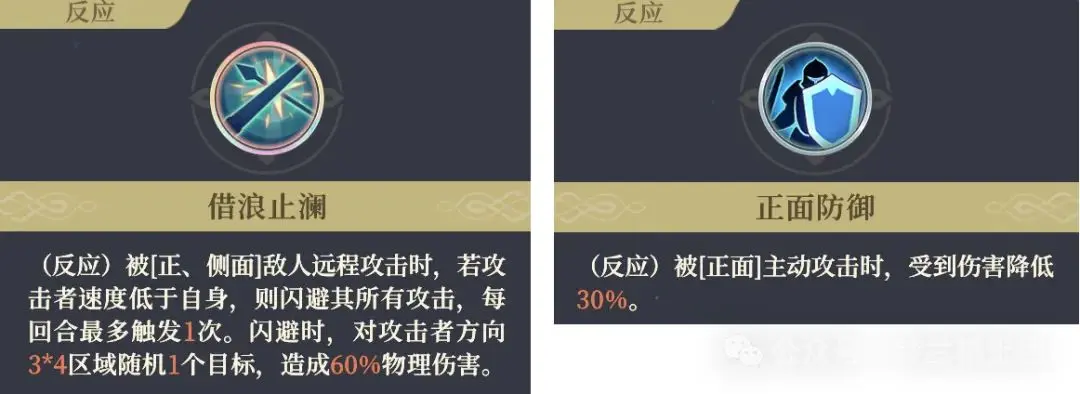
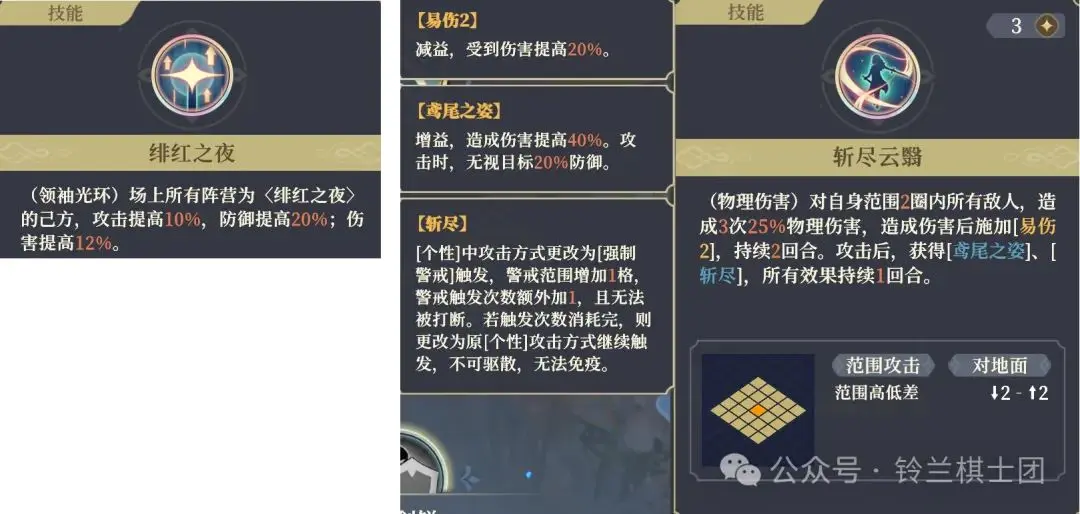
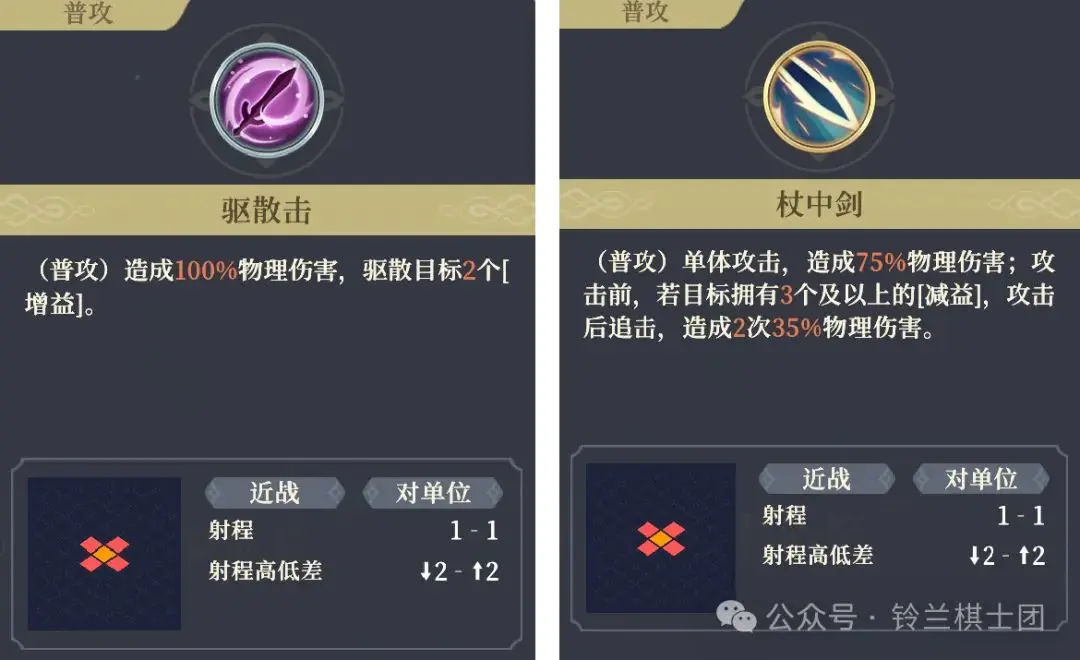
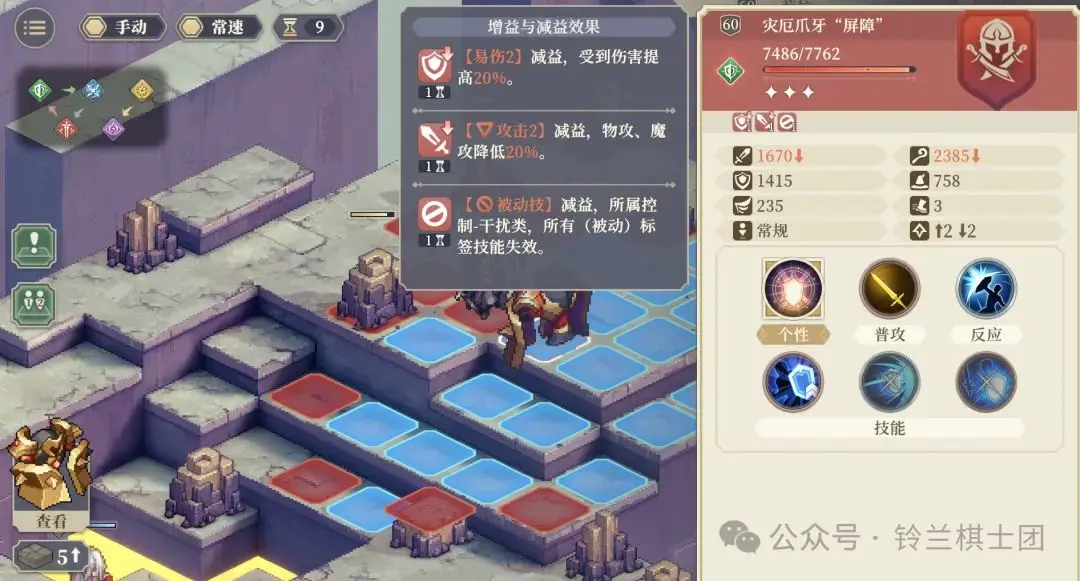
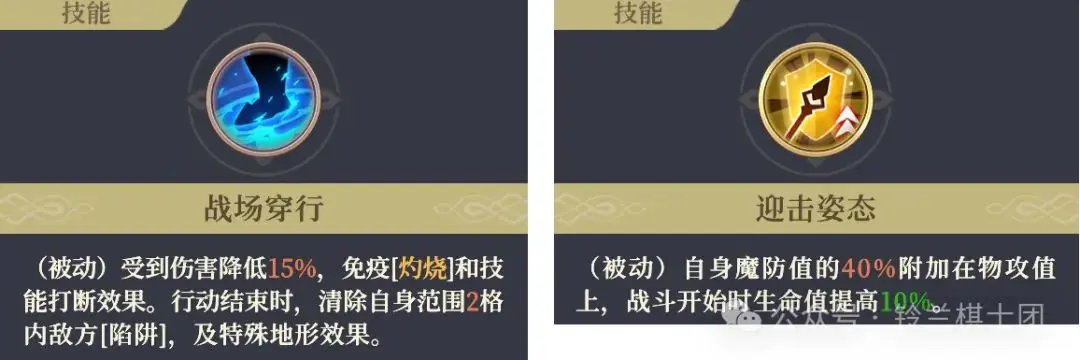
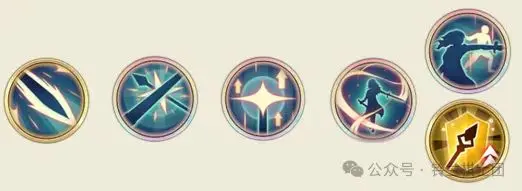


![[Expression_Happy]](https://img.tapimg.com/market/images/48516f625646b5ea2c66f0cab3c9c52a.png)

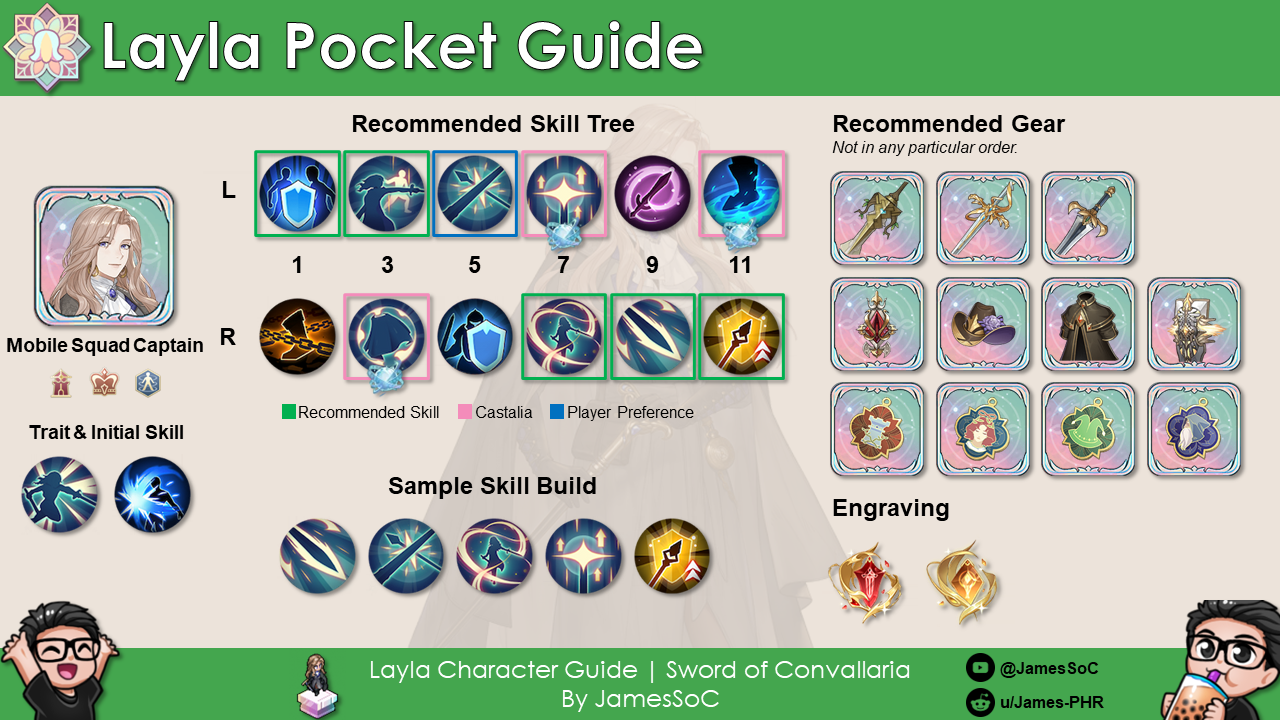

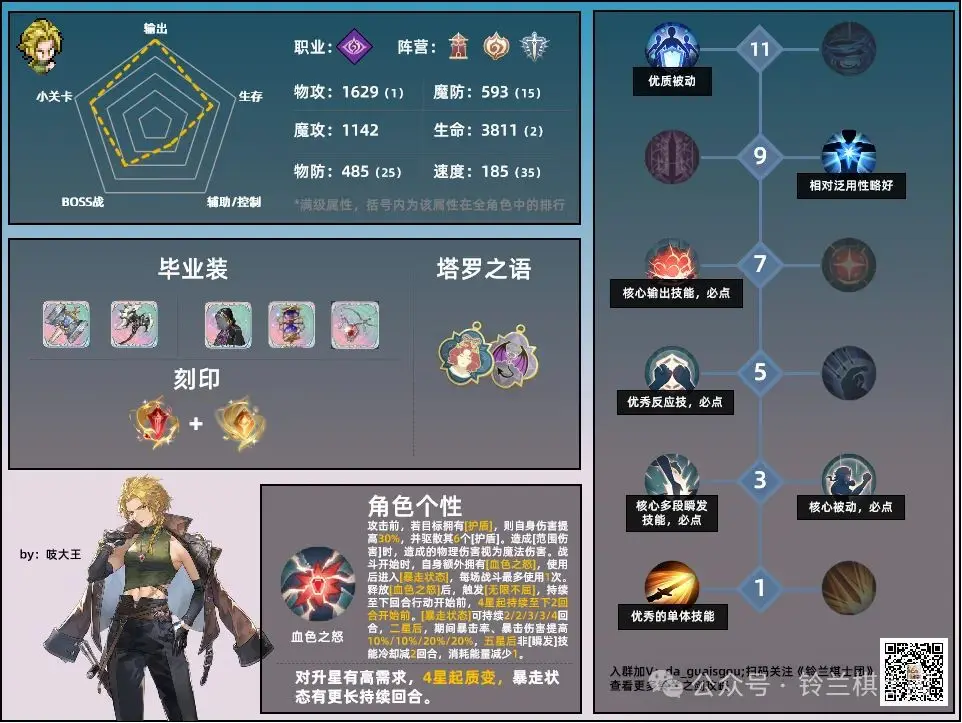

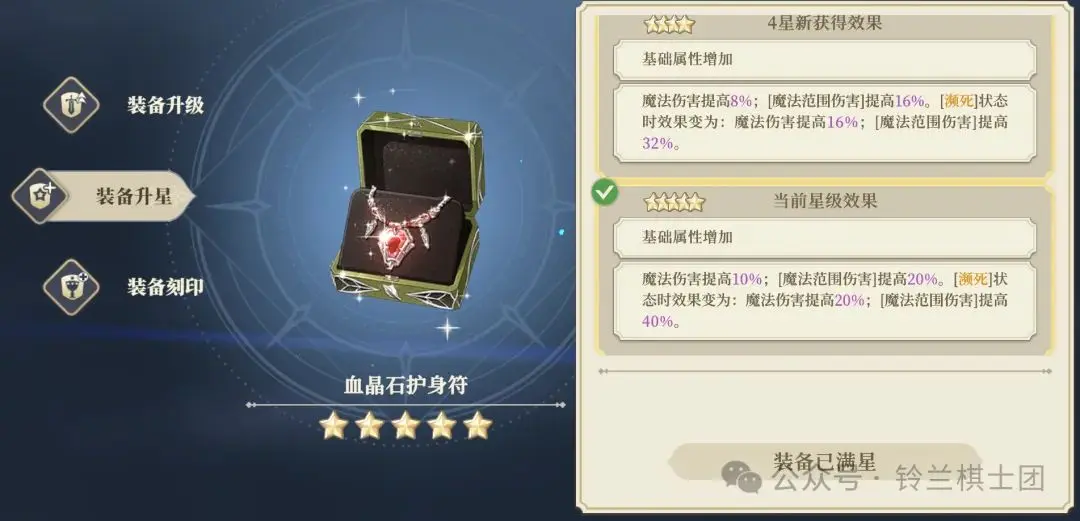

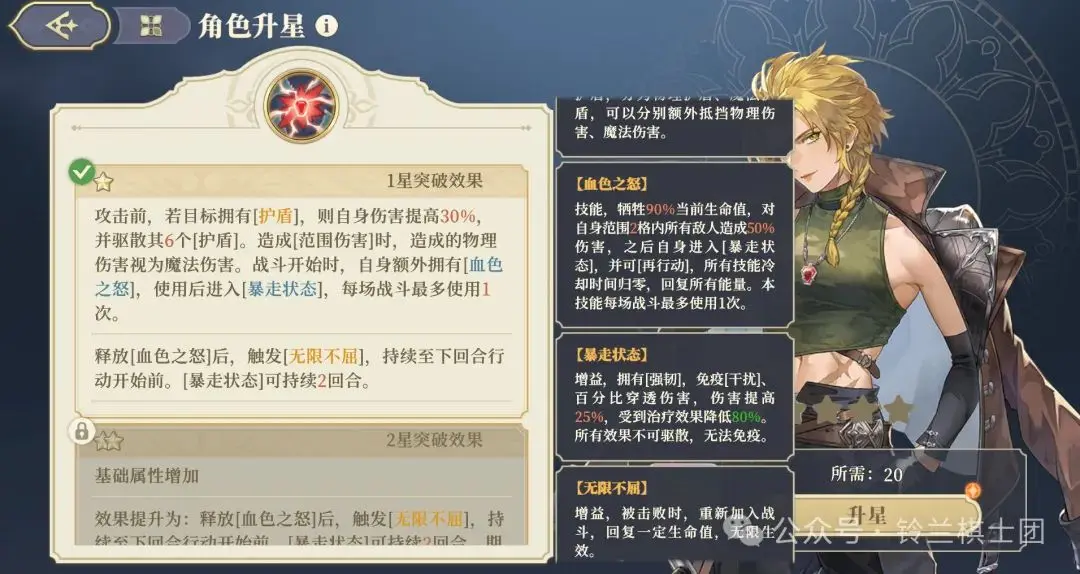
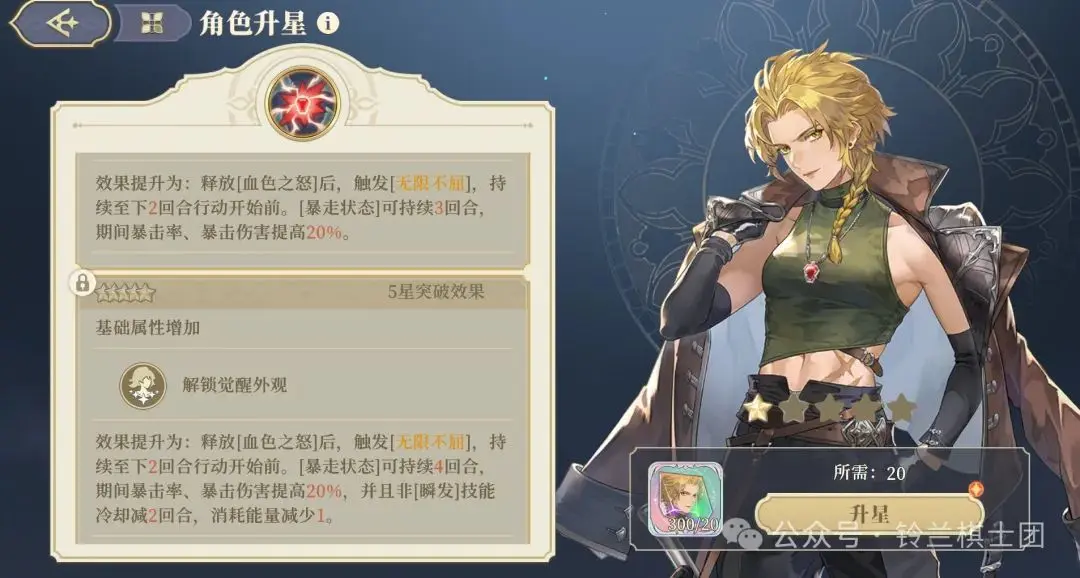
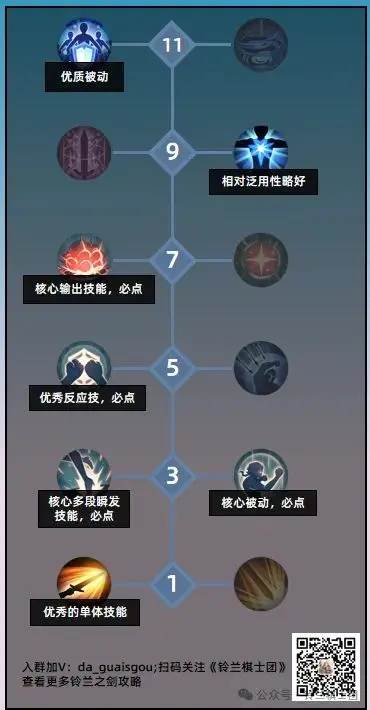
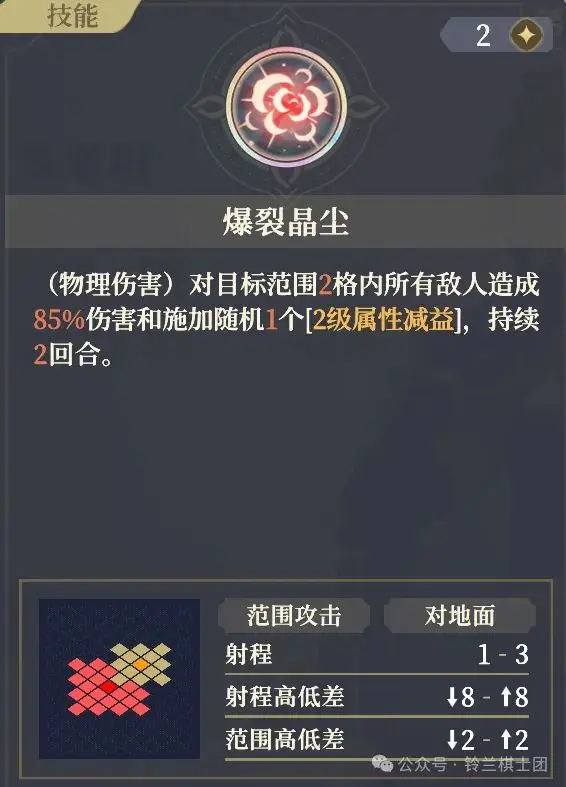
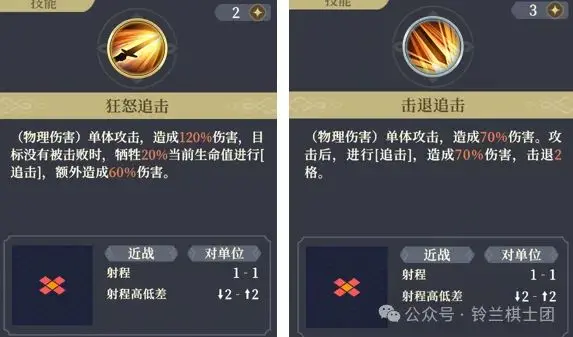
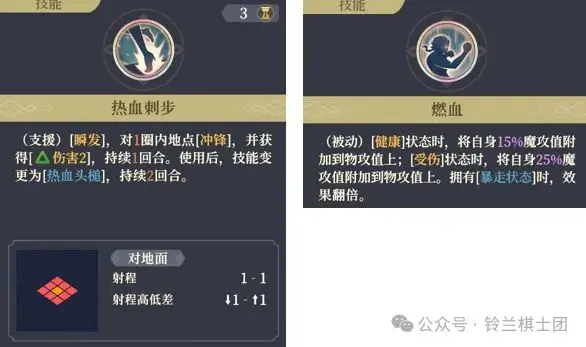
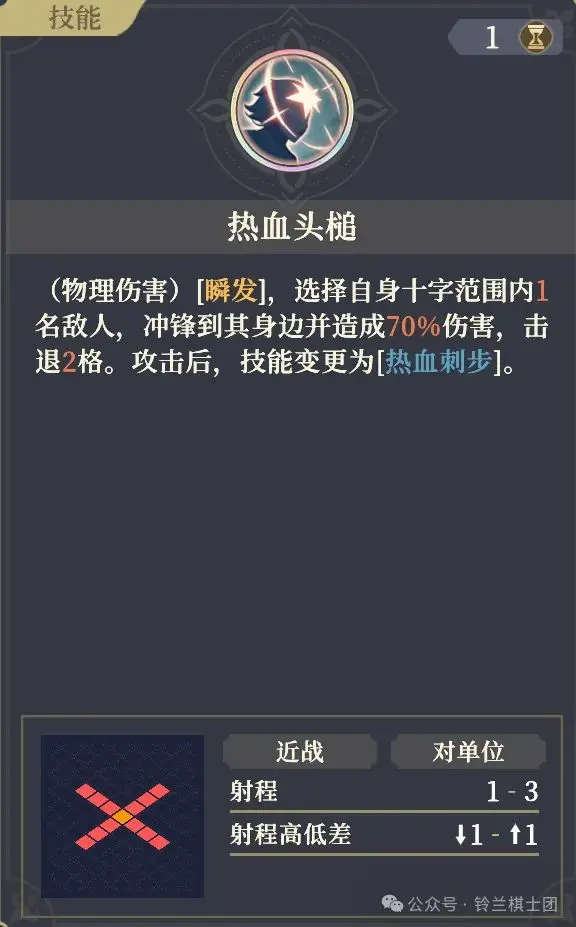
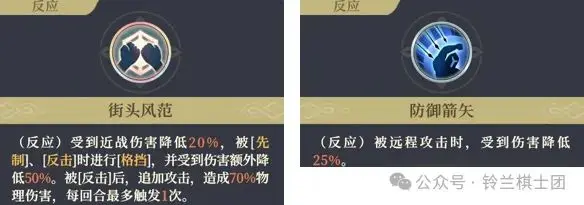
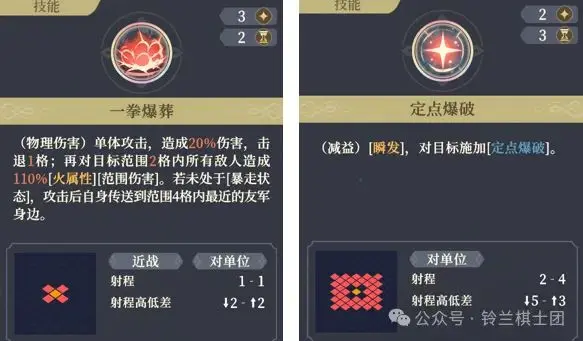
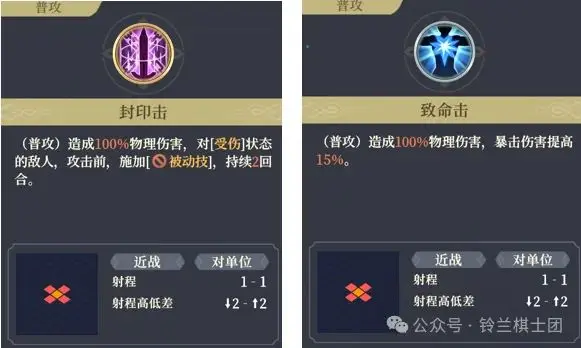
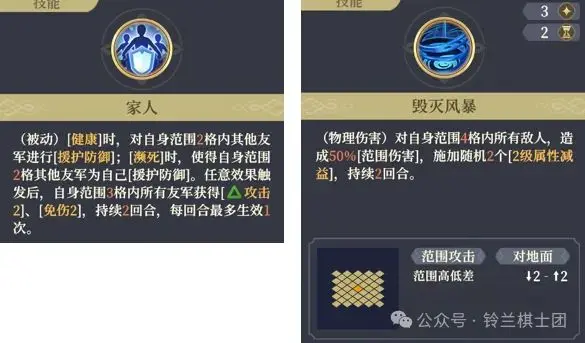
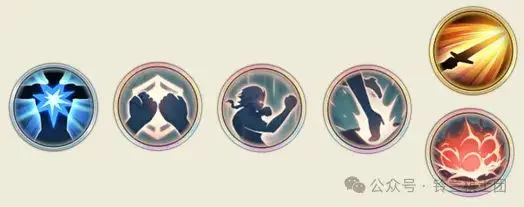


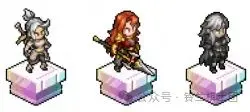
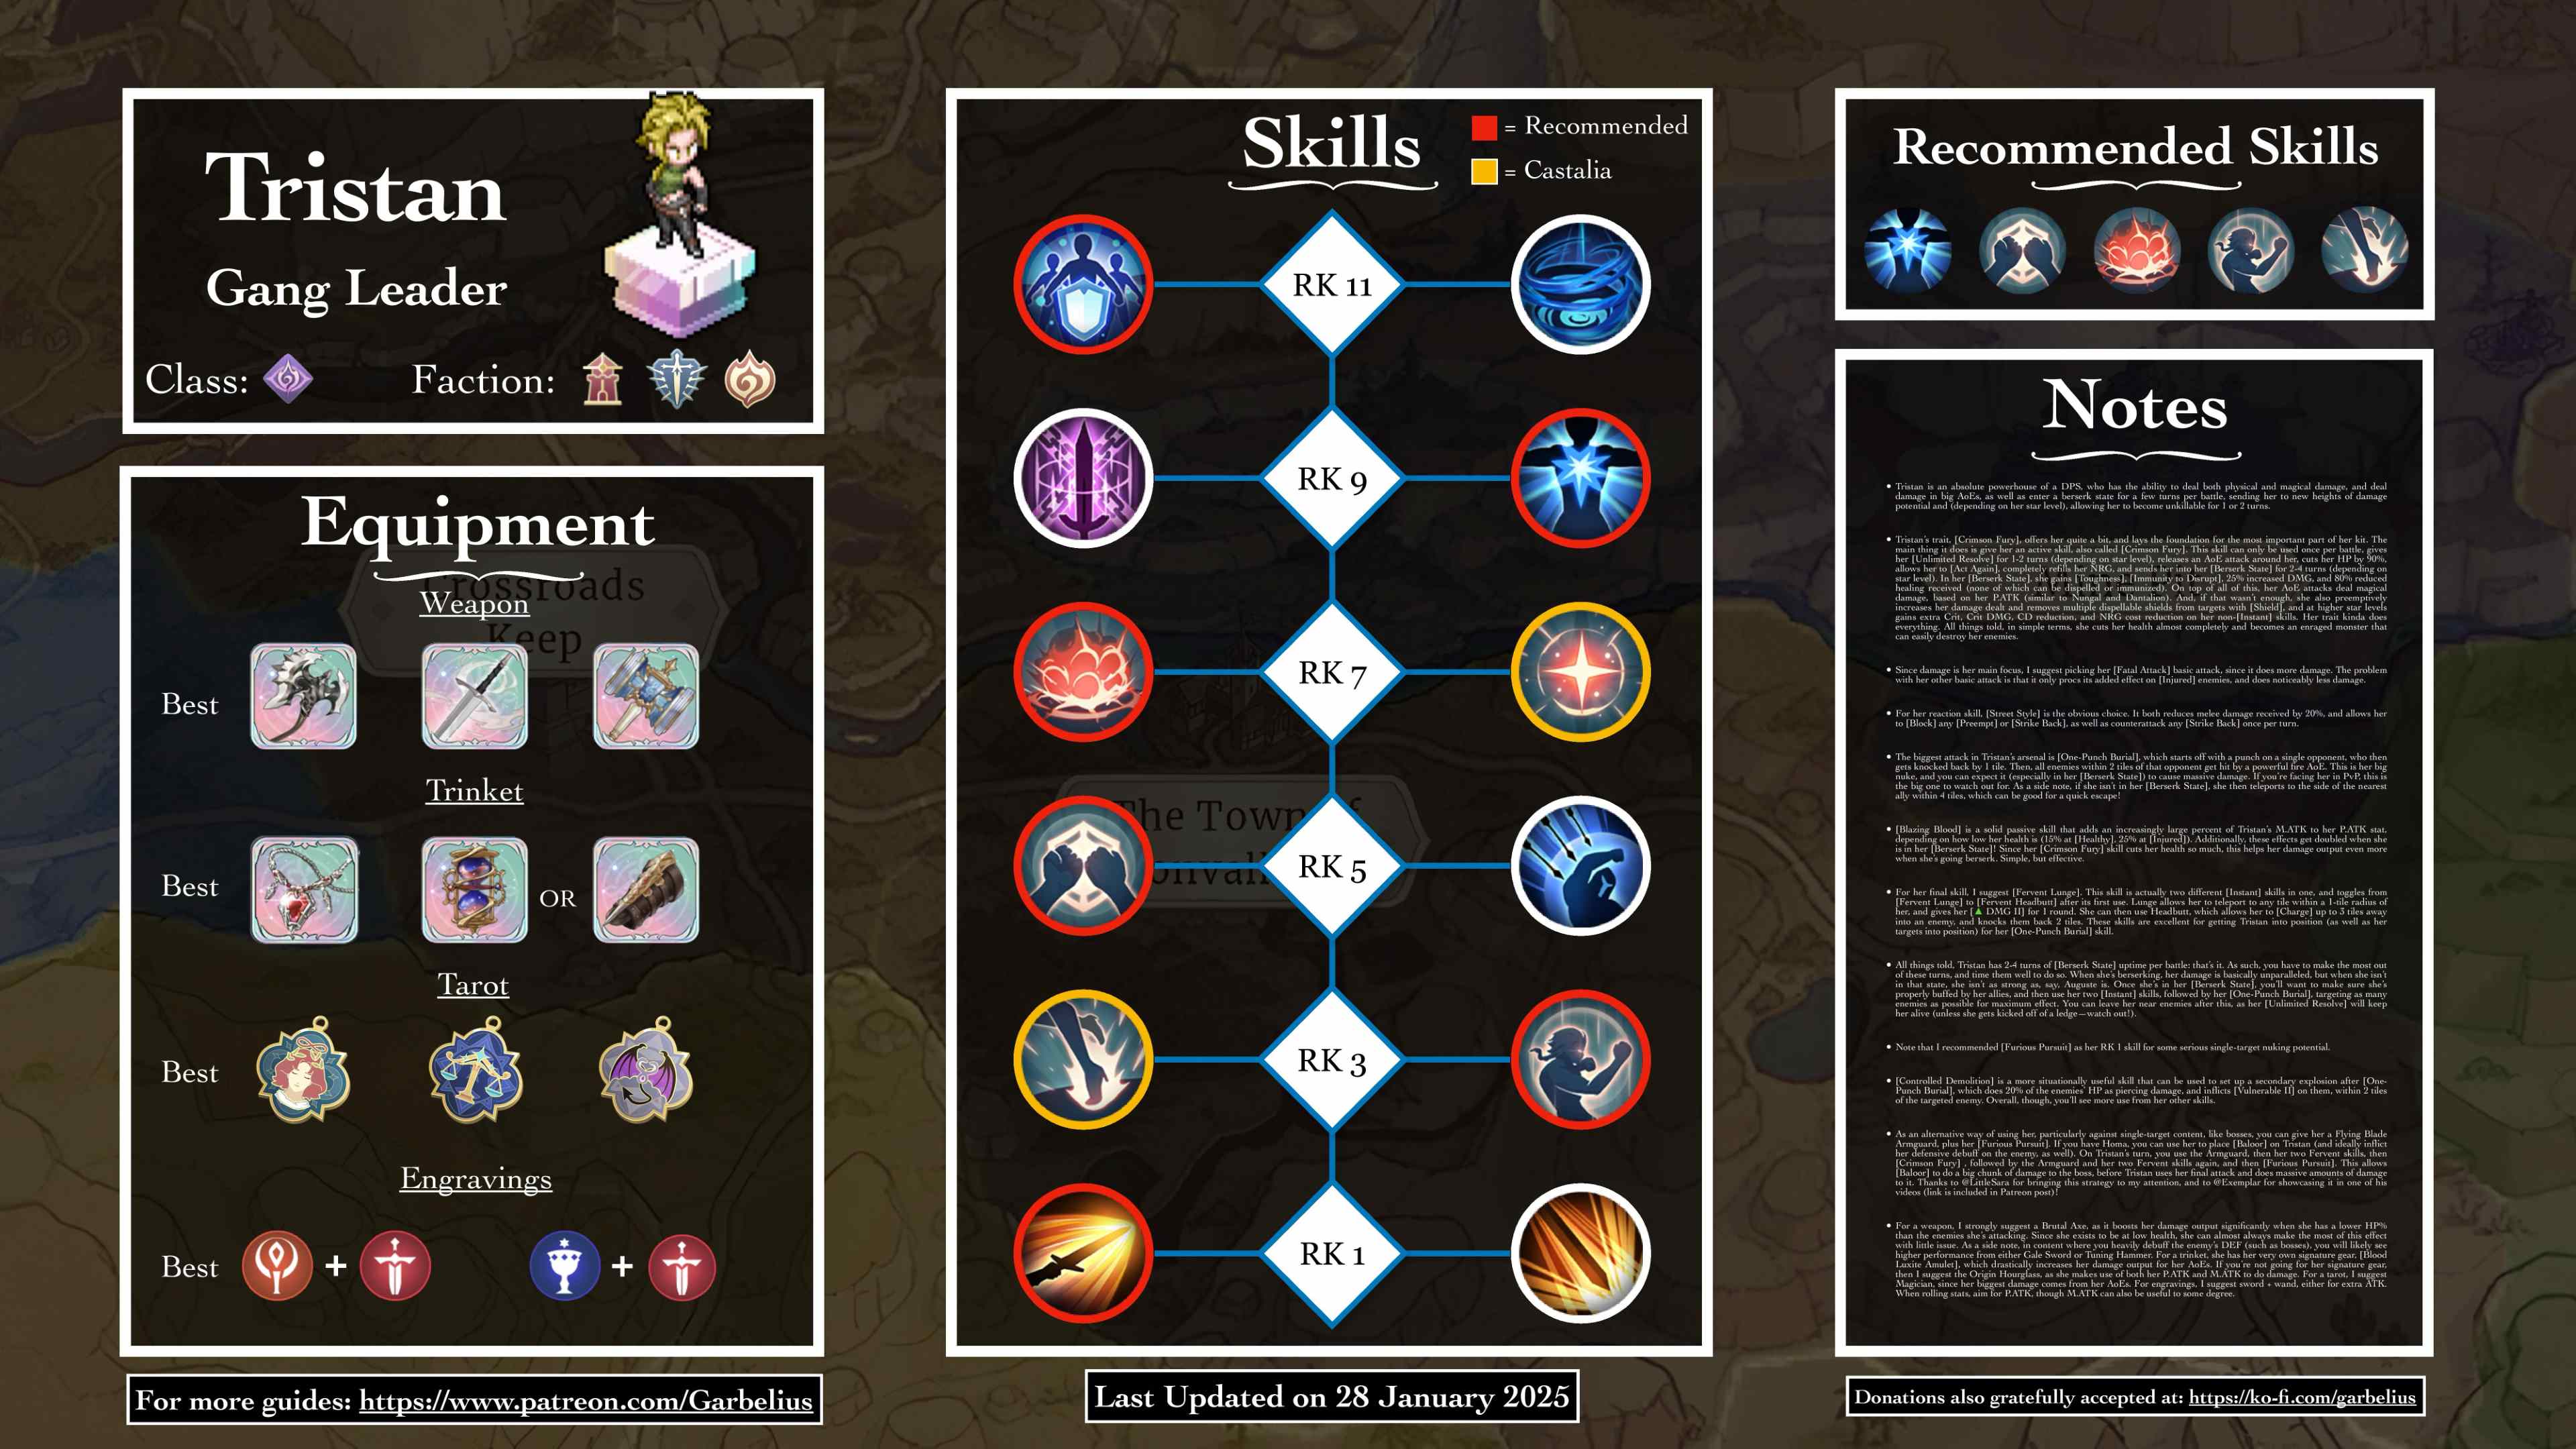
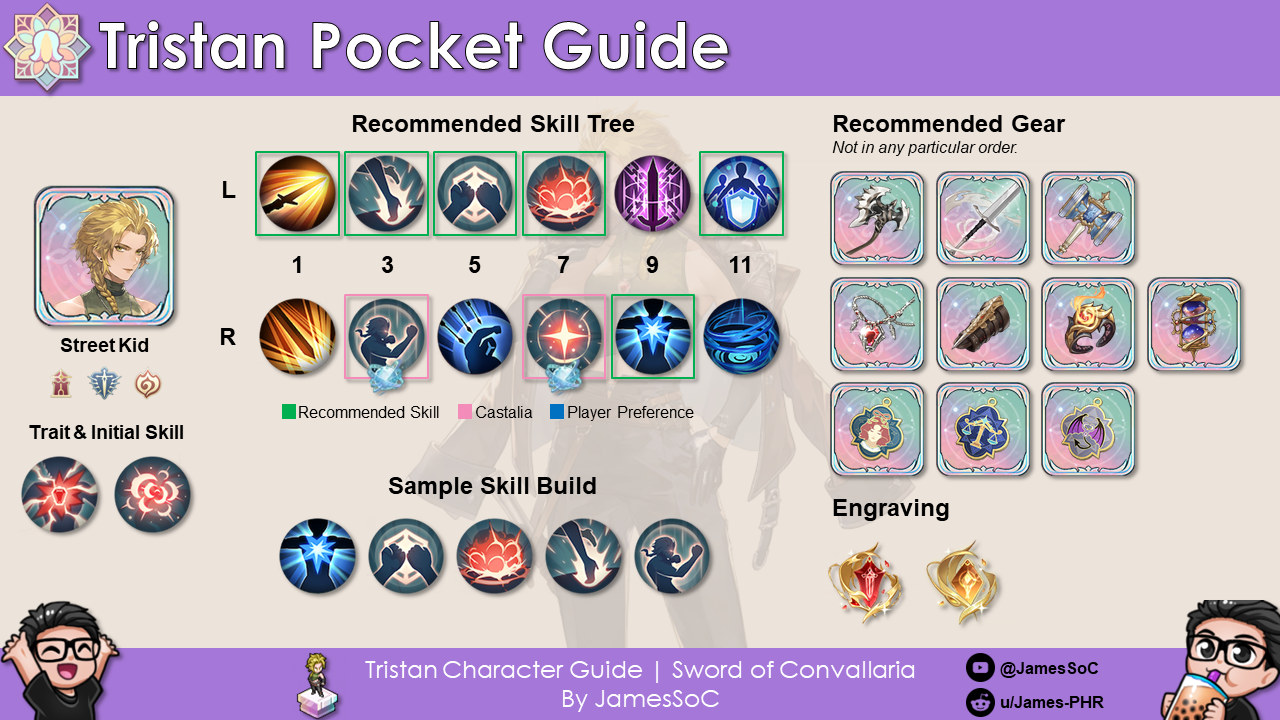
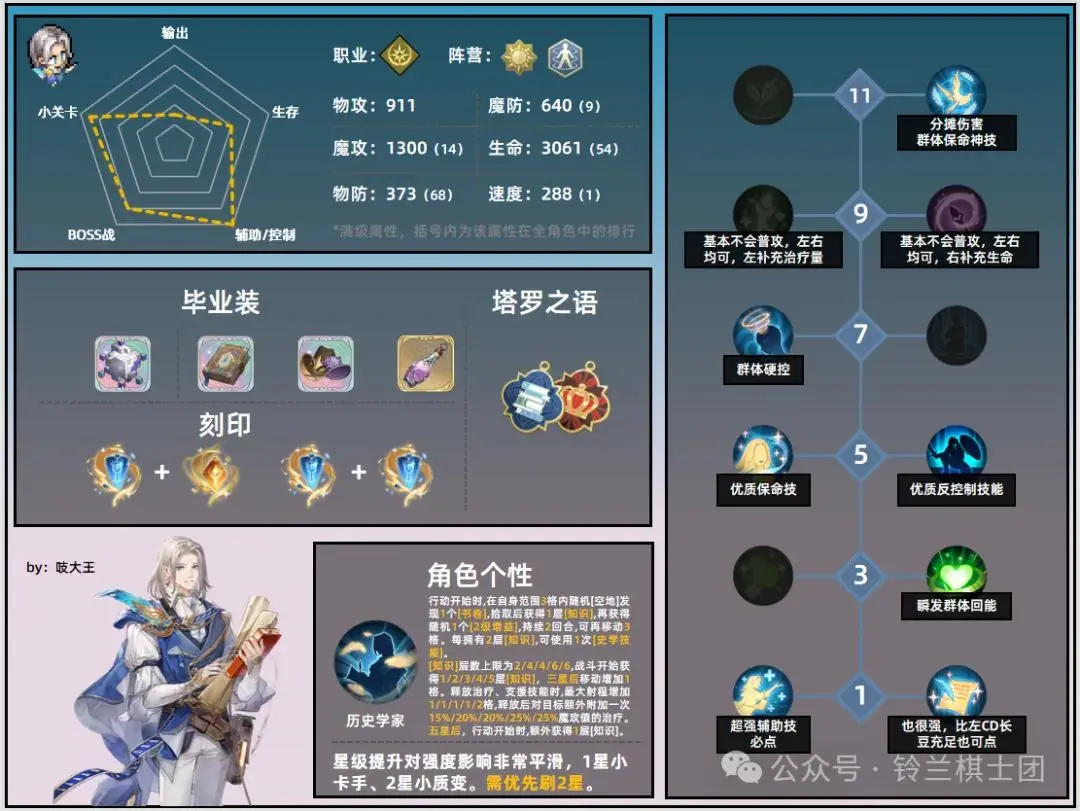

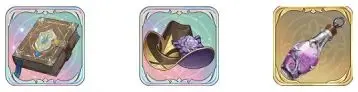
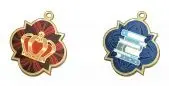
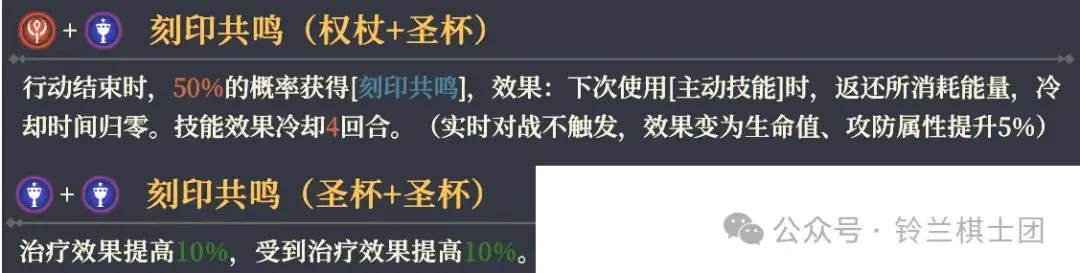
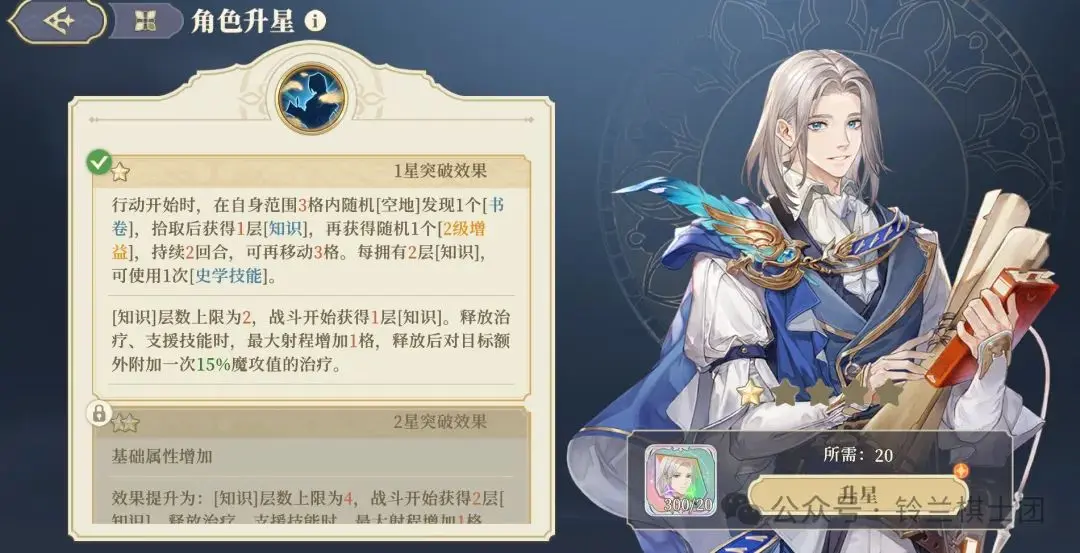
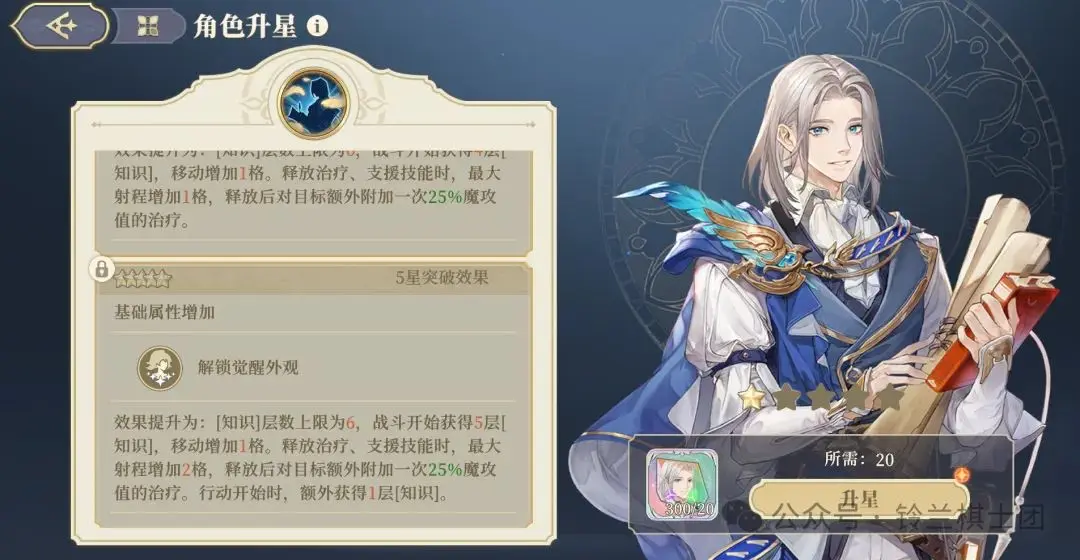
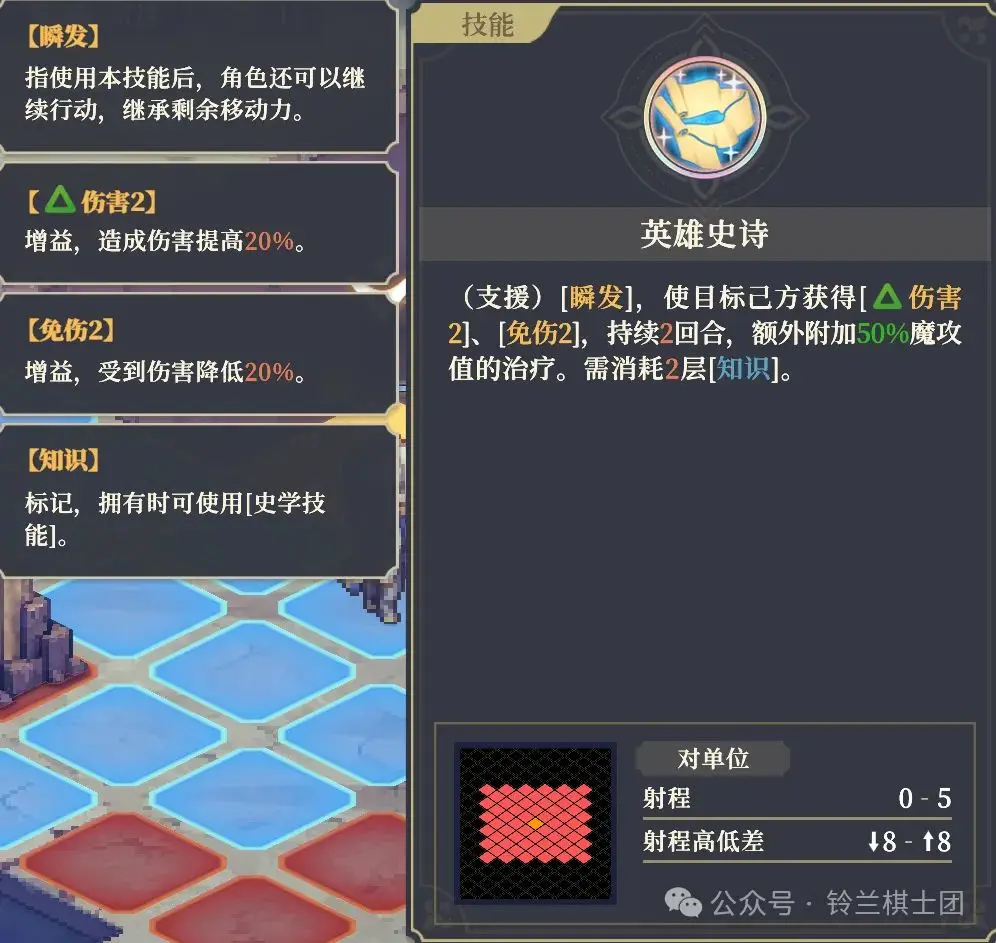

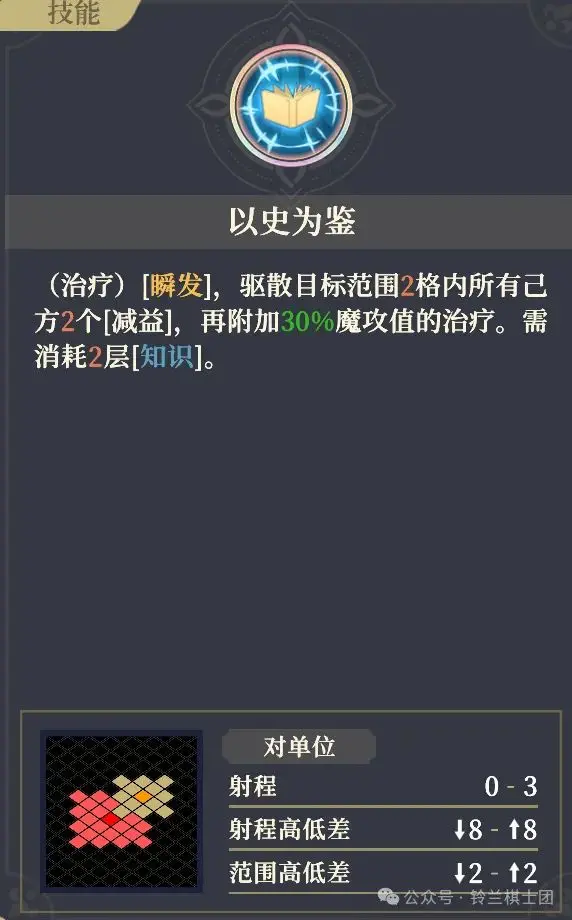
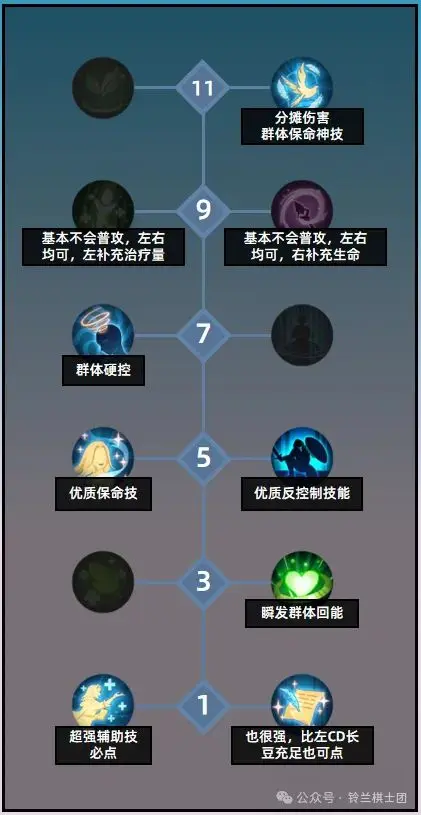
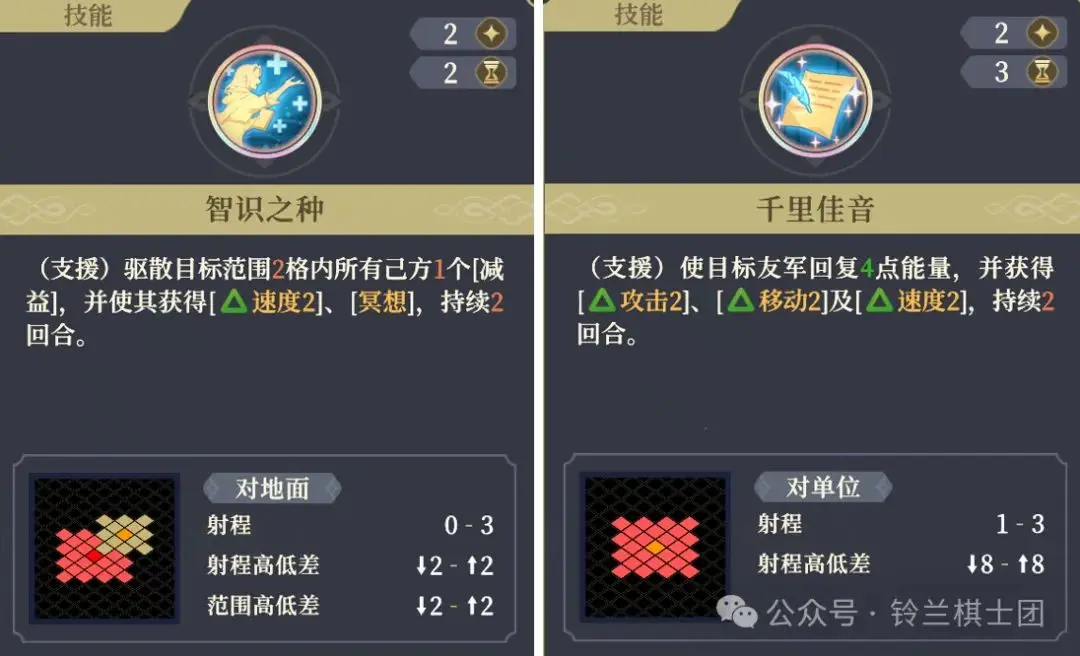
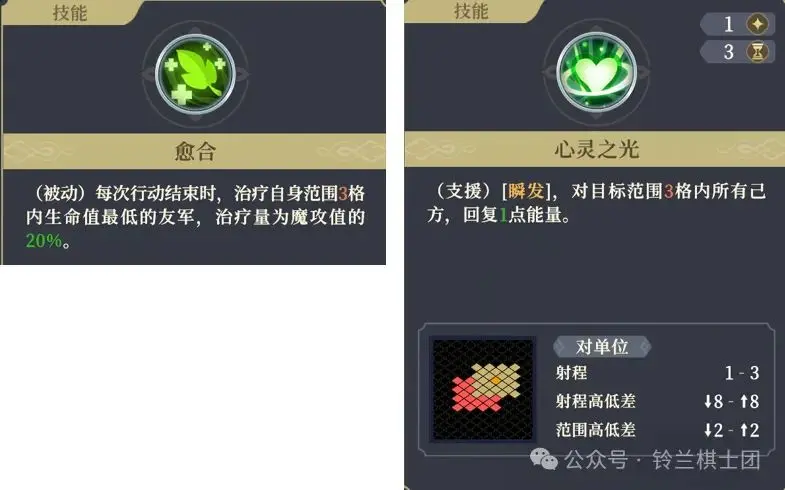
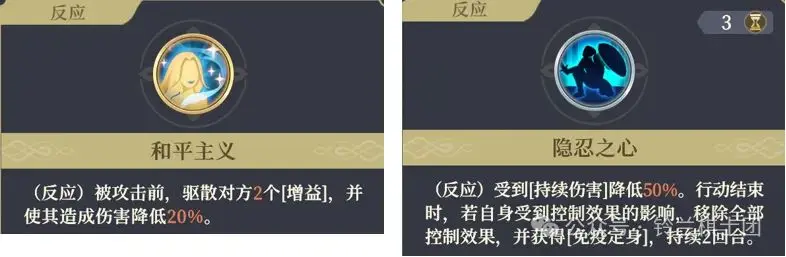
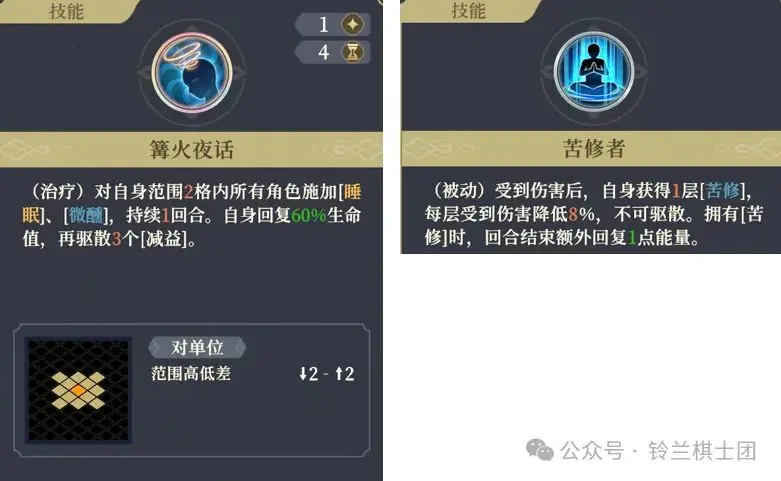
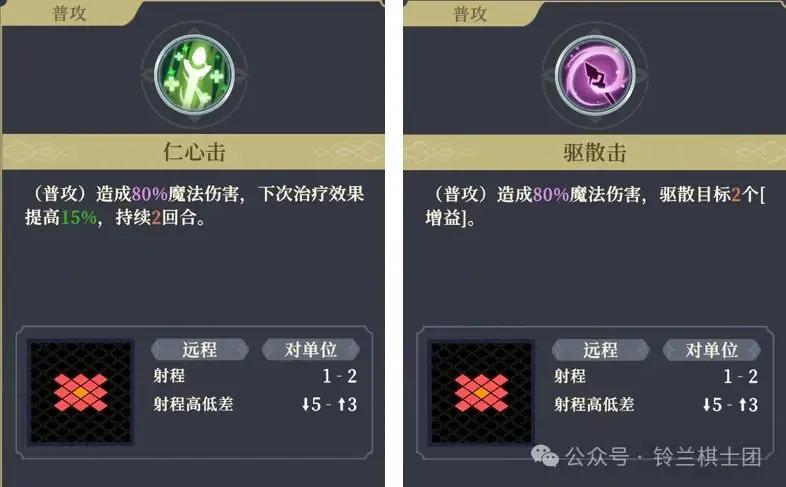
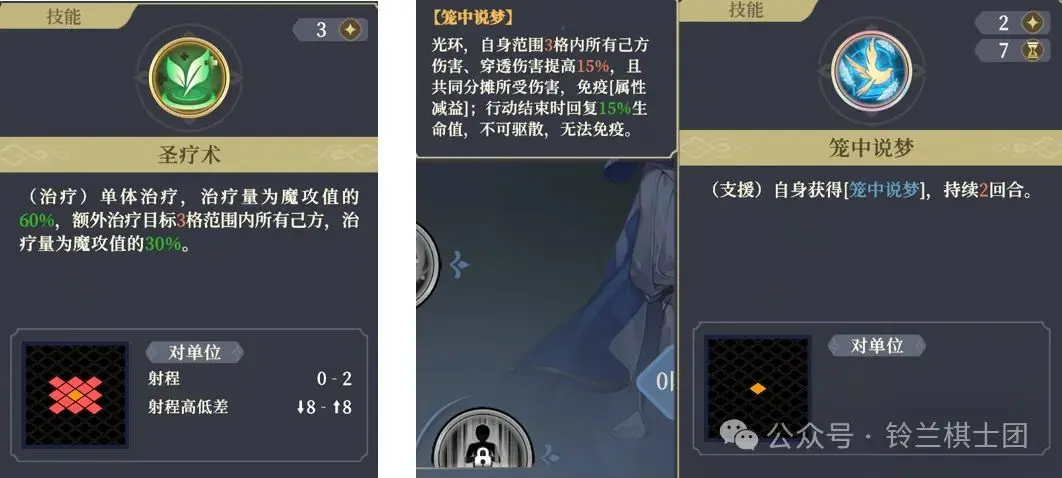
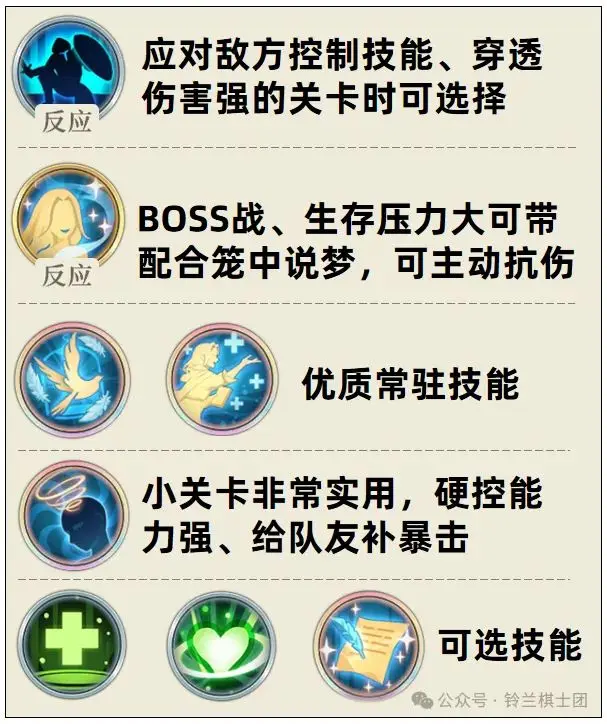

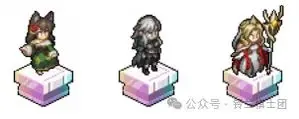
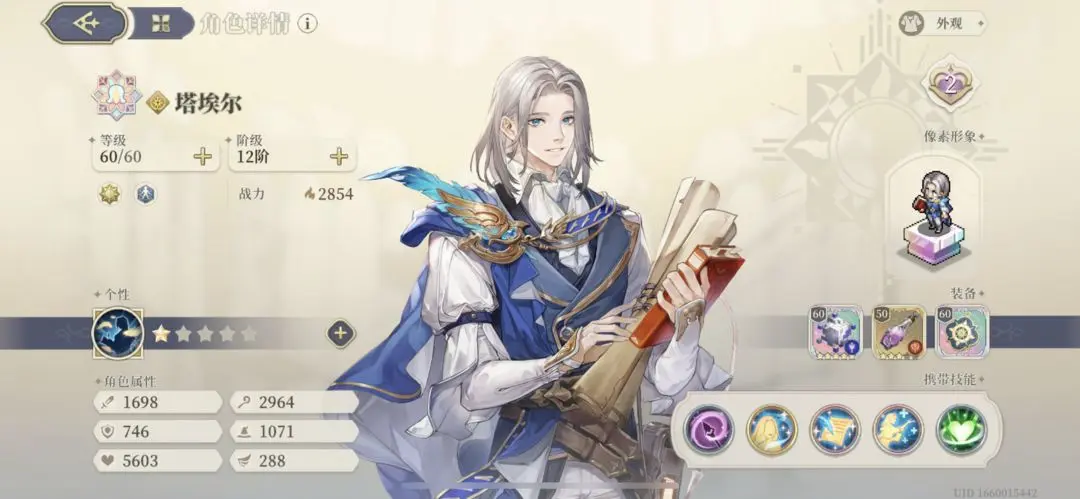

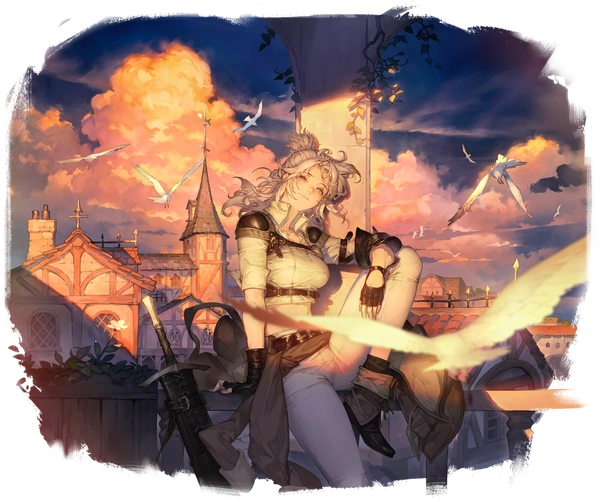
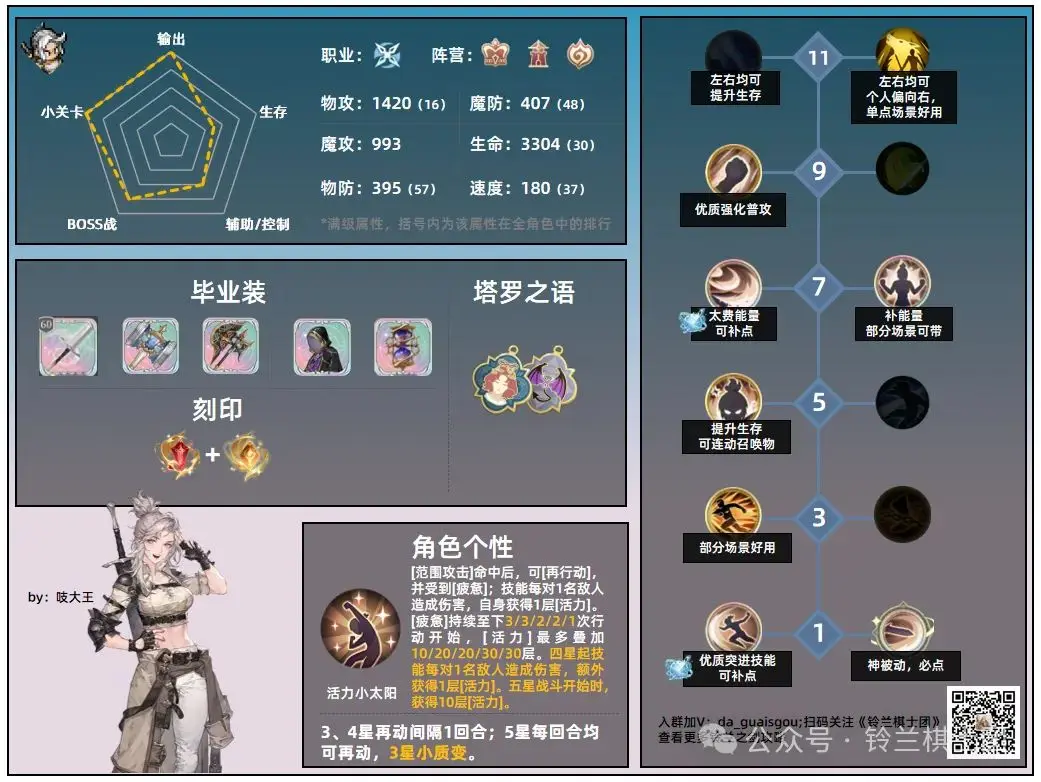


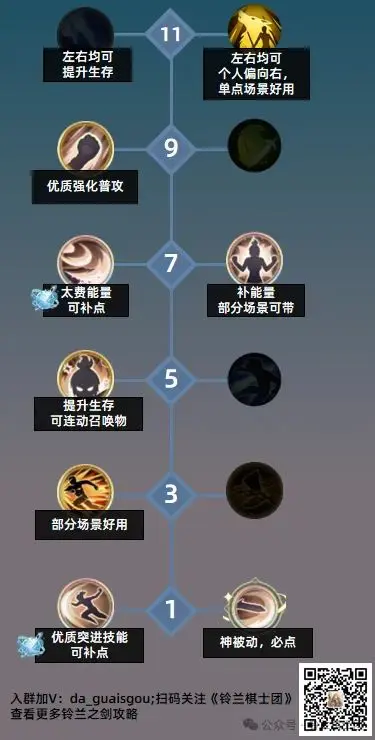
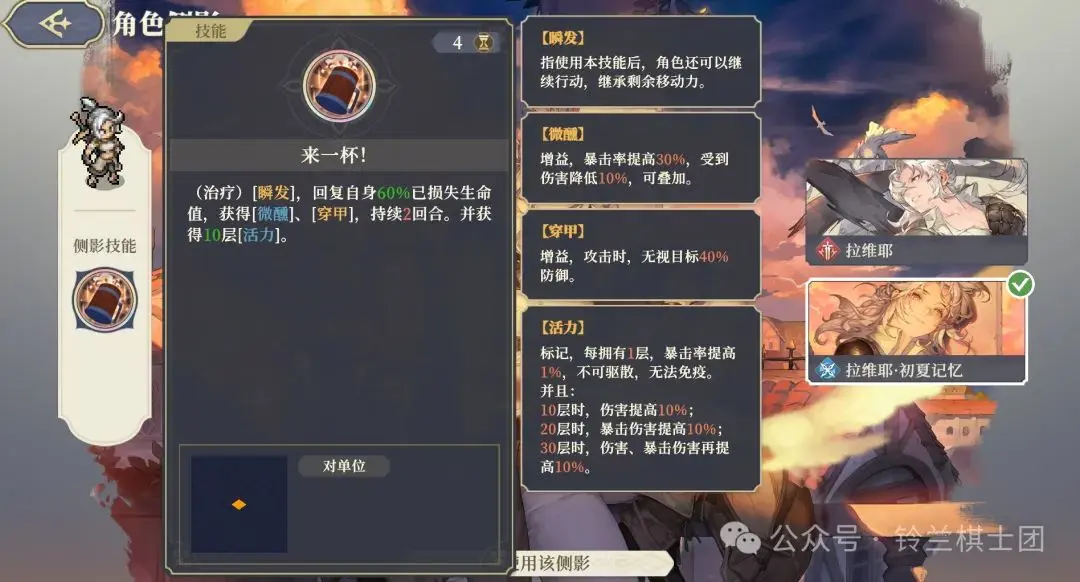
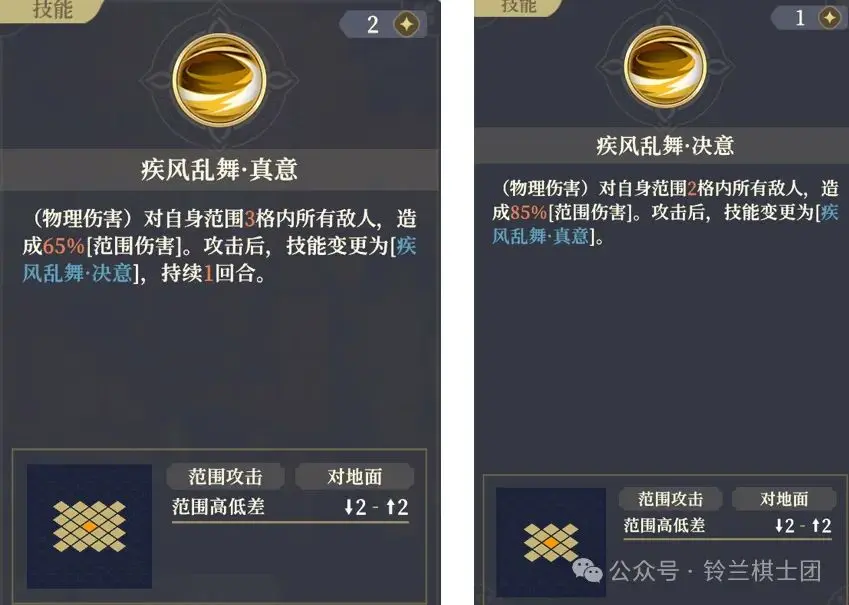
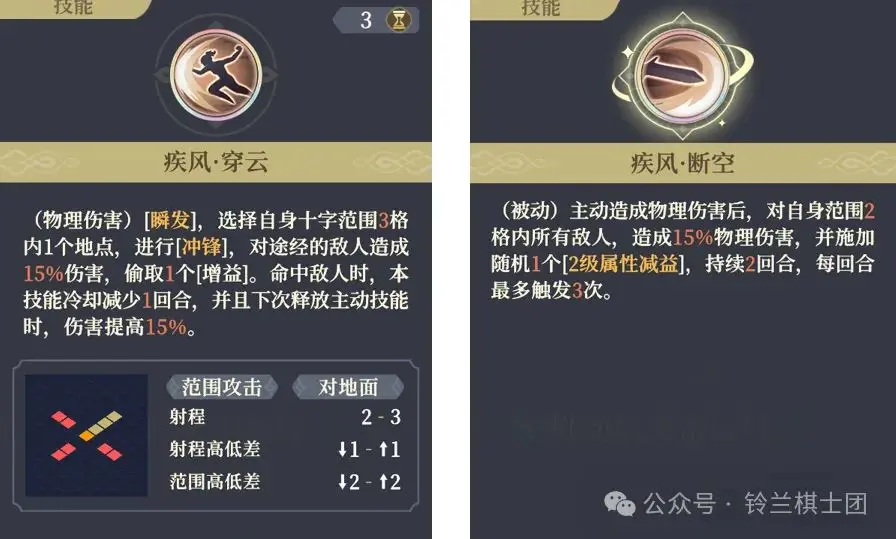
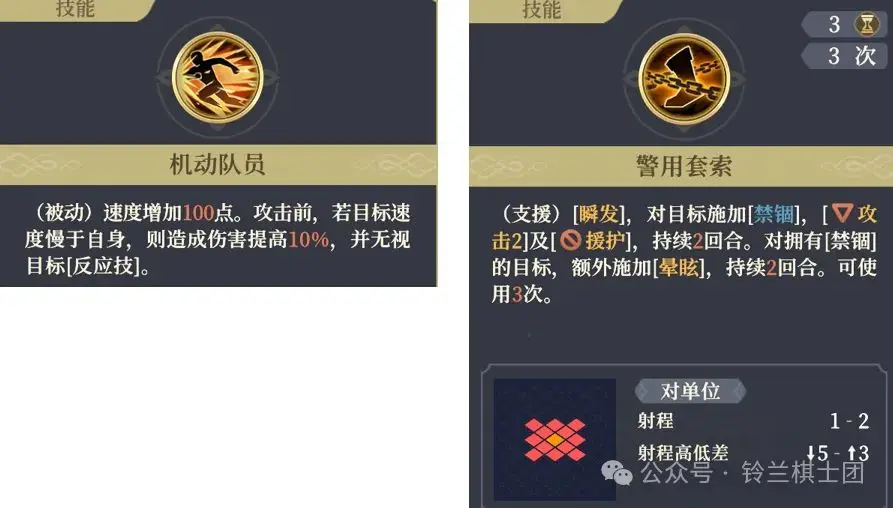
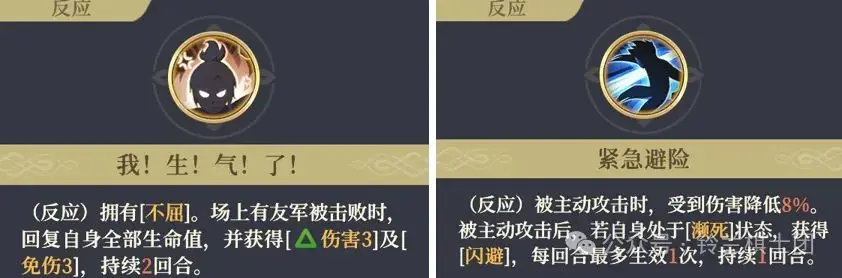
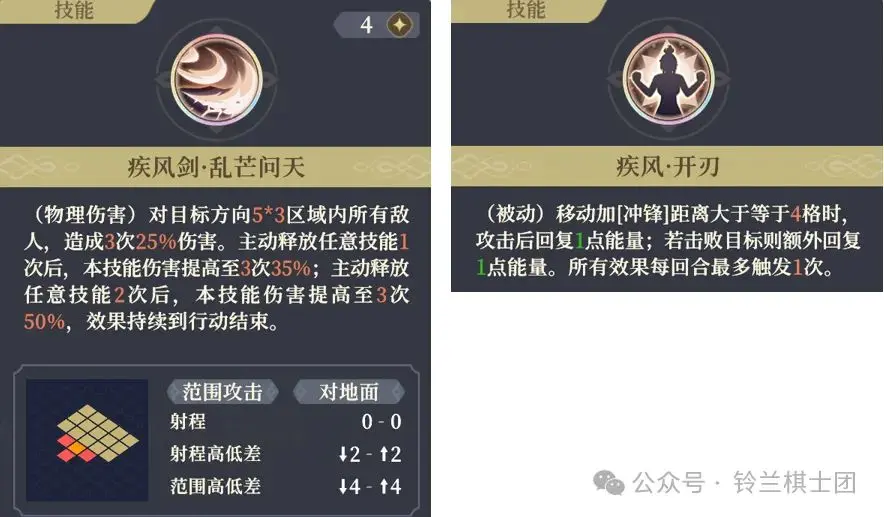
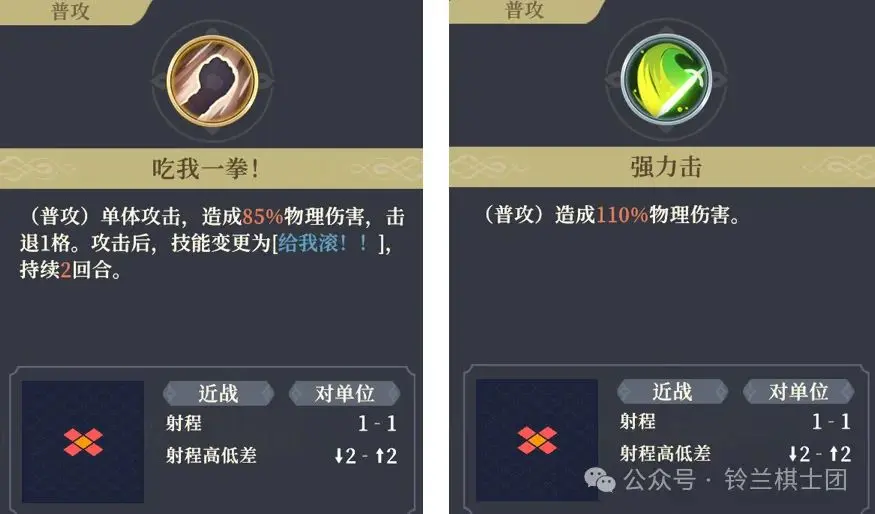
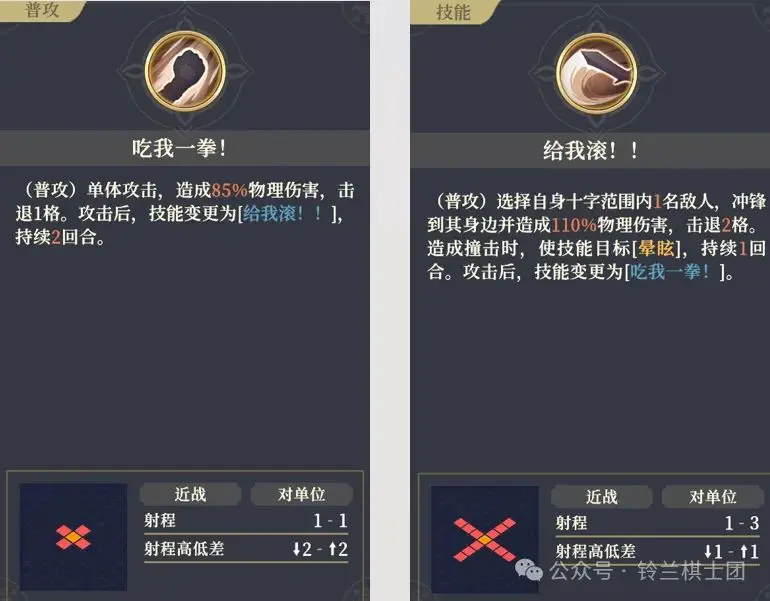

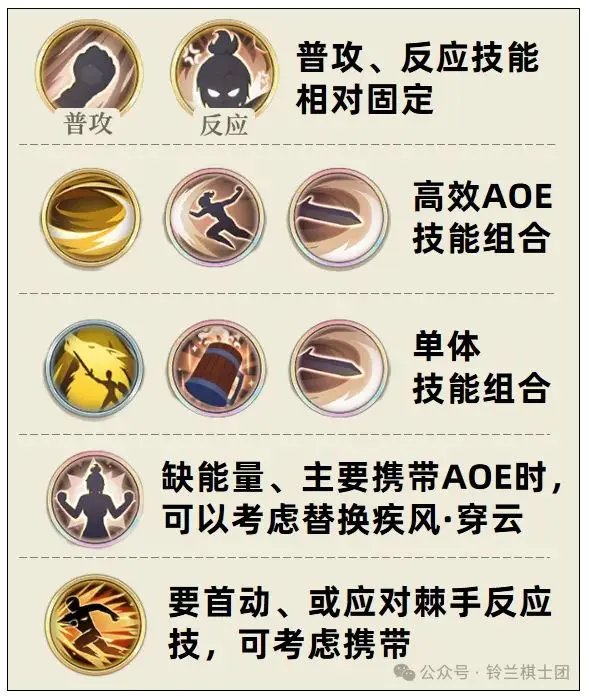

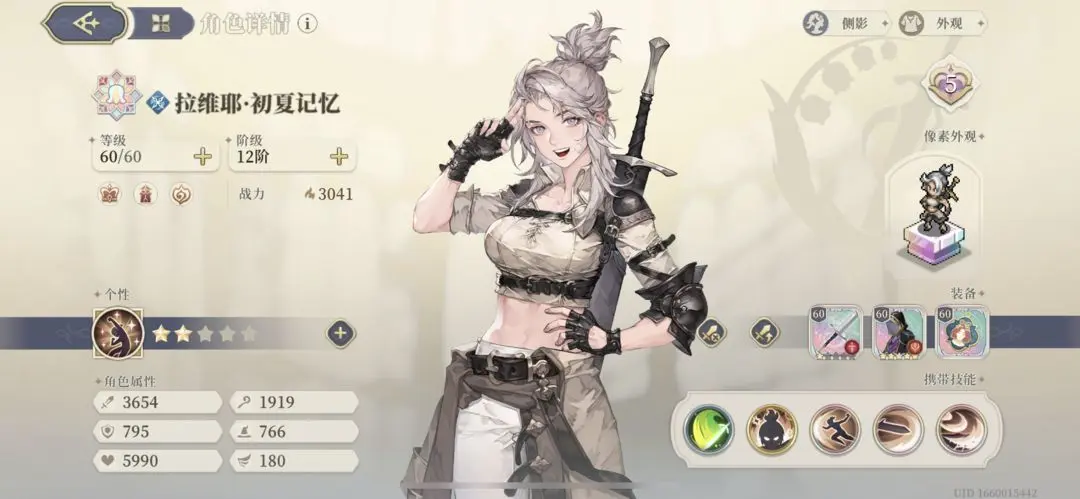
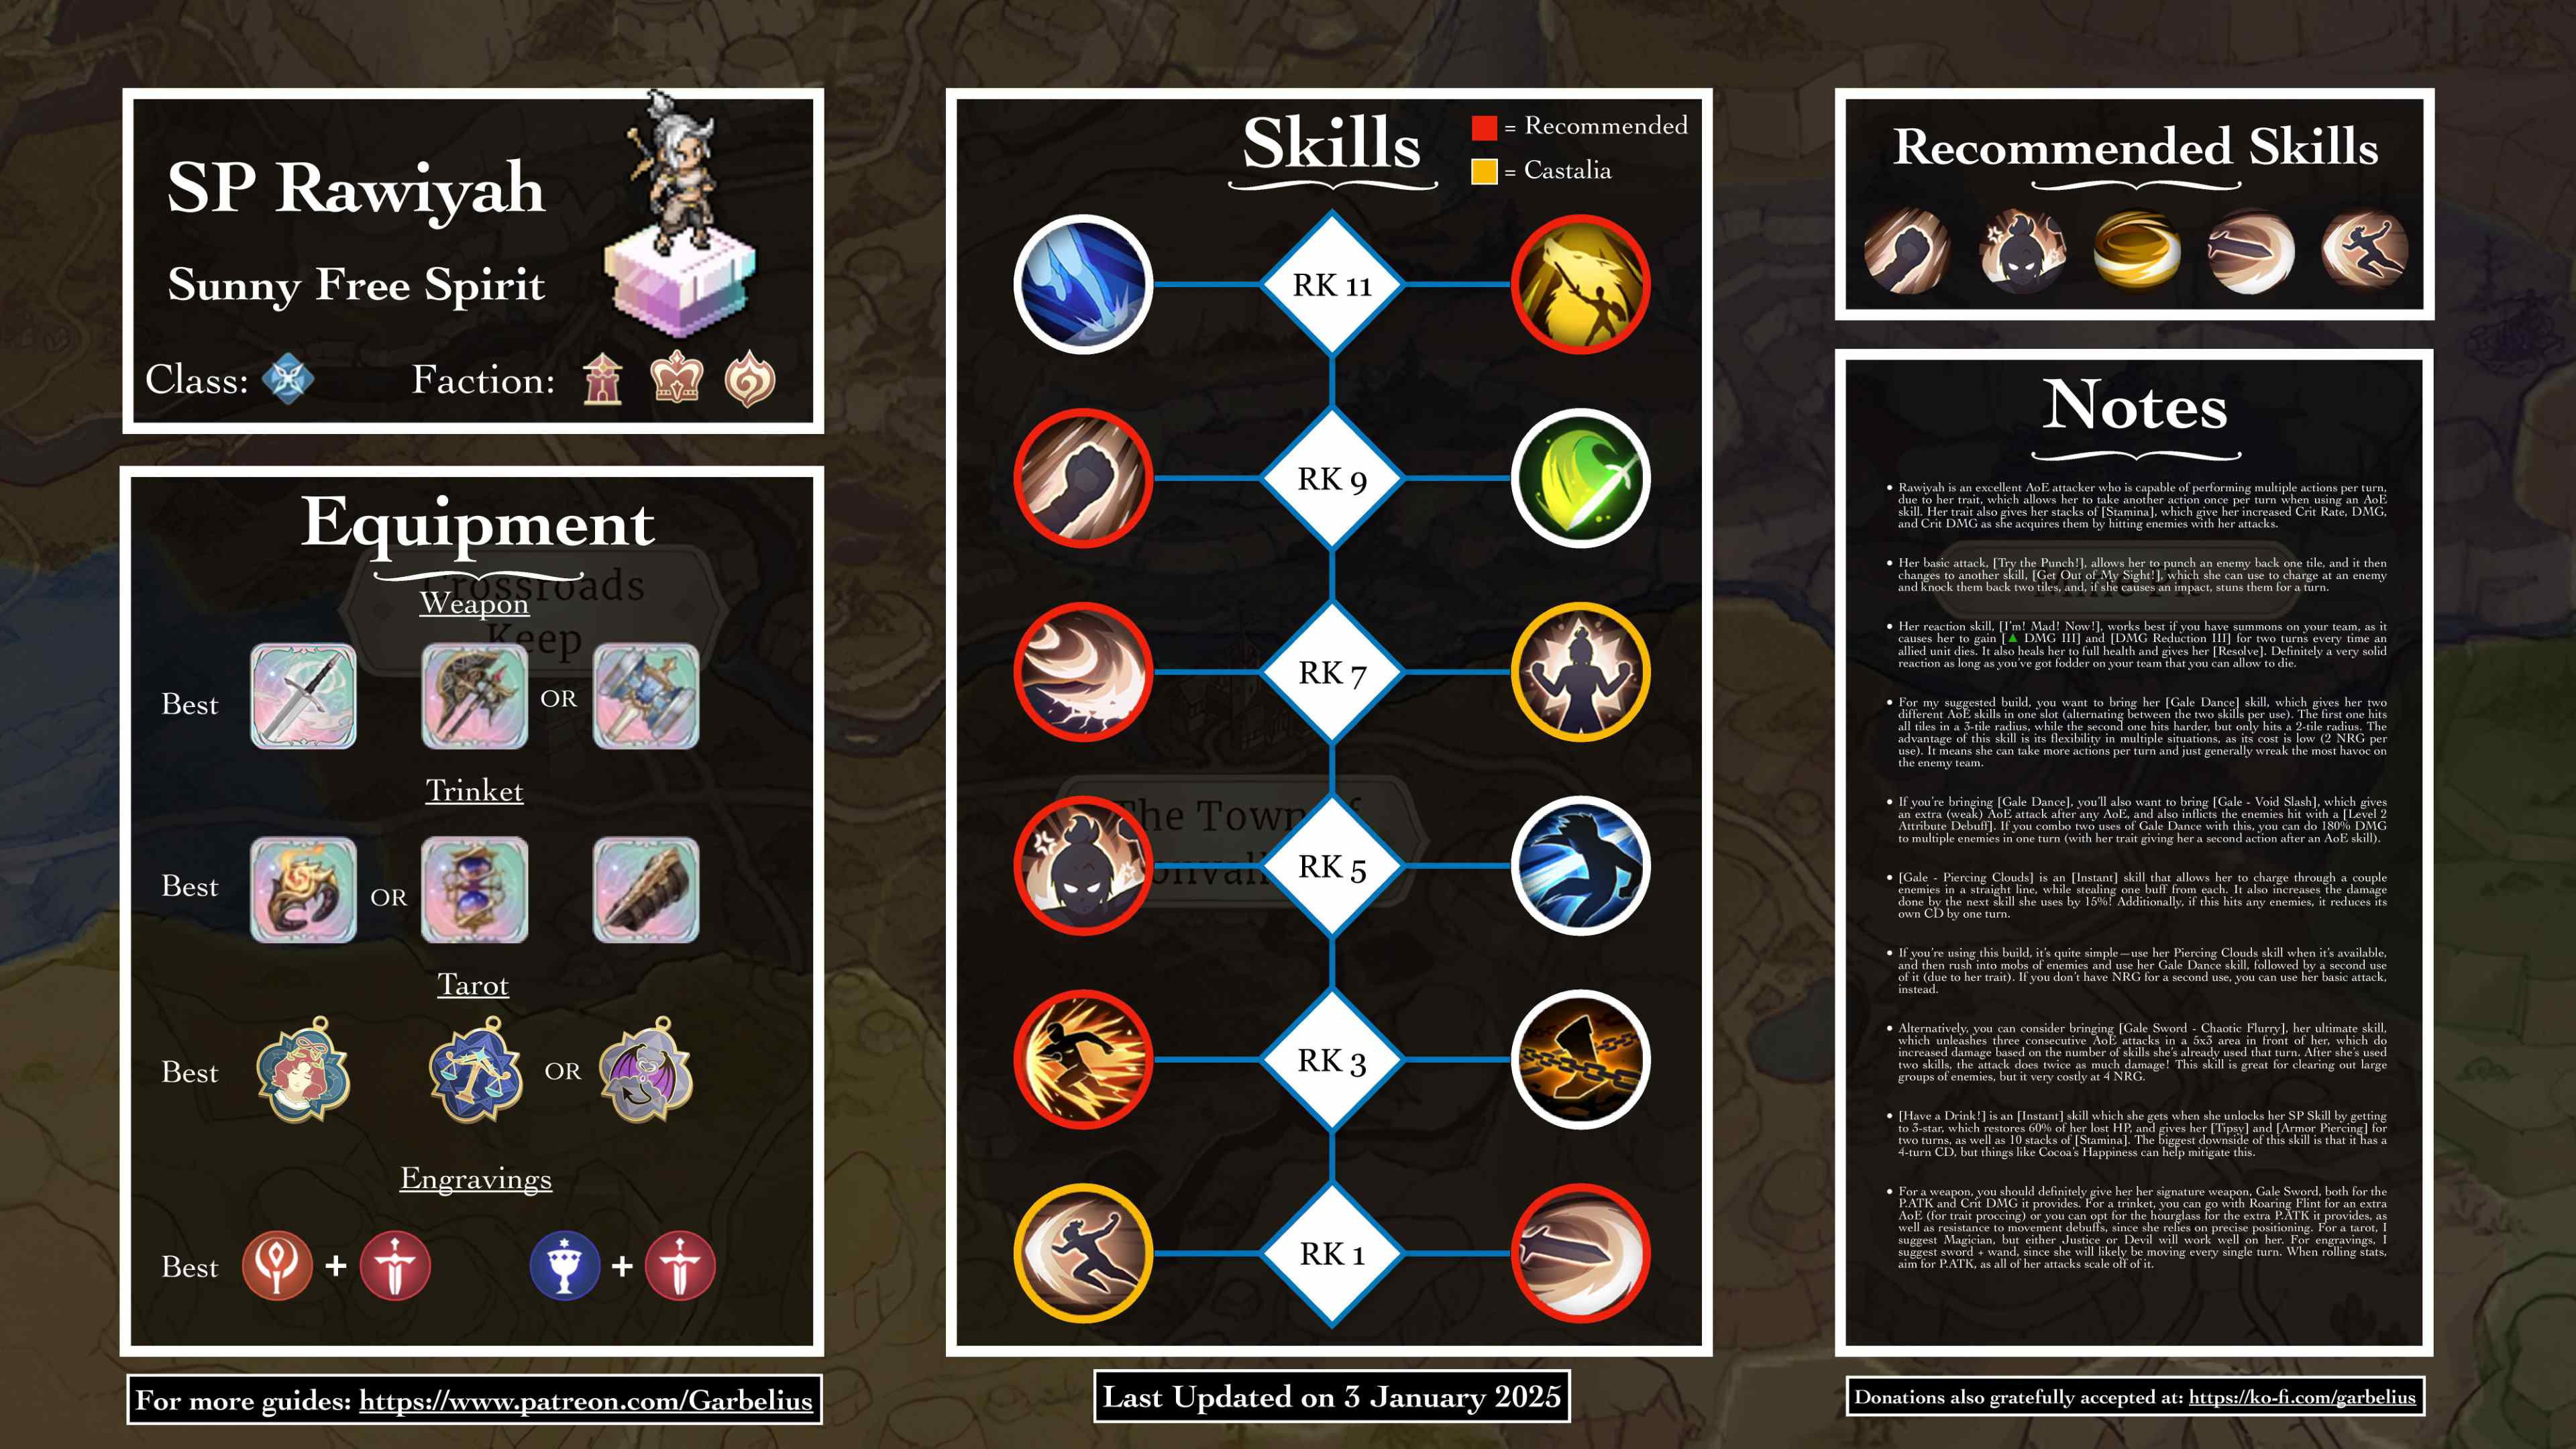
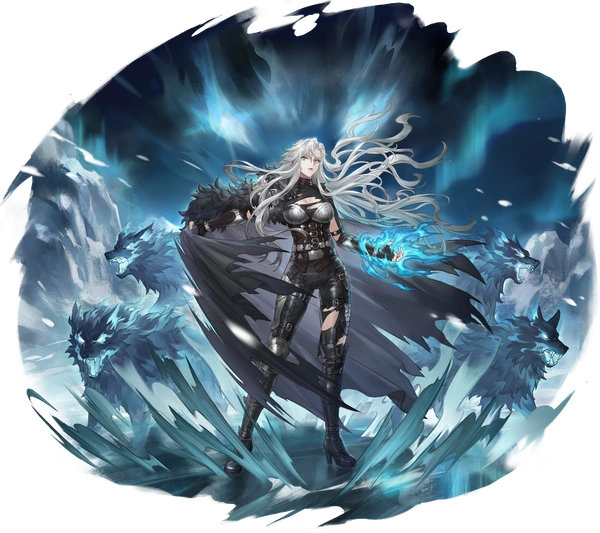
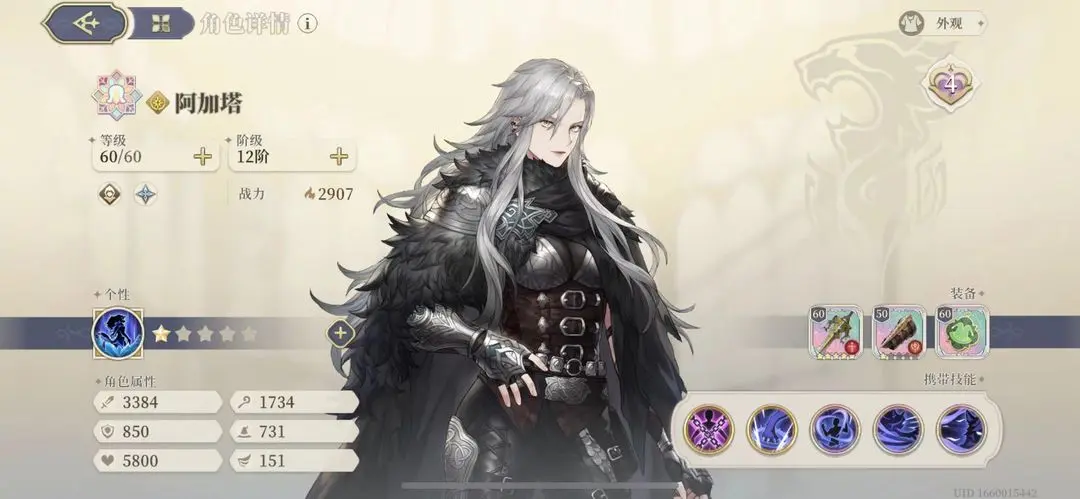
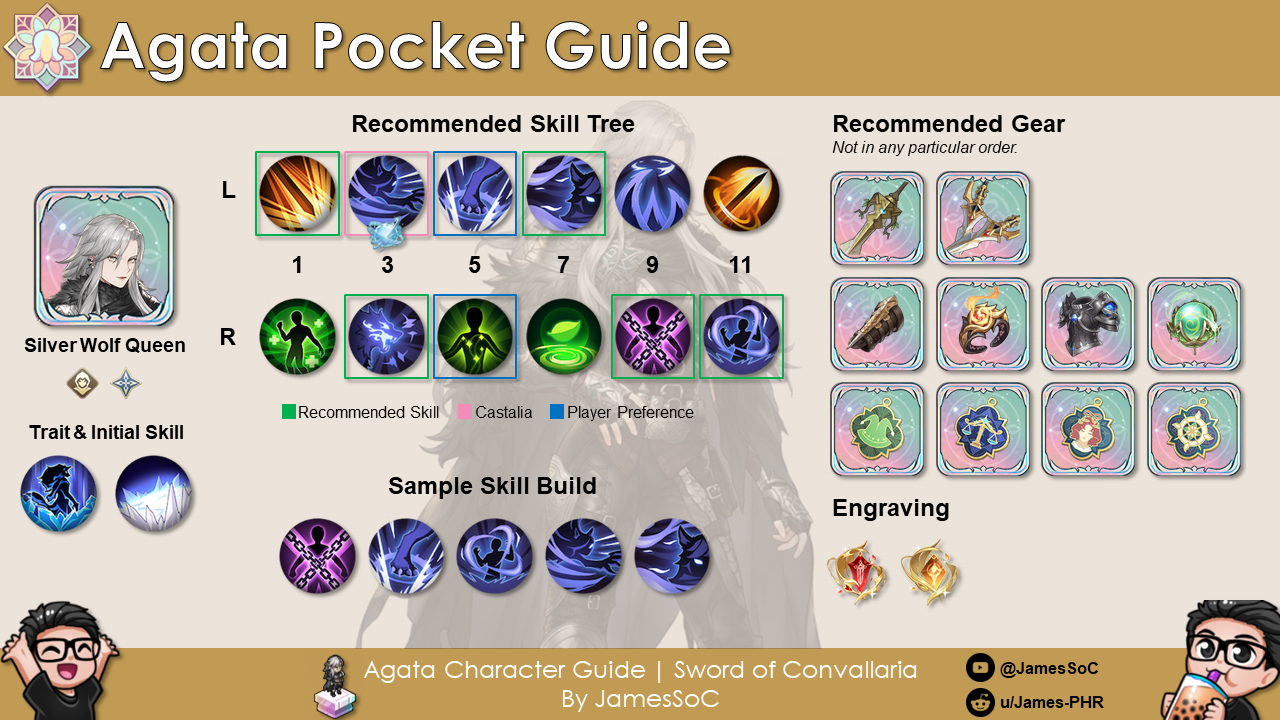
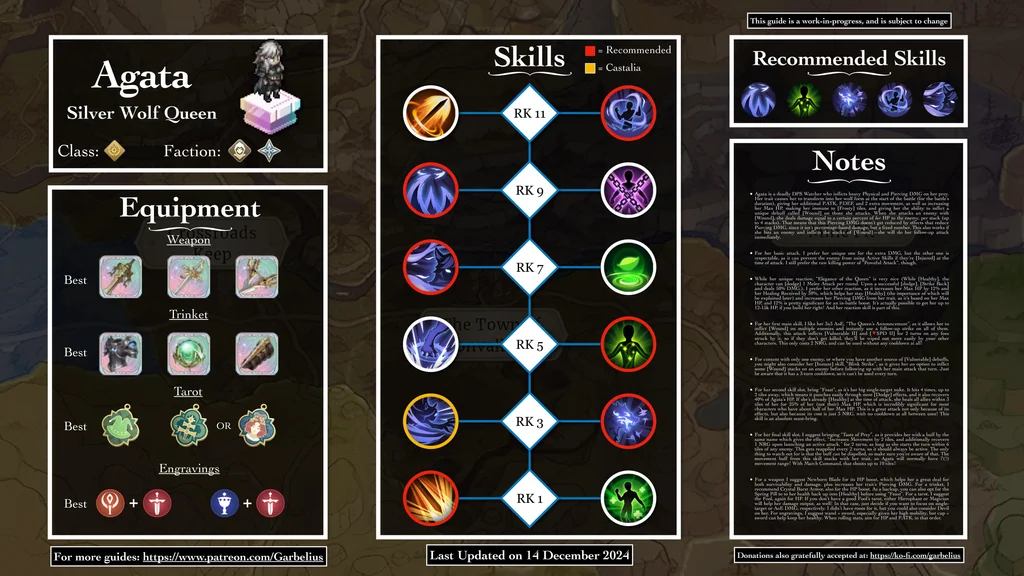
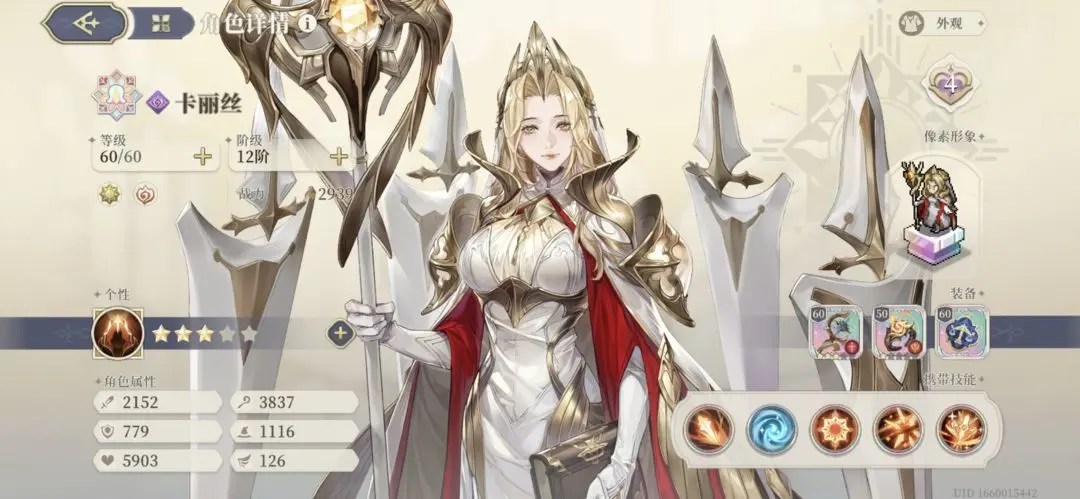
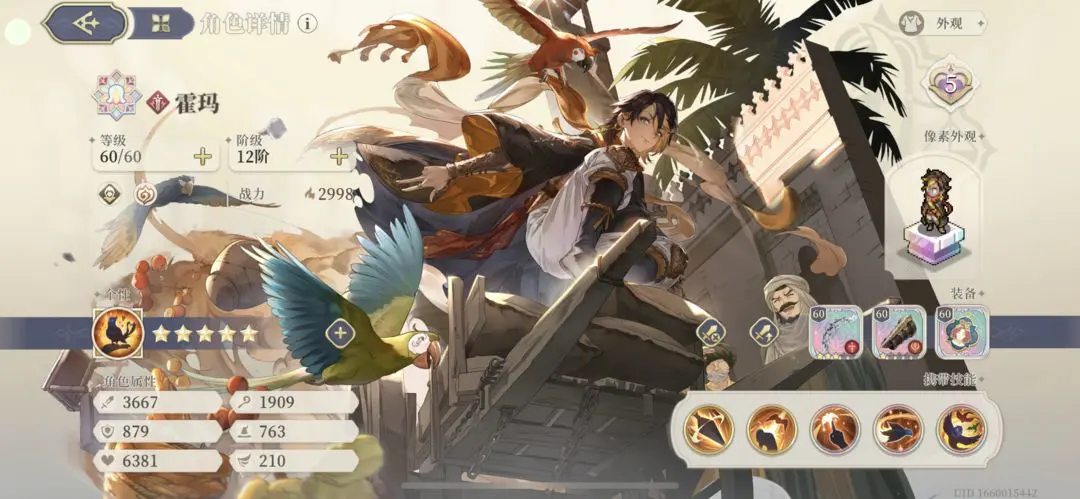

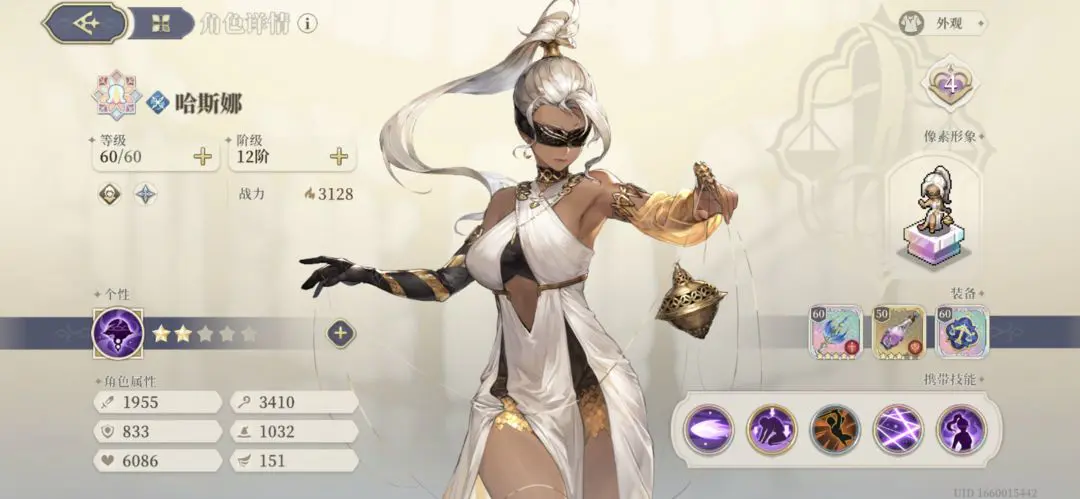
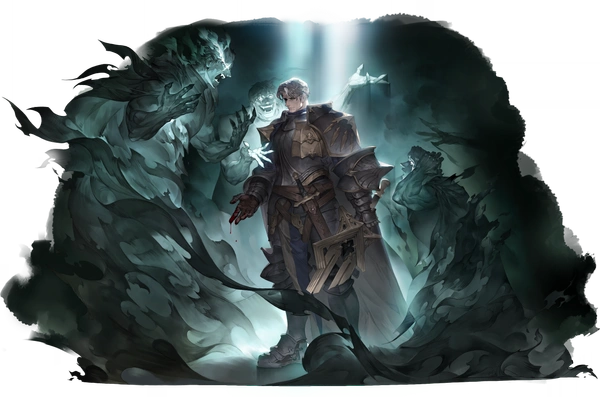
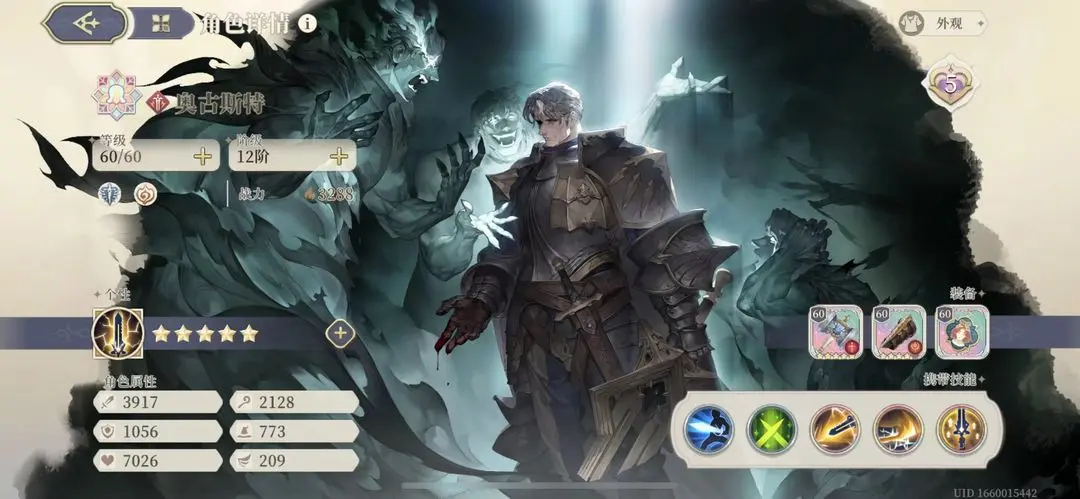
No Comments